Steps in this chapter (20)
Physically verifying a sample of the client's fixed assets (procedure F-05): the register from a file or from the client's BookTrove, key assets and a sample, the checks on phones in both directions, the checklists and the AV working paper.
Asset verification is the inspection of property, plant and equipment on site: checking that assets in the client's register exist and are in use (register to floor), and that assets seen on site are in the register (floor to register). It evidences procedure F-05 "Physically inspect a sample of assets chosen from the register", and points to the related procedures: assets not found to unrecorded disposals (F-03), assets not in the register to unrecorded additions (F-02), and idle, damaged or obsolete assets to impairment (F-07).
It works like the stock count in chapter 24. On a computer, the manager takes the client's fixed asset register at the period end, from a CSV or Excel file or straight from the client's BookTrove company, and selects the key assets and a sample. The team then checks the assets on their phones in field mode, offline when needed, with a photo where the firm requires one. Back at the office, the manager reviews the results and creates the working paper.
In the illustration Okafor Bello & Co verifies the fixed assets of Ikeja Polymers Manufacturing Limited at its Ikeja factory on 31 December 2026, after the inventory count. Ikeja Polymers keeps its books in BookTrove, and the engagement is linked to its BookTrove company. Tunde Bakare (manager) sets up the verification on 15 December. Chioma Eze (senior) and Ibrahim Musa (associate) check the assets on their phones. Tunde creates the working paper on 5 January 2027.
Use cases
- Use case — Verify the client's fixed assets at the year end. Set up the verification, take the register and select the assets on a computer (steps 25.1–25.6), check them on the phones (steps 25.7–25.15), then review and create the working paper (steps 25.16–25.20).
- Use case — The client keeps its books in BookTrove. Link the engagement to the client's BookTrove company with the read-only token the client creates, then Pull from BookTrove: the register at the period end, with the cost, accumulated depreciation and carrying amount at that date (steps 25.2–25.4).
- Use case — The client's register is a spreadsheet. Choose Import the register and match the columns, as for a count listing (step 25.2).
- Use case — An asset cannot be found. Record it as Not found with what the client says (step 25.10). The working paper lists it for procedure F-03.
- Use case — An asset on site is not in the register, or belongs to someone else. Record it under Seen on site (steps 25.12 and 25.13). The working paper lists it for procedure F-02, or as not the client's.
25.1 Set up an asset verification
Why
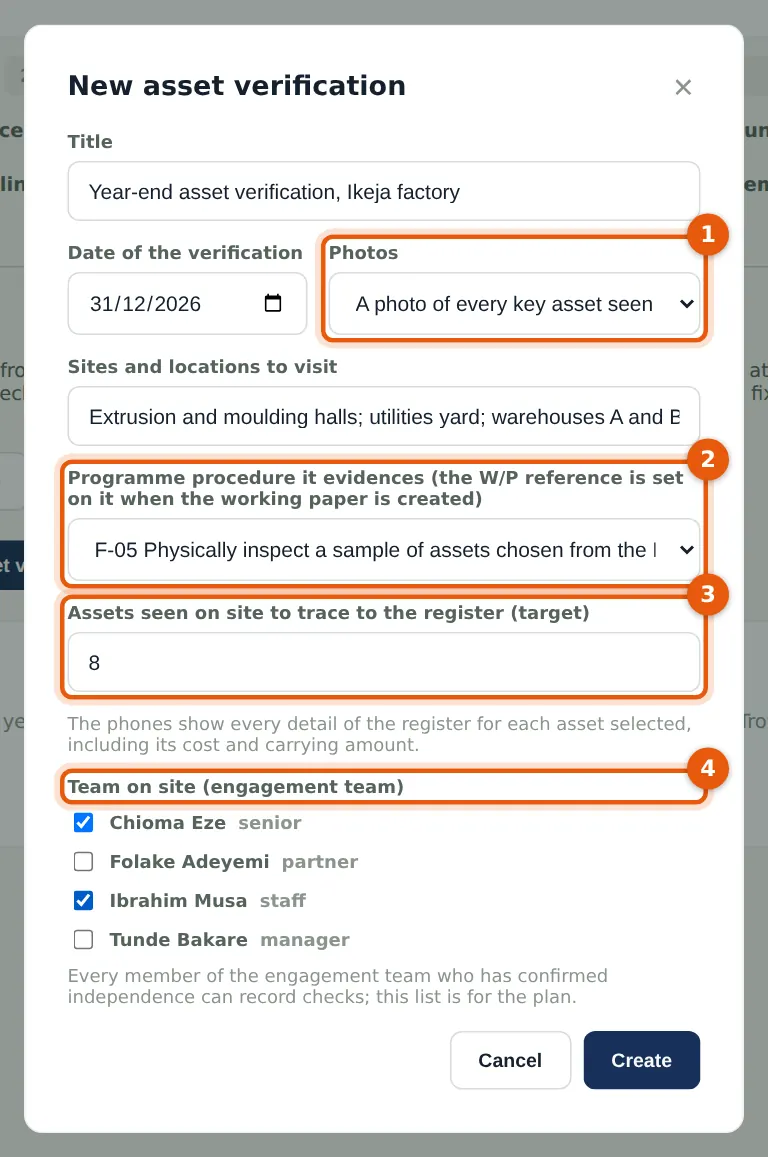
An asset verification belongs to the engagement and gets a reference, AV-01 for the first. Photos (1) can be optional, required for every key asset seen (the default), or required for every asset seen. The programme procedure (2) is F-05; it gets the working paper's reference when the paper is created. The target (3) is the number of assets the team should pick on site and trace back to the register. The team (4) is the plan; every member of the engagement team who has confirmed independence can record checks. Tunde sets the date to 31 December 2026, after the inventory count, and lists the halls, yard, warehouses and office to visit.
Who
Manager or senior, on a computer.
What to do
- Open the engagement's Field work tab, then Asset verification, and choose New asset verification.
- Enter the title, the date, the photo policy (1), the sites and locations to visit, the procedure (2) and the target (3).
- Tick the team (4) and choose Create.
25.2 Take the client's register
Why
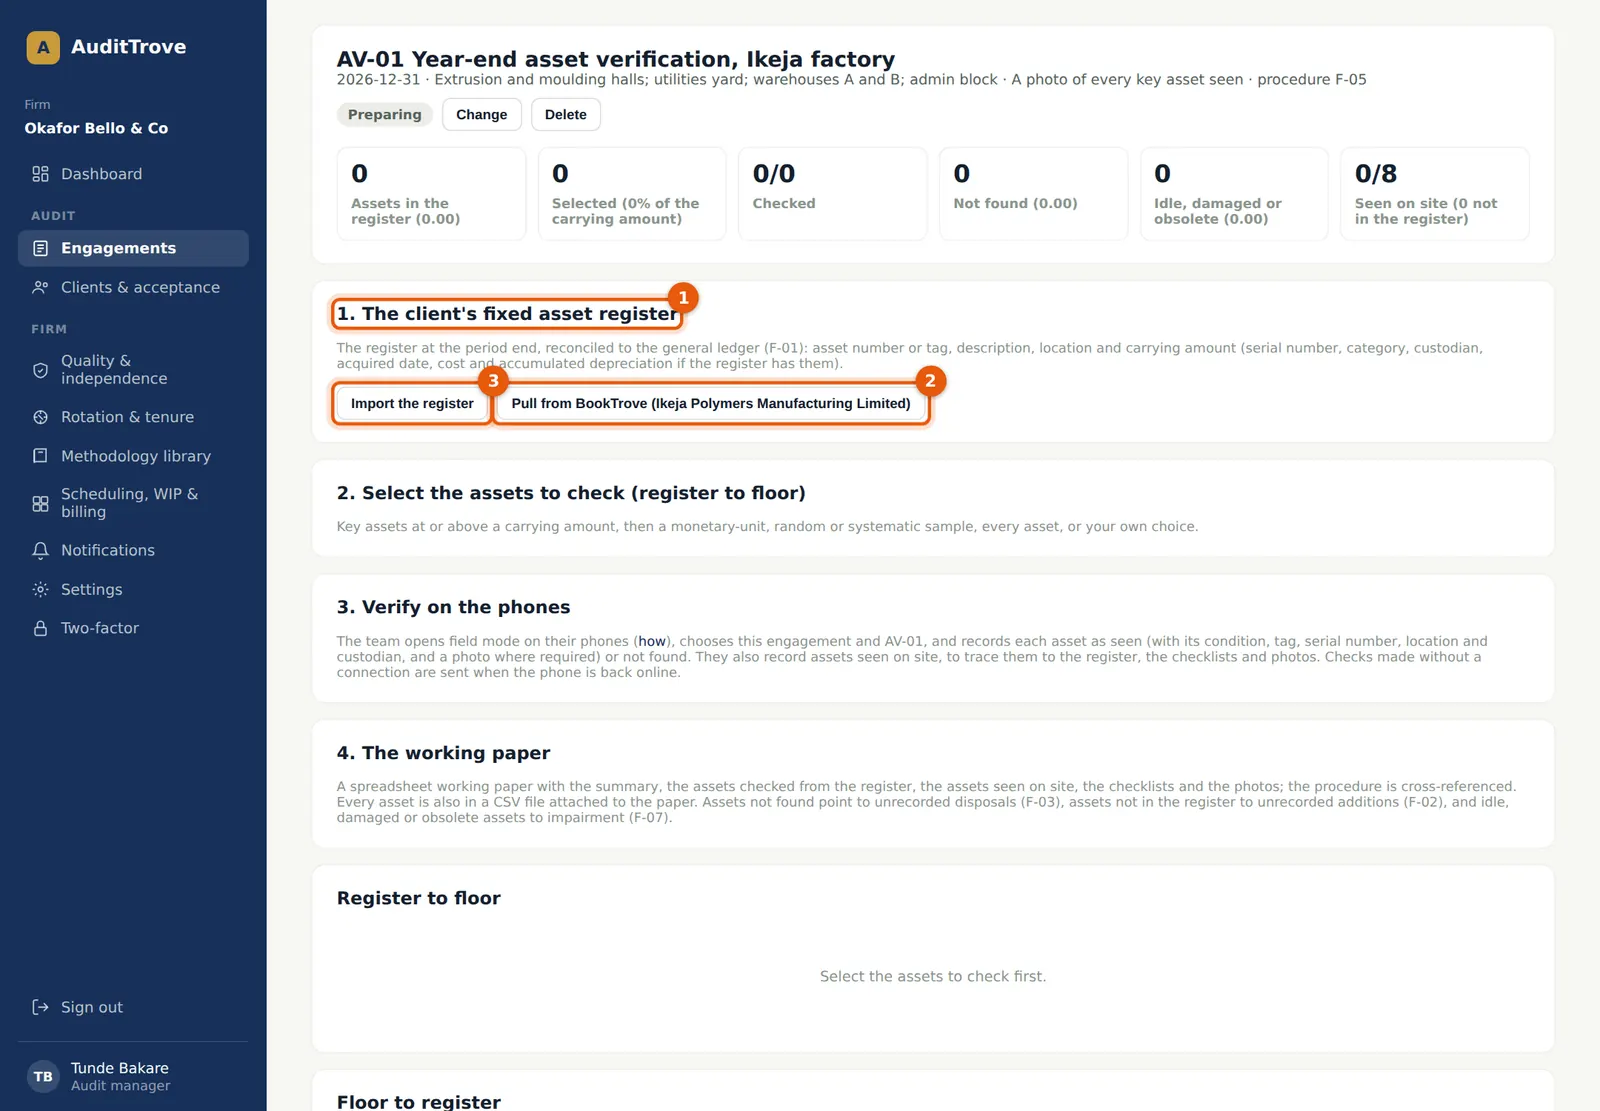
The verification shows its steps in order, starting with the client's fixed asset register (1). It should be the register at the period end, reconciled to the general ledger (procedure F-01). Ikeja Polymers keeps its books in BookTrove and the engagement is linked to its BookTrove company, so Tunde can pull the register (2). A client with a spreadsheet register is imported from a CSV or Excel file (3): asset number, tag, serial number, description, category, location, custodian, acquired date, cost, accumulated depreciation and carrying amount, matched by their headings.
Who
Manager or senior.
What to do
- Choose Pull from BookTrove (2) if the engagement is linked to the client's BookTrove company.
- Otherwise choose Import the register (3), check the columns against the first rows, and choose Import.
25.3 Pull the register from BookTrove
Why
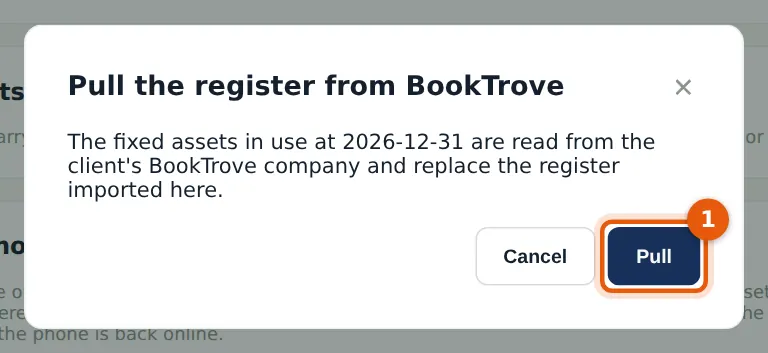
AuditTrove reads the client's fixed assets in use at the period end, 31 December 2026, from its BookTrove company through the read-only token. Assets bought after that date, or disposed of by it, are left out. The cost, accumulated depreciation and carrying amount are the figures at that date. The tag, location, custodian and the client's own last physical check are as they are in BookTrove now. The pull replaces any register imported before.
Who
Manager or senior.
What to do
- Choose Pull (1).
25.4 The register is in
Why
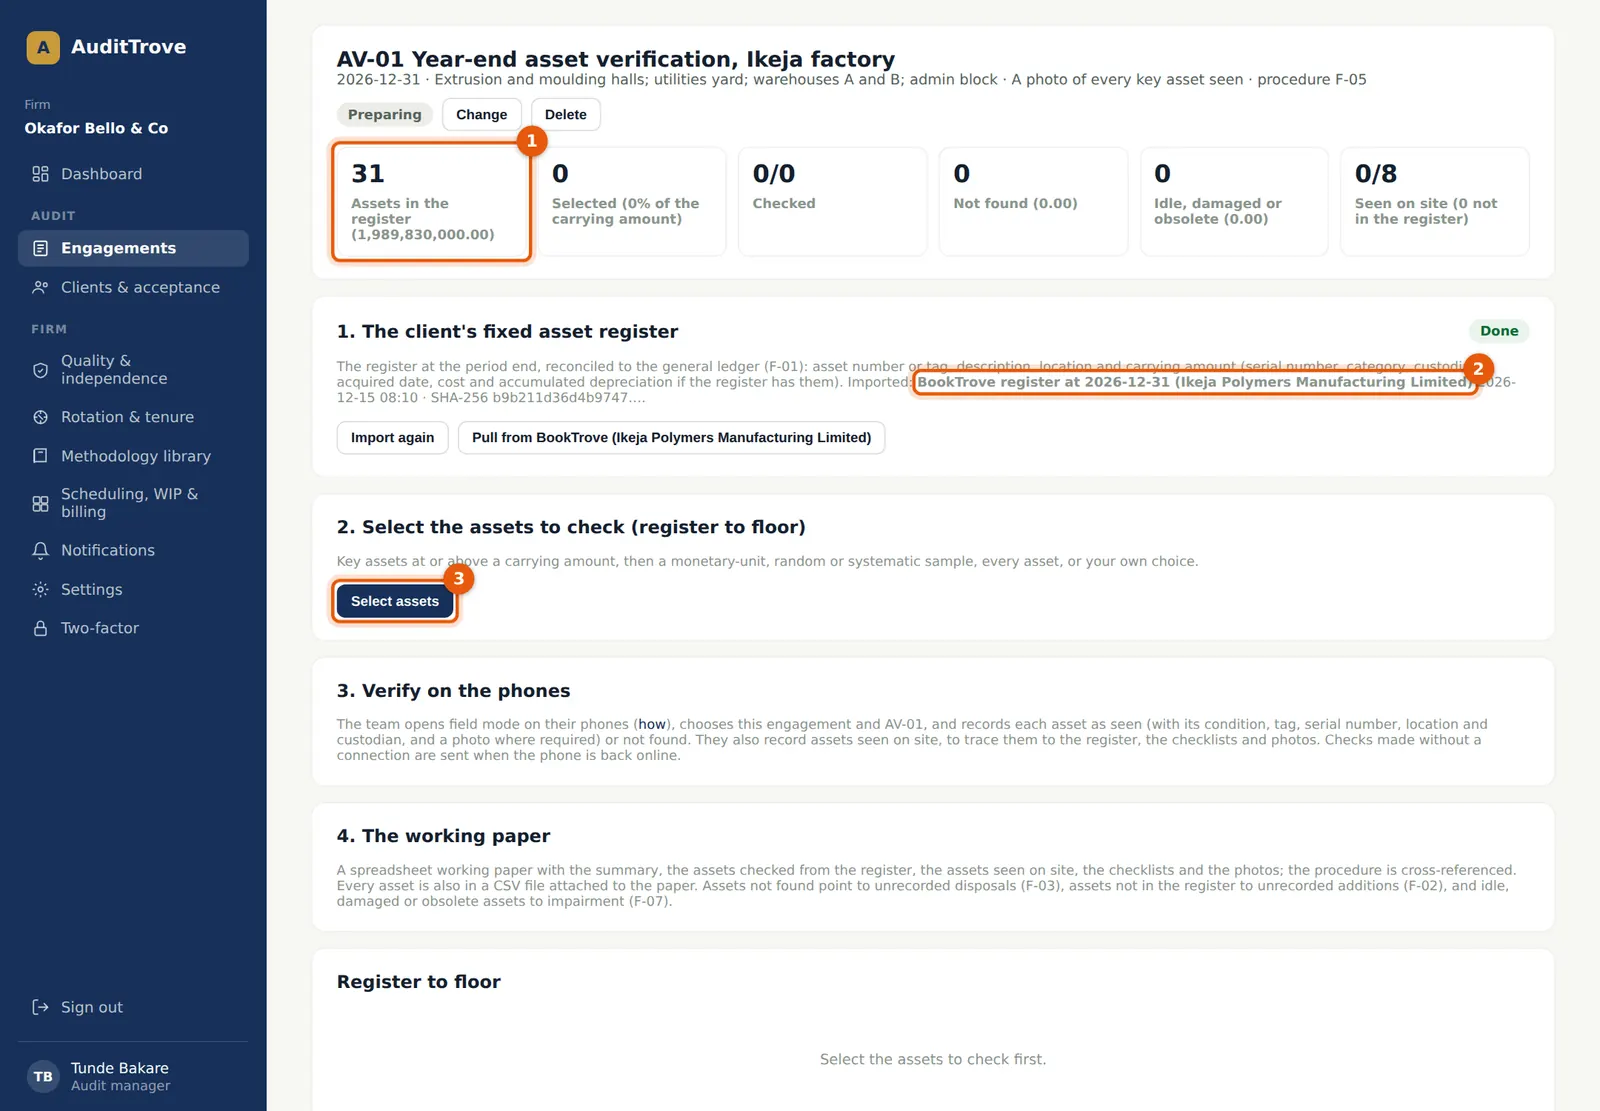
The register holds 31 assets with a carrying amount of ₦1,989,830,000.00 (1). A printing machine bought on 10 January 2027 is in BookTrove but is not in the register at 31 December, so it is left out. Step 1 records where the register came from, "BookTrove register at 2026-12-31 (Ikeja Polymers Manufacturing Limited)", when, and the SHA-256 fingerprint of what was read (2). Agree the total to the general ledger (F-01) before selecting.
Who
Manager.
What to do
- Check the number of assets and the carrying amount against the ledger.
- Choose Select assets (3).
25.5 Select the assets to check
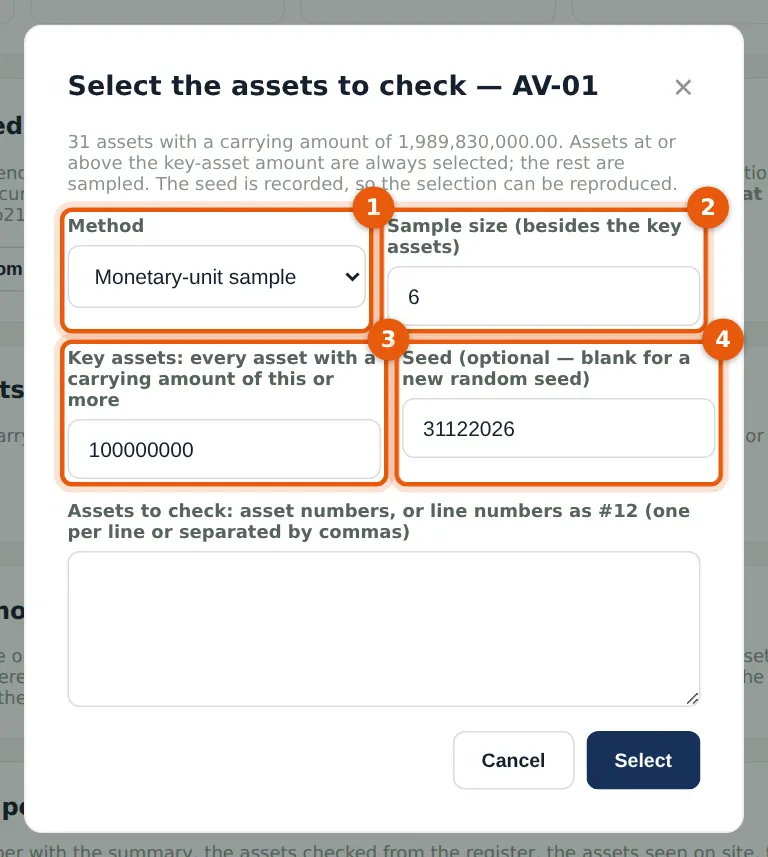
Why
Every asset with a carrying amount at or above the key-asset amount (3) is always selected; Tunde uses ₦100,000,000. The rest is a sample (1): monetary-unit (the default, so assets with higher carrying amounts are more likely to be chosen), random or systematic, or every asset, or a list of asset numbers the team chooses. Here the sample is 6 (2). The seed (4) is recorded, so the same seed gives the same selection.
Who
Manager.
What to do
- Choose the method (1), the sample size (2), the key-asset amount (3) and, if you want, the seed (4).
- Choose Select.
25.6 Ready to verify
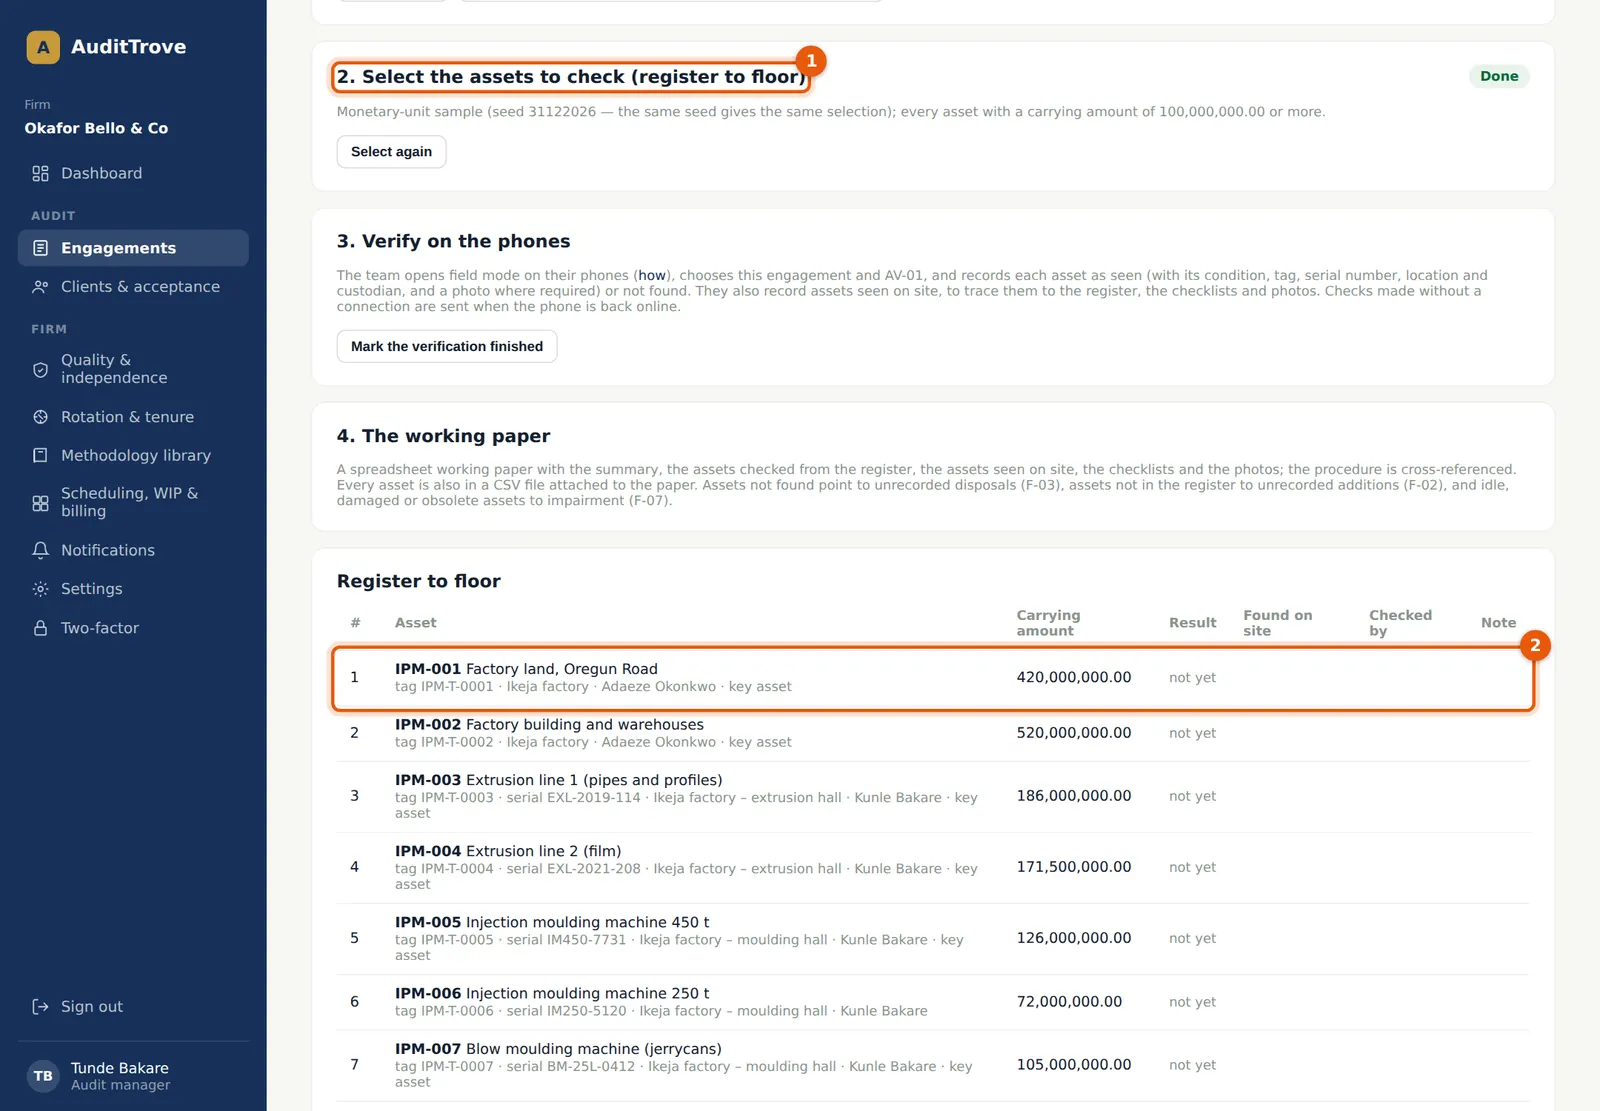
Why
Step 2 (1) records the method, the seed and the key-asset amount. Twelve assets are selected: 6 key assets (2) and 6 from the sample, 86.58% of the carrying amount. The register and the selection can still be changed, with Import again or Select again, until a member of the team downloads the verification to a phone.
Who
Manager.
What to do
- Check the selection and tell the team the verification is ready.
25.7 Open the verification on the phone
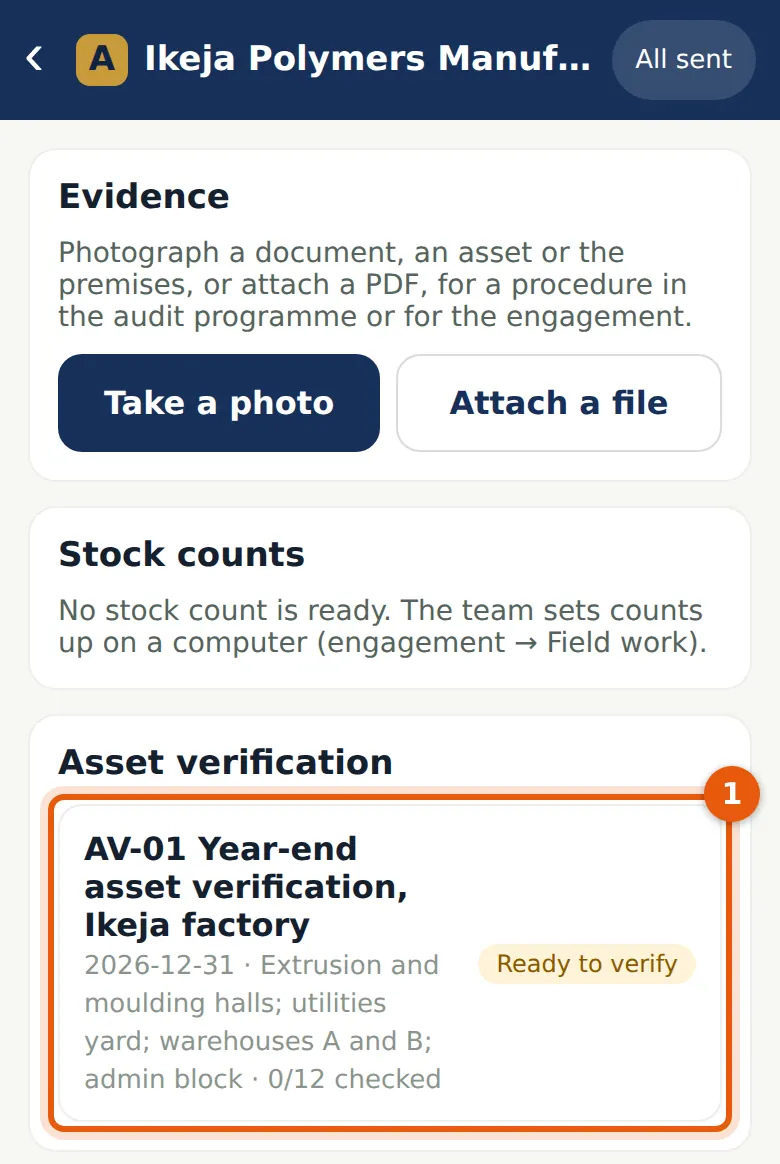
Why
After the inventory count, Chioma opens the engagement in field mode. Asset verification (1) lists AV-01 with its date, the places to visit and what is left to check. Opening it downloads the selected assets to the phone, so the checks can be made without a signal.
Who
Each member of the team, on their phone in field mode (chapter 24).
What to do
- Sign in to field mode and unlock it with your PIN.
- Choose the engagement, then the asset verification (1).
25.8 The assets to check
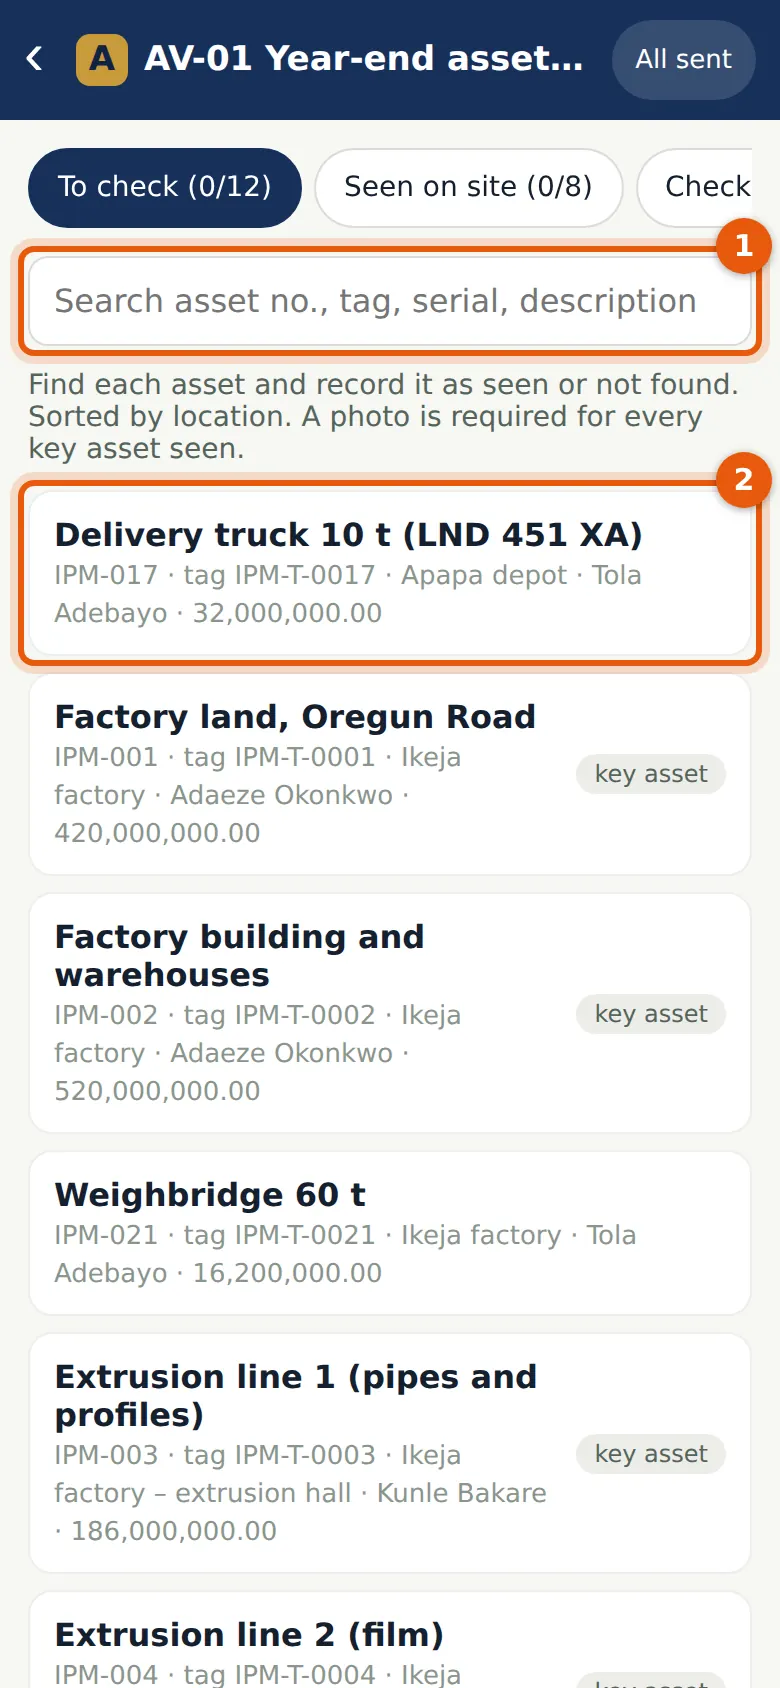
Why
The list shows the selected assets sorted by location, with the asset number, tag, location, custodian and carrying amount. Key assets are marked. Search (1) by asset number, tag, serial number or description, or scan a tag on phones that can read barcodes. The first asset (2) is the 10-tonne delivery truck, recorded at the Apapa depot.
Who
The team.
What to do
- Tap an asset to check it, or search for it (1).
25.9 Check an asset: seen
Why
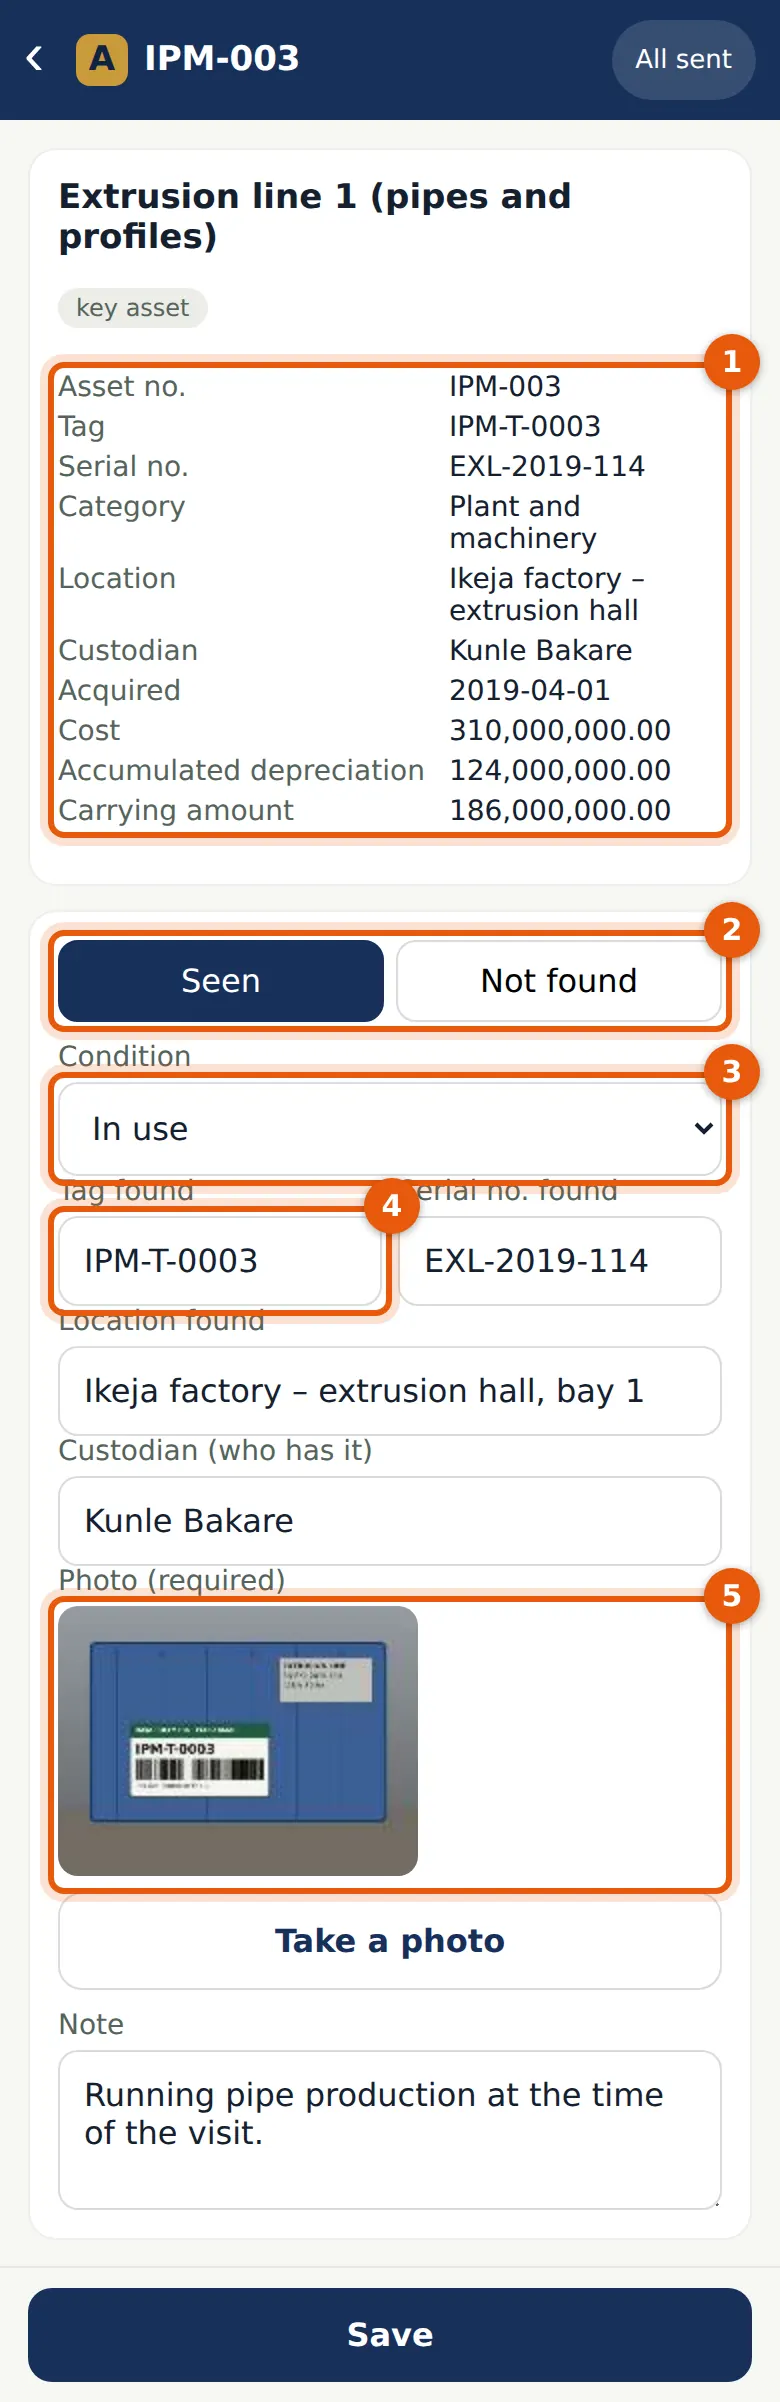
The phone shows everything the register holds on the asset (1), including its cost and carrying amount. Chioma finds extrusion line 1 running in bay 1 of the extrusion hall. She marks it Seen (2) and In use (3); the conditions are in use, idle, damaged, obsolete or beyond economic use, and belongs to a third party. She checks the tag (4), serial number, location and custodian against what she sees, and takes the photo the firm requires for a key asset (5).
Who
The team.
What to do
- Tap Seen (2) and choose the condition (3).
- Correct the tag (4), serial number, location and custodian to what you find.
- Take the photo (5) and choose Save.
25.10 An asset not found
Why
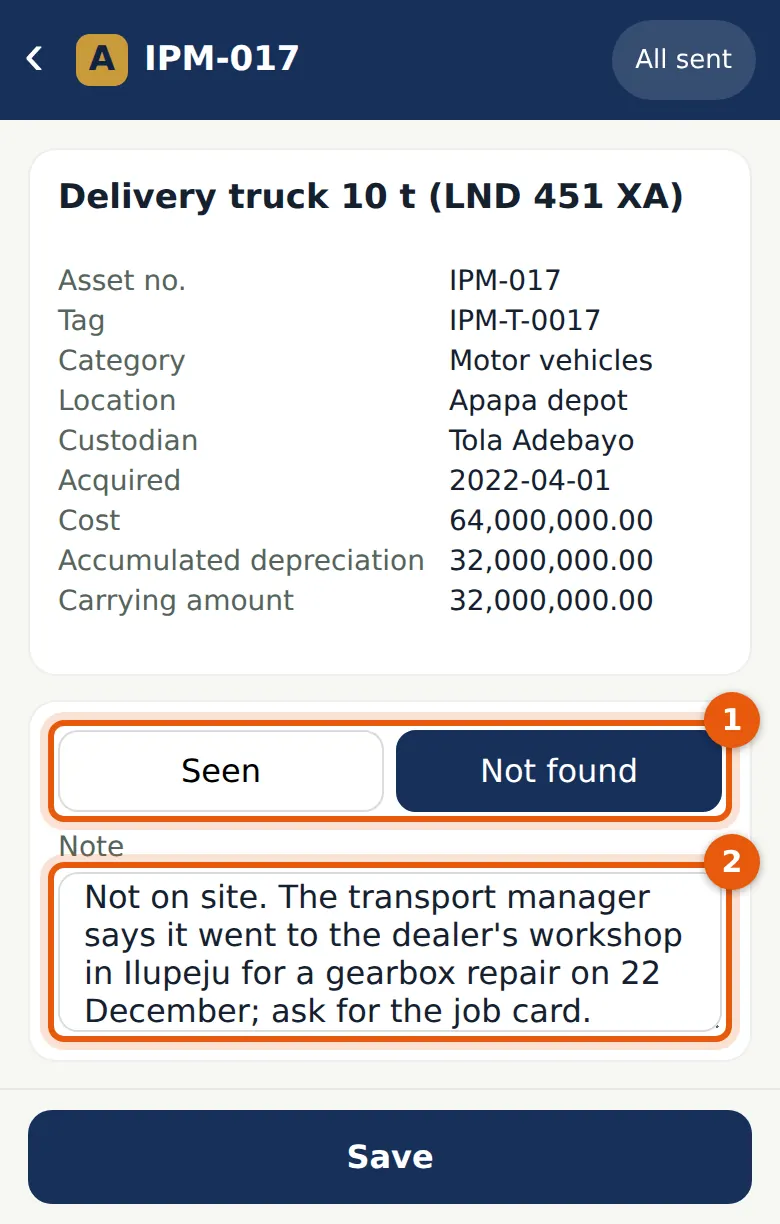
The 10-tonne truck is not on site. The transport manager says it went to the dealer's workshop for a gearbox repair on 22 December. Chioma records it as Not found (1) and writes what she was told (2), so the manager can follow it up: the job card would show the truck still exists; if it cannot be found, it may have been disposed of without being recorded (F-03).
Who
The team.
What to do
- Tap Not found (1), note what the client says (2) and choose Save.
25.11 An asset that is damaged
Why
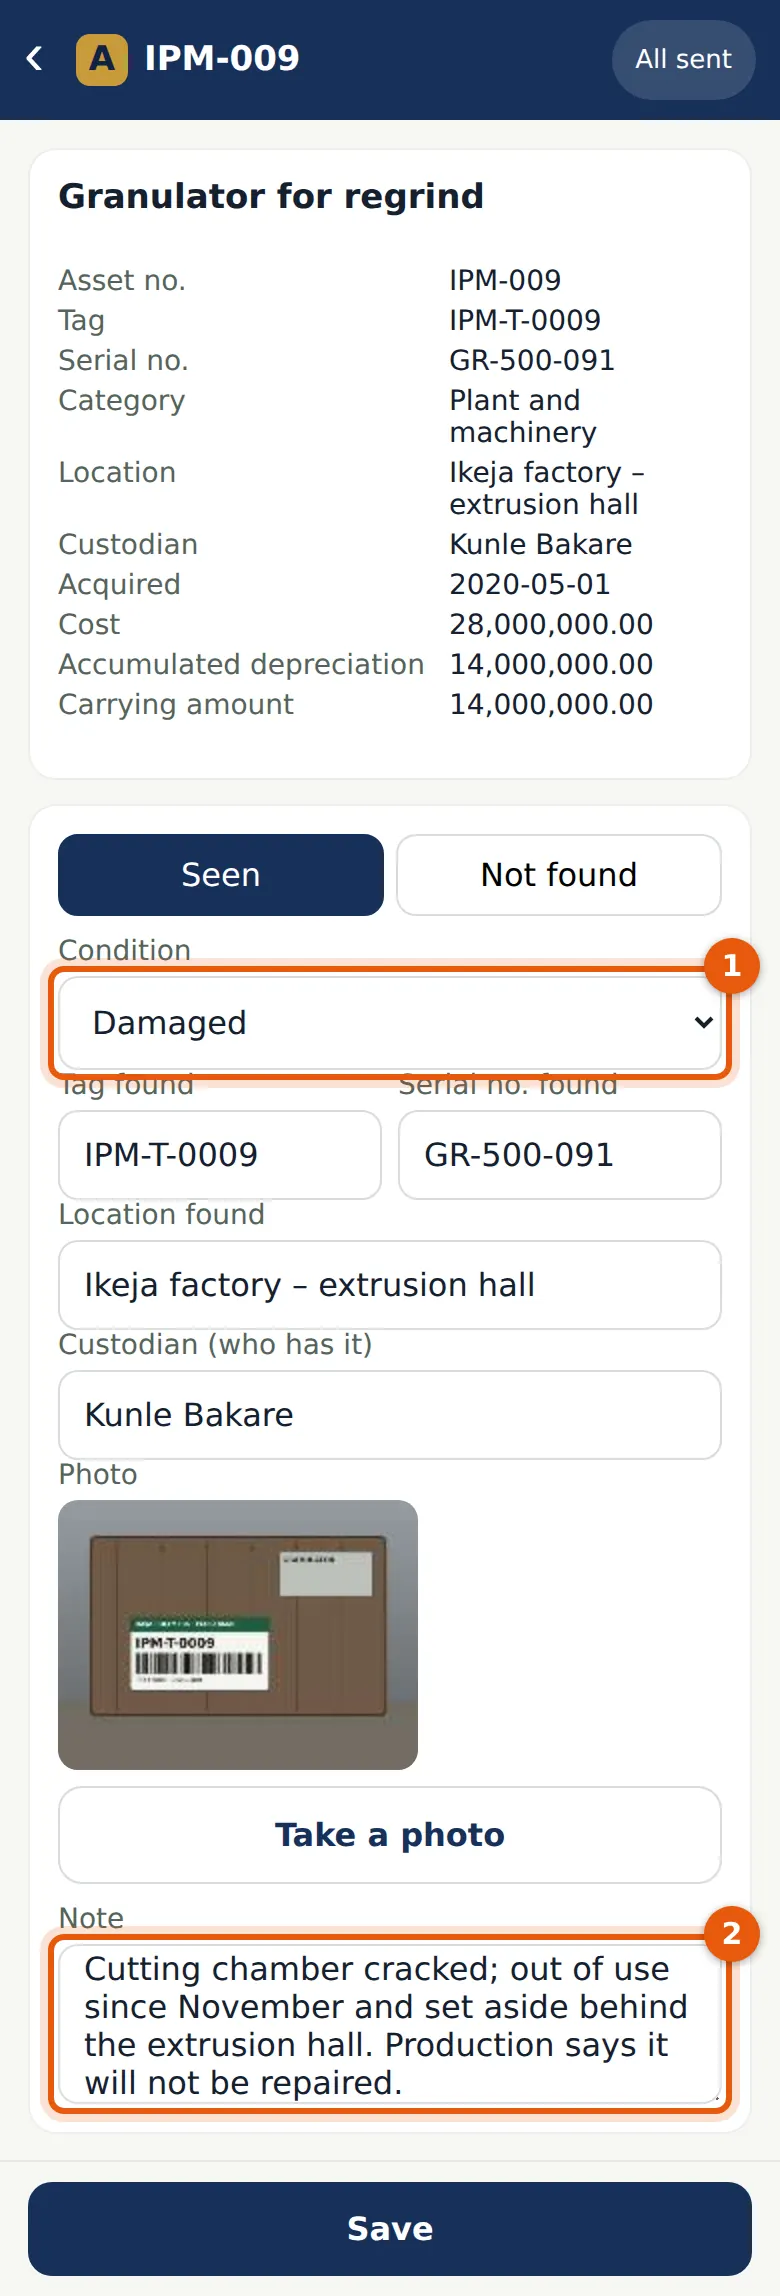
The granulator is on site but its cutting chamber is cracked, it has been out of use since November and production says it will not be repaired. Chioma records the condition as Damaged (1) with a note (2) and a photo. Idle, damaged and obsolete assets are impairment indicators for procedure F-07.
Who
The team.
What to do
- Choose the condition (1), add a note (2) and a photo, and choose Save.
25.12 An asset seen on site
Why
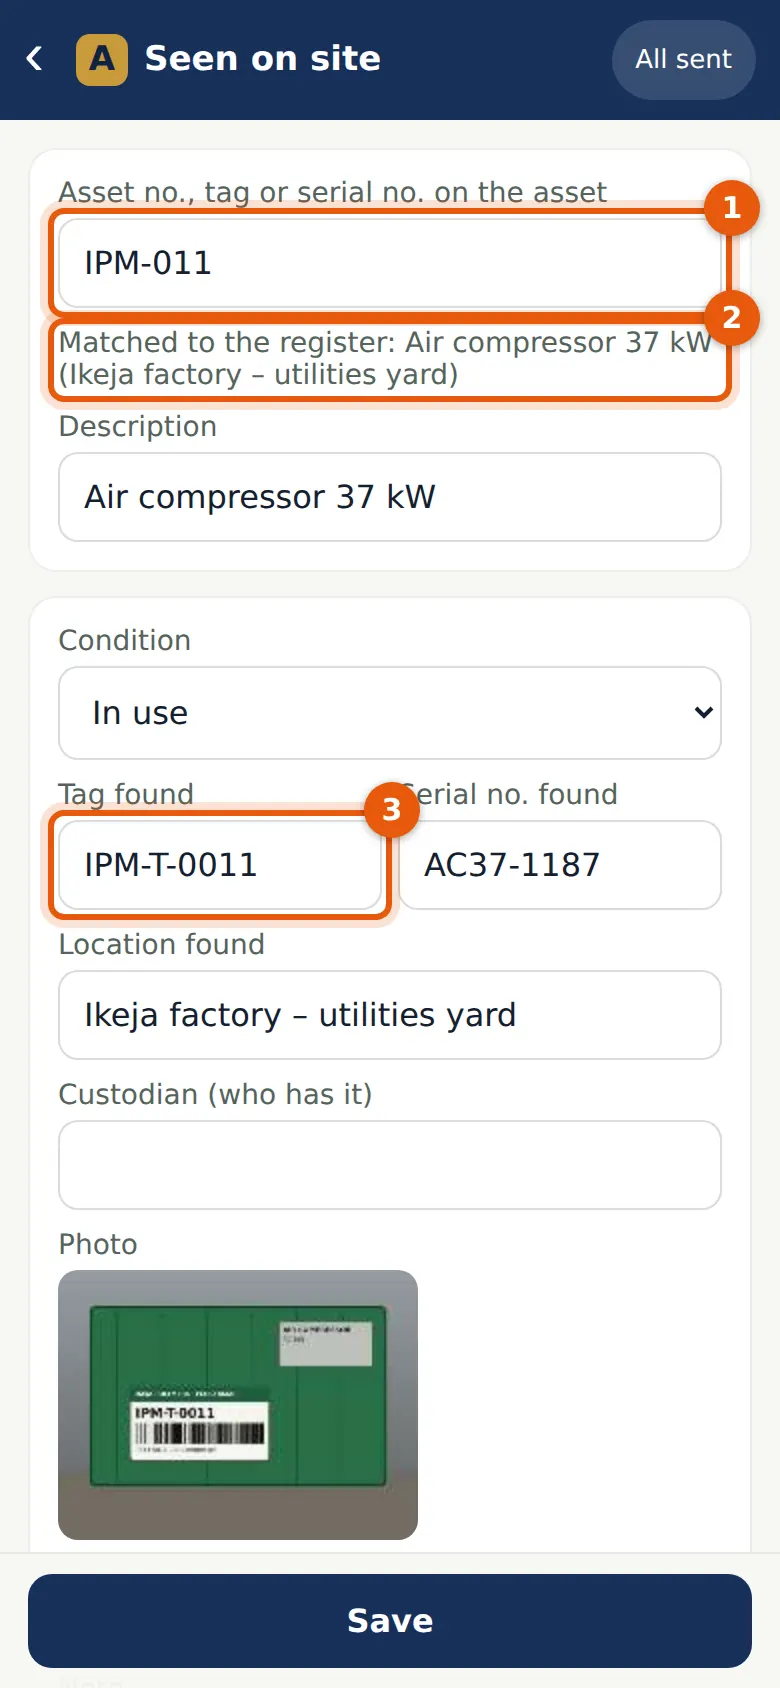
Checking from the floor to the register tests completeness. In the utilities yard Chioma picks the 37 kW air compressor, types the asset number on its tag (1), and the phone finds it in the register (2) with its recorded location. She records the tag found (3), the condition and a photo.
Who
The team.
What to do
- Open Seen on site and choose Record an asset seen on site.
- Type the asset number, tag or serial number (1) and pick the register entry (2), or describe the asset if it is not in the register.
- Record the tag (3), condition and photo, and choose Save.
25.13 Assets seen on site
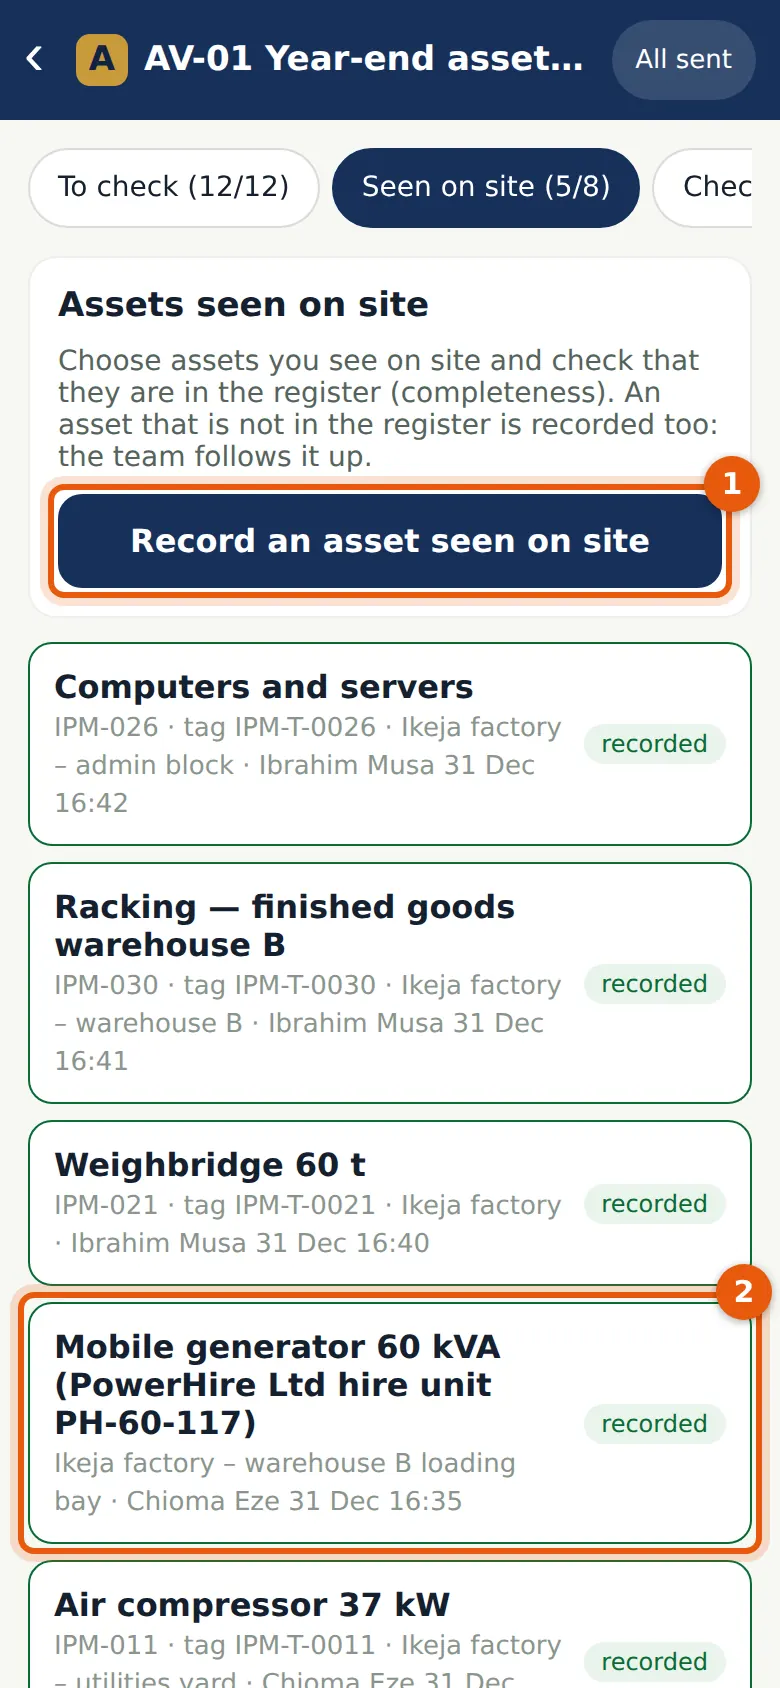
Why
Five assets were seen on site against a target of eight (1). At the warehouse B loading bay Chioma found a 60 kVA mobile generator with the hire company's sticker. It is not in the register, and the finance manager confirms it is hired. She recorded it with the condition "Belongs to a third party" (2) and a photo, so it is not treated as the client's.
Who
The team.
What to do
- Record every asset you pick on site until the target is reached (1).
25.14 The checklists
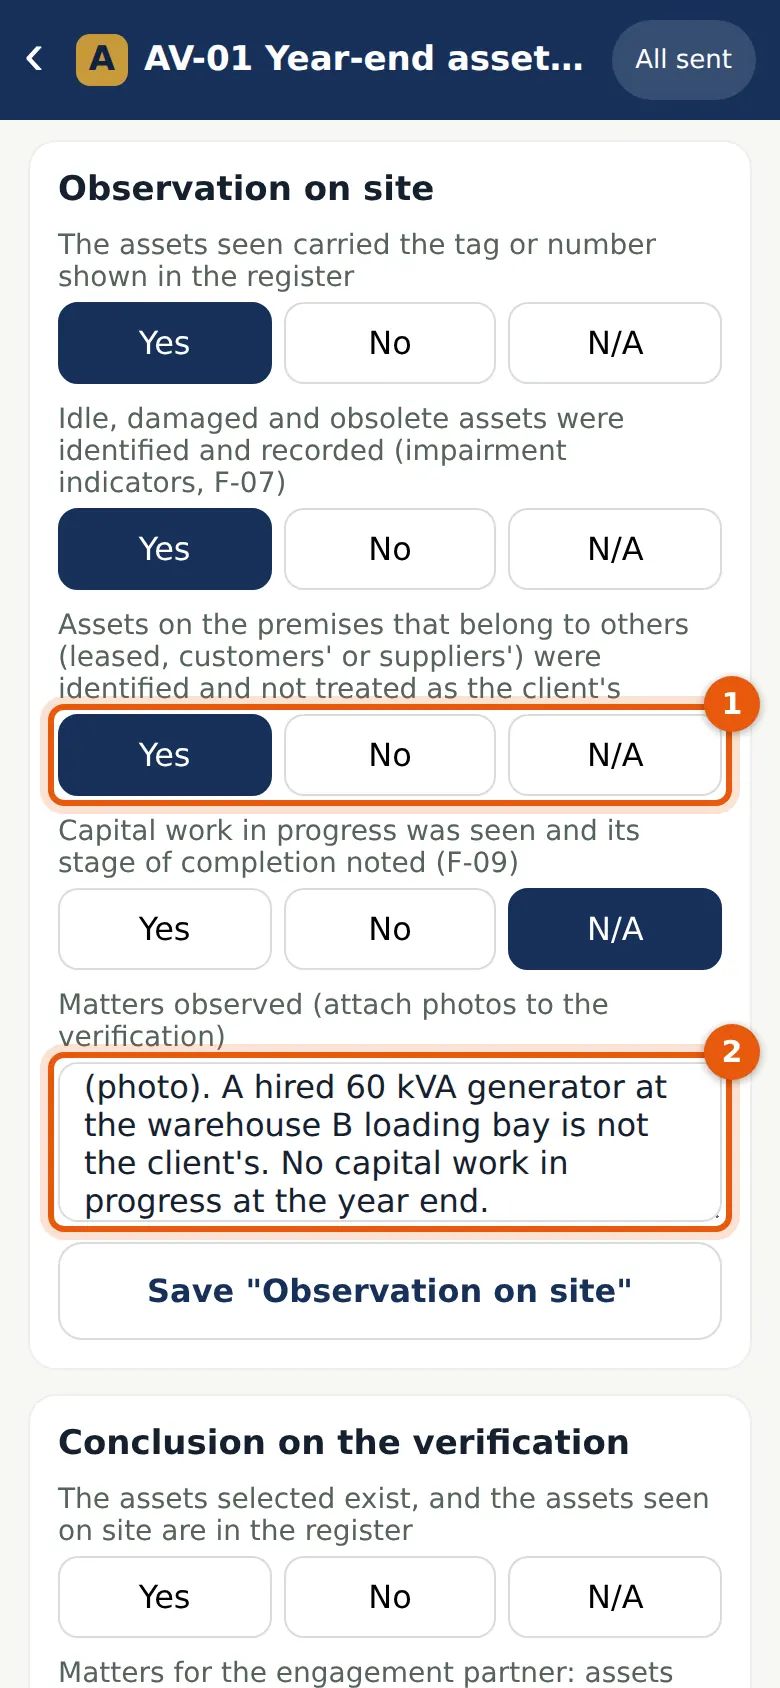
Why
Three checklists are recorded on the phone: before the verification (the register used is the one reconciled to the ledger, the client tags its assets, assets elsewhere were identified), observation on site, and the conclusion. Chioma answers that assets belonging to others were identified and not treated as the client's (1) and notes what she observed (2): the cracked granulator, the hired generator, and no capital work in progress at the year end.
Who
The senior on site.
What to do
- Open Checklists, answer each question and write the notes.
- Choose Save for each checklist.
25.15 Finish the verification
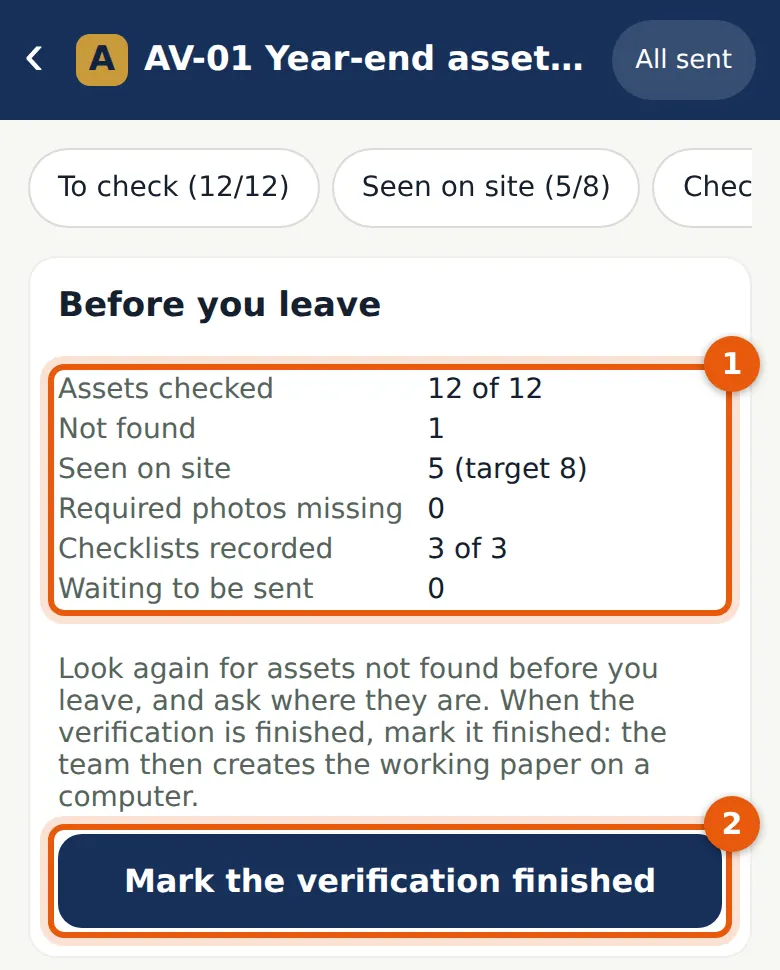
Why
The summary (1) shows 12 of 12 assets checked, 1 not found, 5 seen on site against a target of 8, no required photo missing, all 3 checklists recorded and nothing waiting to be sent. Look again for assets not found before you leave, and ask where they are.
Who
The team.
What to do
- Check the summary (1).
- Choose Mark the verification finished (2) and confirm.
25.16 The results on the computer
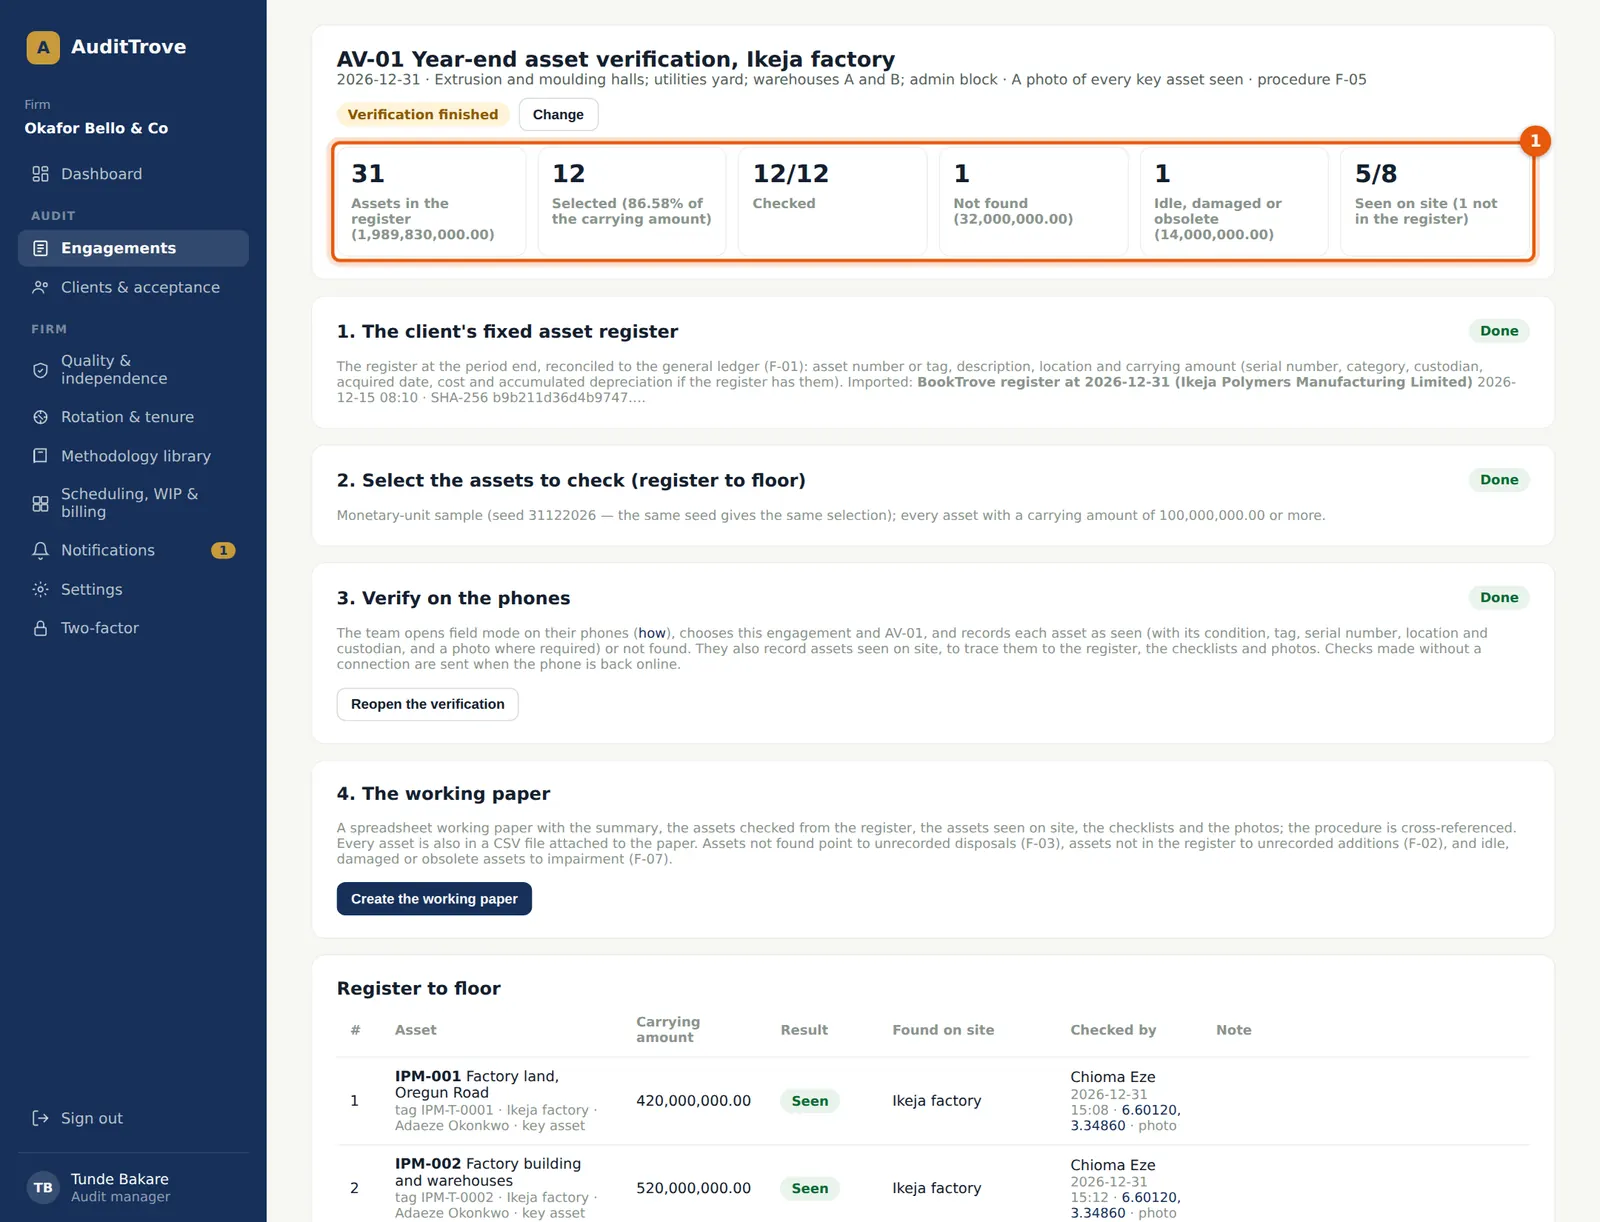
Why
The figures (1) show 31 assets in the register, 12 selected (86.58% of the carrying amount), 12 of 12 checked, 1 not found (₦32,000,000.00), 1 idle, damaged or obsolete (₦14,000,000.00), and 5 seen on site, 1 of them not in the register. Times on the computer are shown in UTC; Lagos time is one hour ahead.
Who
Manager, back at the office.
What to do
- Read the figures, then the tables below them.
25.17 Register to floor
Why
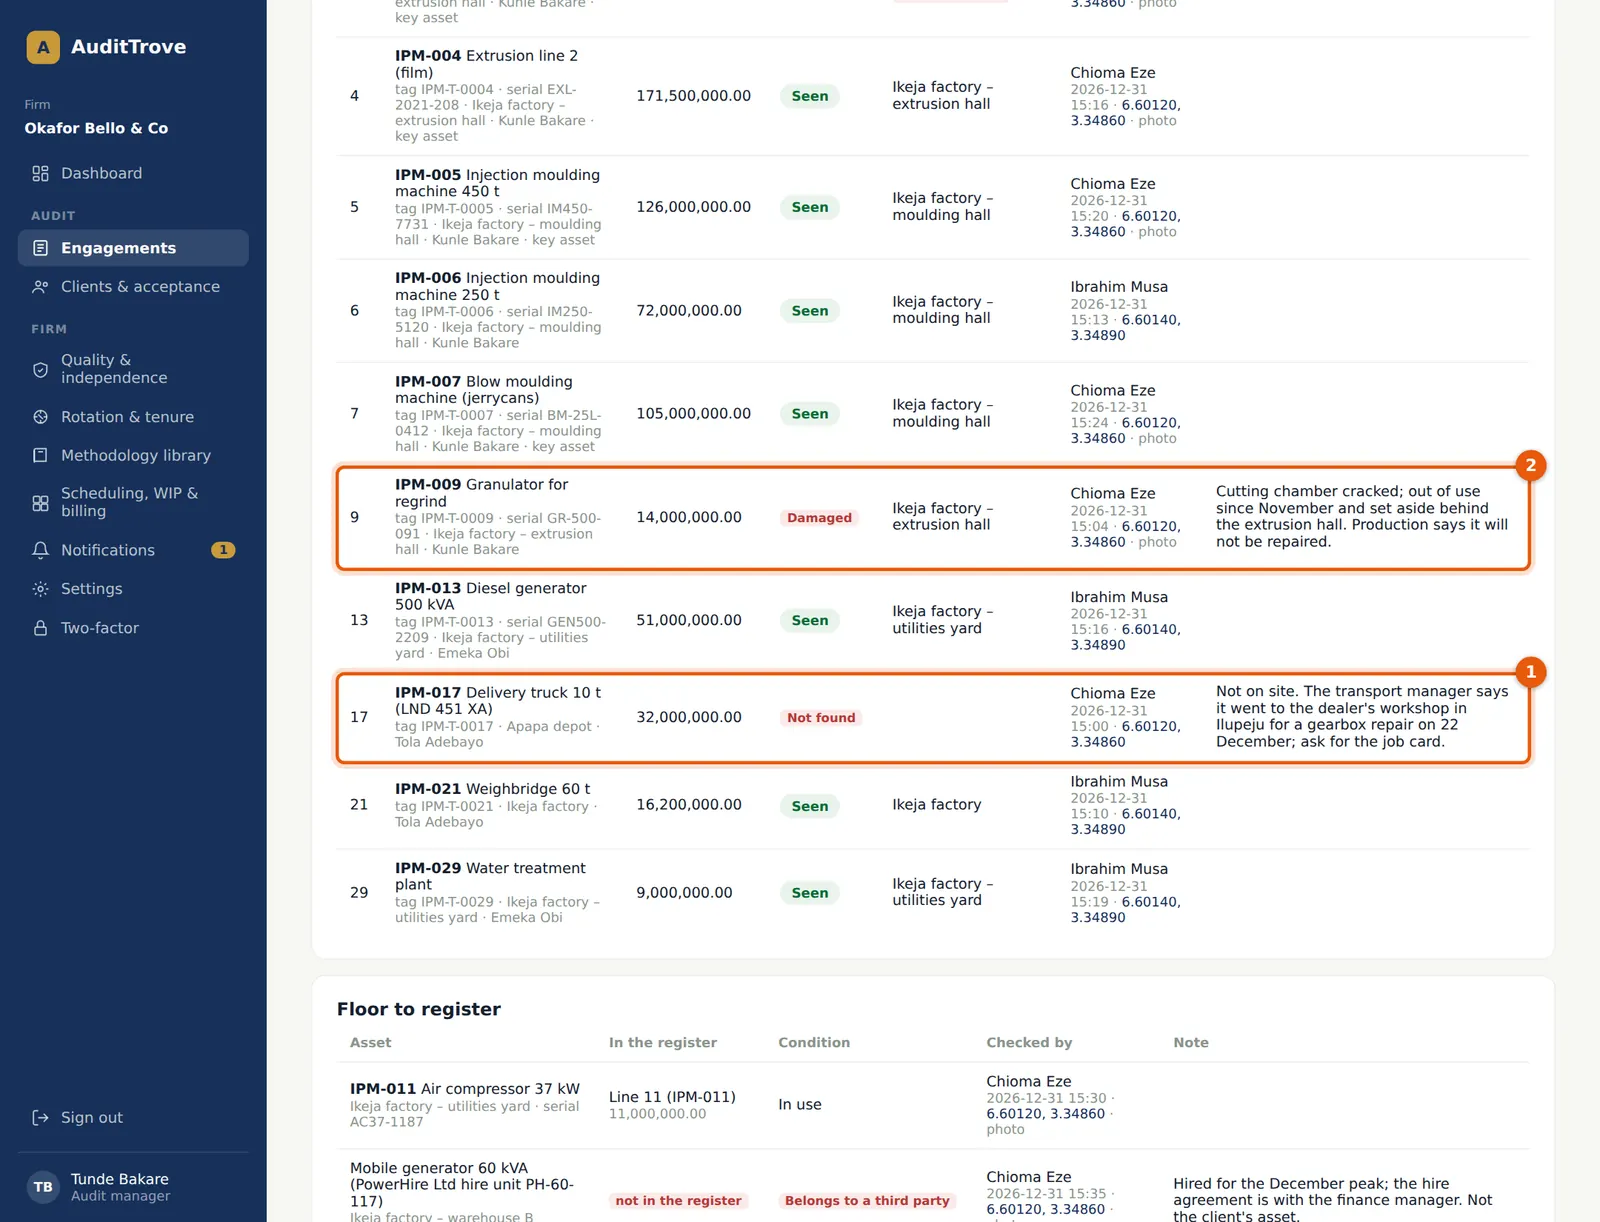
Each selected asset shows its result, what was found on site, who checked it, when and where, whether a photo was taken, and the note. The truck (1) is not found, with what the transport manager said; Tunde asks for the job card. The granulator (2) is damaged and will not be repaired, an impairment indicator for F-07. Differences in the tag, serial number, location or custodian are flagged.
Who
Manager.
What to do
- Follow up each asset not found and each asset in poor condition.
- Ask the client for evidence where needed, and record it in the related procedures (F-03, F-07).
25.18 Floor to register
Why
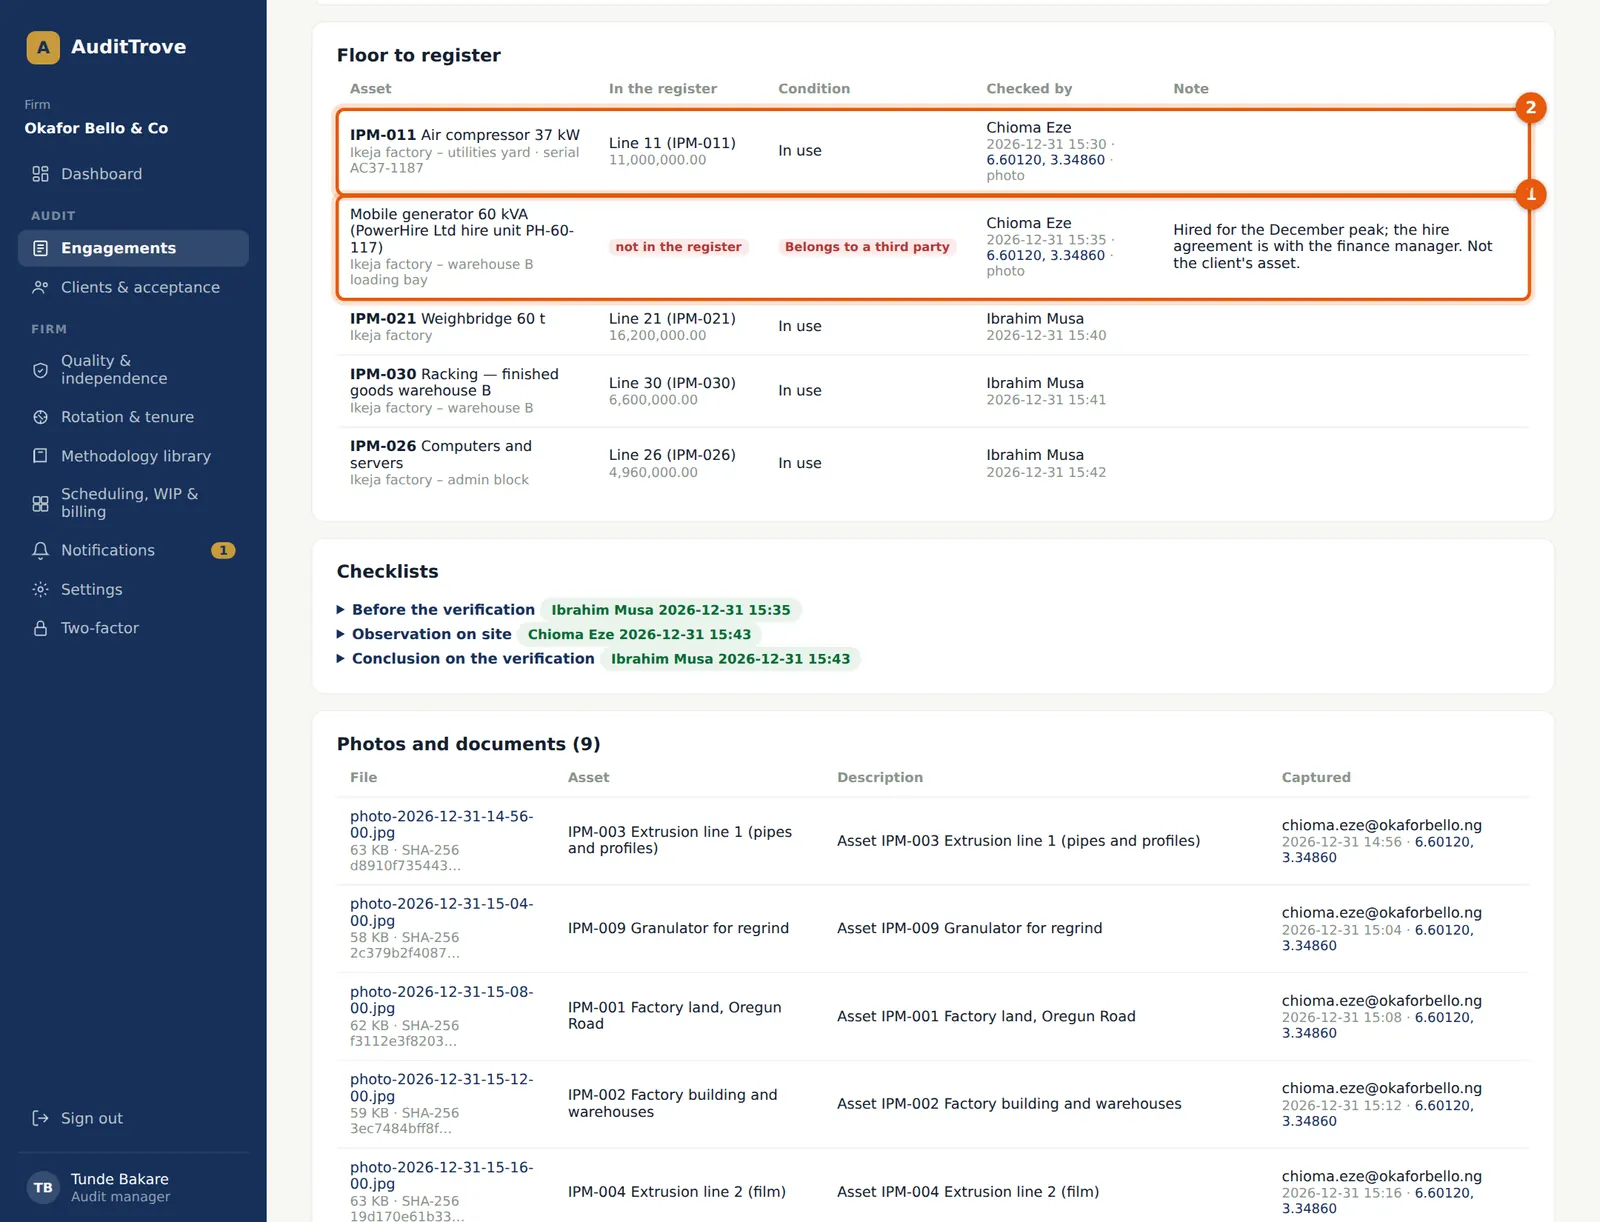
Each asset seen on site is traced to the register line it matches (2), with the register's carrying amount and location. An asset that is not in the register (1) is flagged: here the hired generator, recorded as belonging to a third party. An asset of the client that is not in the register would point to an unrecorded addition (F-02).
Who
Manager.
What to do
- Check each asset seen on site against the register.
25.19 Create the working paper
Why
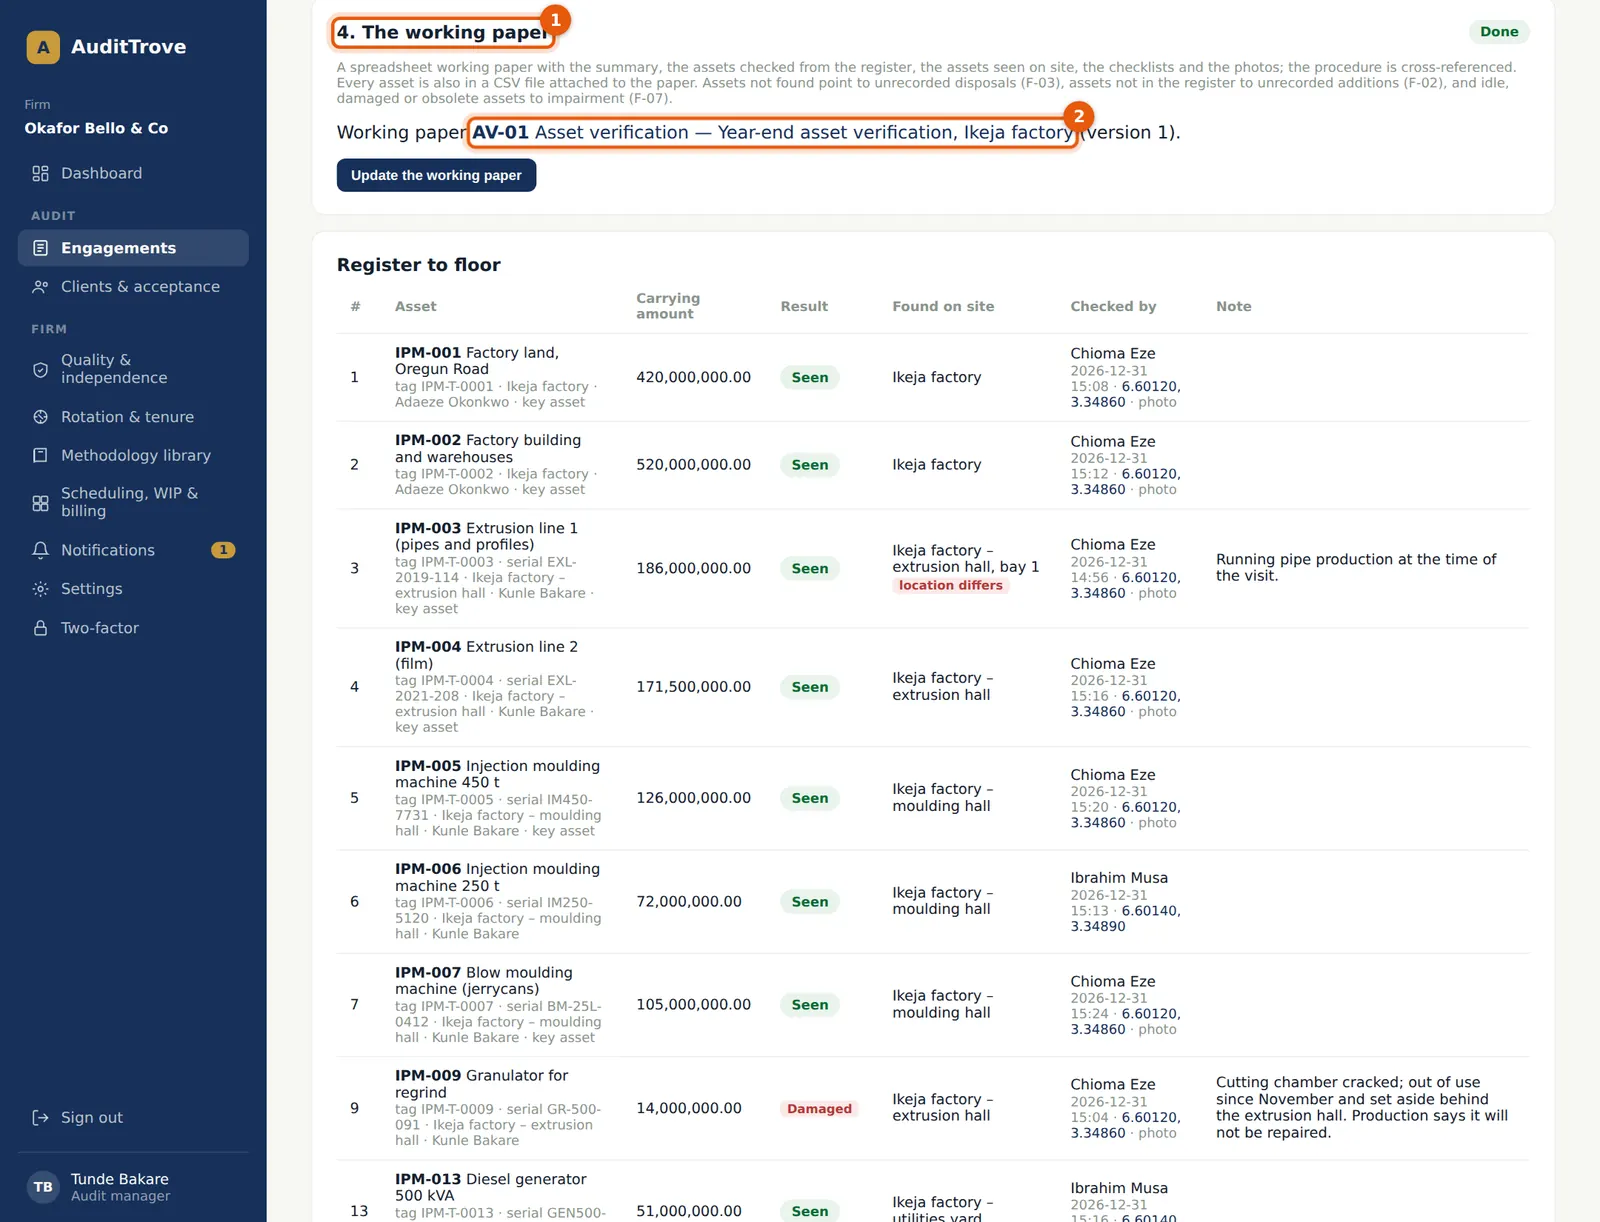
Create the working paper (1) makes the spreadsheet working paper AV-01 (2): the summary, the assets checked from the register, the assets seen on site, the checklists and the photos. Every asset is also in a CSV file attached to the paper. Procedure F-05 gets the reference AV-01. After a reopened verification is finished again, Update the working paper replaces it with a new version.
Who
Manager or senior, once the verification is finished.
What to do
- Choose Create the working paper (1).
- Open the paper (2) to review and sign it off.
25.20 The AV working paper
Why
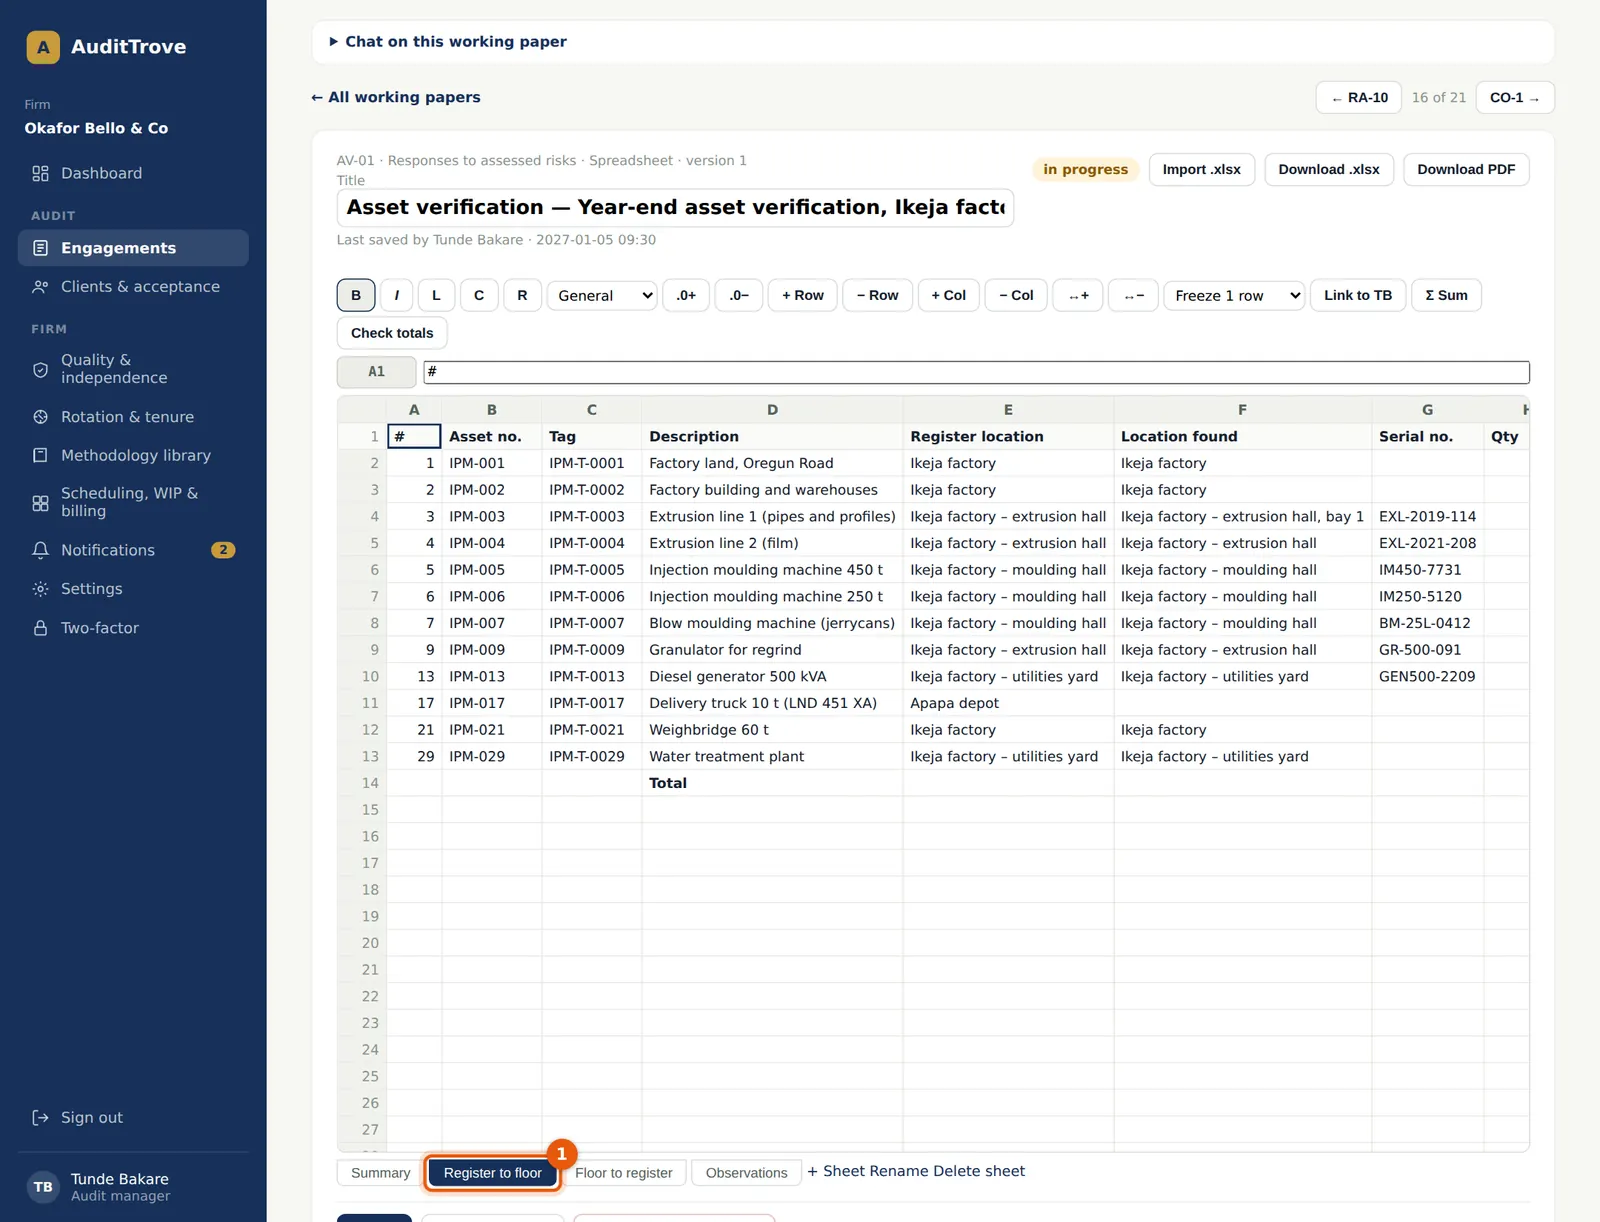
The paper has four sheets: Summary, Register to floor (1), Floor to register and Observations. A large register shows what fits, with the assets not found first. The paper is signed off like any other working paper (chapter 10).
Who
Manager, then the partner.
What to do
- Review each sheet and sign off the paper.