Steps in this chapter (27)
AuditTrove on a phone for work away from a desk: photographing evidence, attending a stock count with test counts in both directions, the checklists and cut-off, working offline, then the working paper on a computer.
Field mode is AuditTrove on a phone, for the work done away from a desk: photographing a document, an asset or the premises as evidence, and attending the client's stock count (ISA 501). It is part of the AuditTrove web app, so there is nothing to install from an app store. The phone opens the field sign-in page, and the person signs in with their own login and authenticator code. A field sign-in opens only the field app, and the person's computer stays signed in.
Everything field mode keeps on the phone is encrypted under a PIN the person chooses. It is removed at sign-out, after 14 days without a connection, after five wrong PINs, or when the firm withdraws the phone. Work recorded without a signal is kept on the phone and sent when the phone is back online. Photos are taken inside field mode and are not saved to the phone's gallery.
A stock count is set up on a computer: the client's count listing is imported and the lines to test are selected. The team then counts on their phones, from the sheet to the floor and from the floor to the sheet, and records the count checklists and the cut-off information. Back at the office the manager traces the counts to the client's final inventory listing and creates the working paper.
In the illustration Okafor Bello & Co attends the year-end inventory count of Ikeja Polymers Manufacturing Limited at its Ikeja factory on 31 December 2026, for the audit of the year ending that day. Tunde Bakare, the audit manager, sets up the count on 14 December. Chioma Eze (senior) and Ibrahim Musa (associate) count on their phones. Tunde completes the working paper on 5 January 2027, and Ifeoma Chukwu, the firm administrator, looks after the phones. The figures are fictional, like the rest of the illustration.
Use cases
- Use case — The team attends a client's stock count. Set up the count and its selection on a computer (steps 24.2–24.5), count on the phones (steps 24.13–24.18), then trace to the final listing and create the working paper (steps 24.20–24.24).
- Use case — Photograph a document or an asset as evidence on site. Open the engagement in field mode and choose Take a photo; choose the procedure it supports (steps 24.11–24.12). The photo arrives in the procedure's evidence and in Captured evidence (step 24.25).
- Use case — There is no signal in the warehouse. Keep counting. The work is kept on the phone, encrypted, and sent when the phone is back online (step 24.17).
- Use case — A phone is lost or stolen, or a person leaves. An owner or administrator withdraws the phone in Settings → Field mode (steps 24.26–24.27). It is signed out at once and its data is removed when it is next opened online.
- Use case — The firm wants only firm-issued phones, or locations on every capture. The owner or administrator sets the policies in Settings → Field mode (step 24.1).
24.1 The firm's field-mode policies
Why
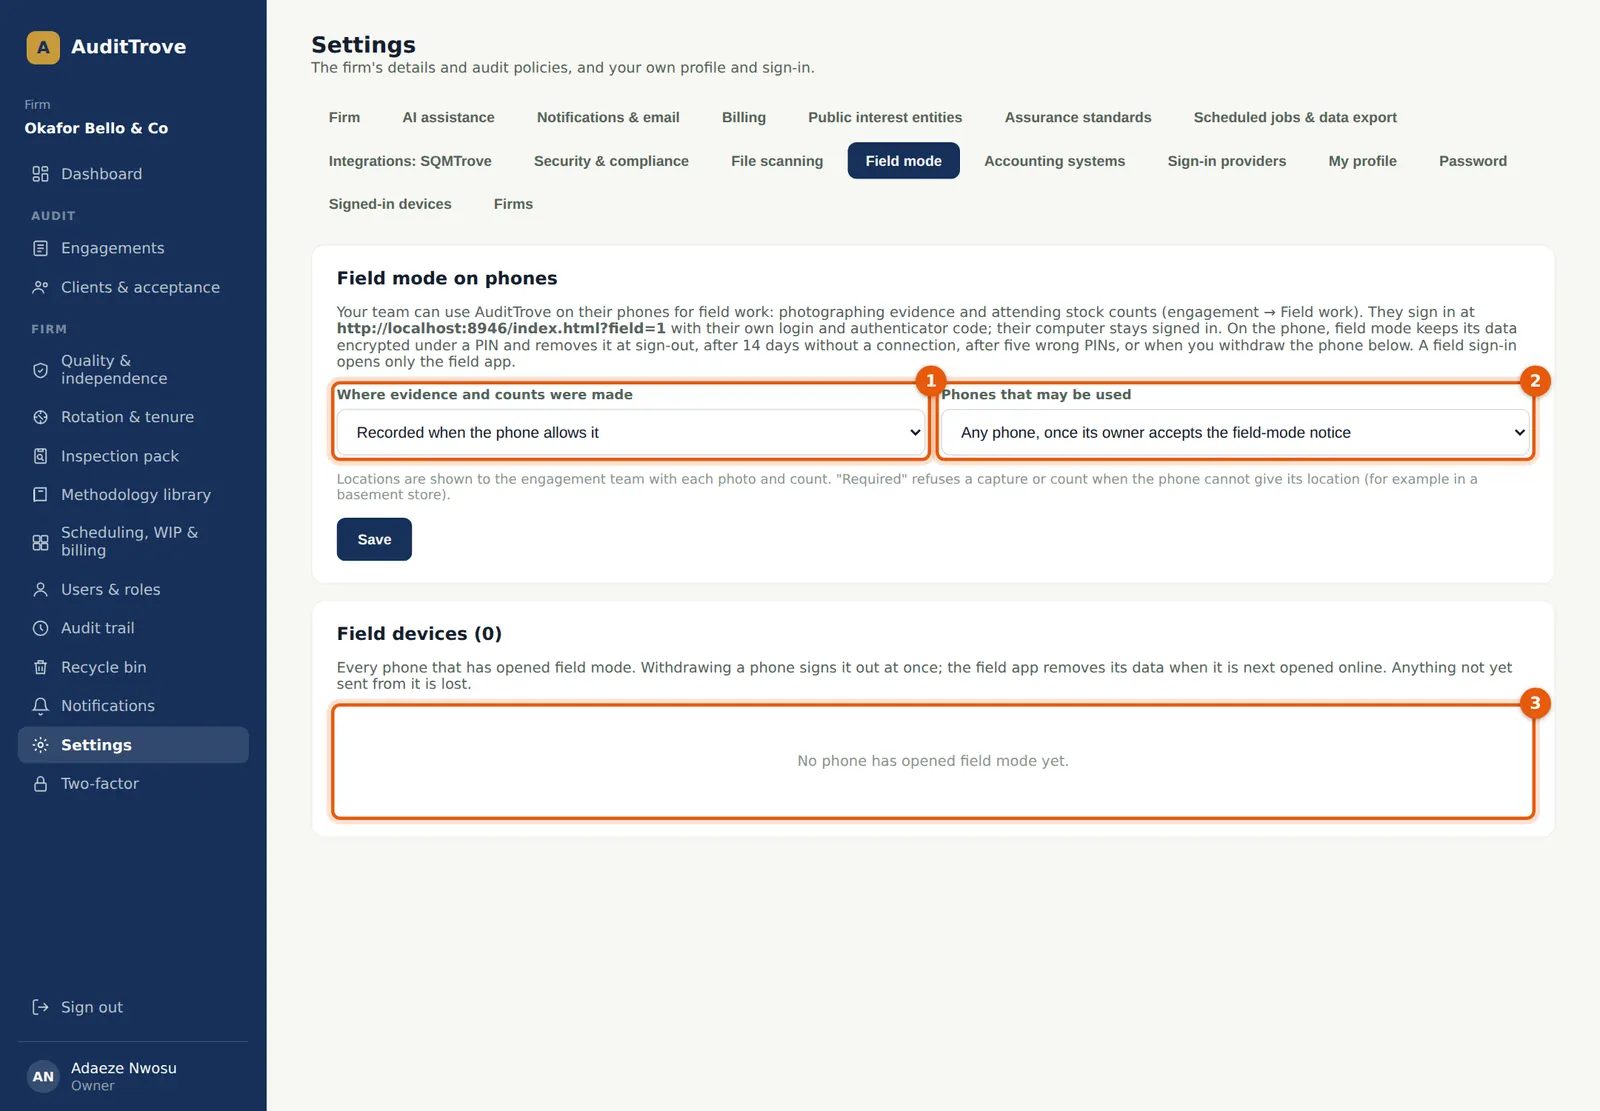
Field mode is included in every plan and is ready to use; these two policies decide how it works for the firm. Where evidence and counts were made (1): Not recorded; Recorded when the phone allows it (the default); or Required for every capture and count, which refuses a capture or count when the phone cannot give its location (for example in a basement store). Locations are shown to the engagement team with each photo and count. Phones that may be used (2): any phone once its owner accepts the field-mode notice (the default, for personal phones), or only phones an owner or administrator approves. The list (3) shows every phone that has opened field mode; it is empty until the first person signs in on a phone.
Who
Owner or firm administrator, on a computer.
What to do
- Open Settings → Field mode.
- Choose the location policy (1) and the phone policy (2), and choose Save.
- Under the approval policy, approve each new phone in the list (3) once its owner has accepted the notice.
24.2 Set up a stock count
Why
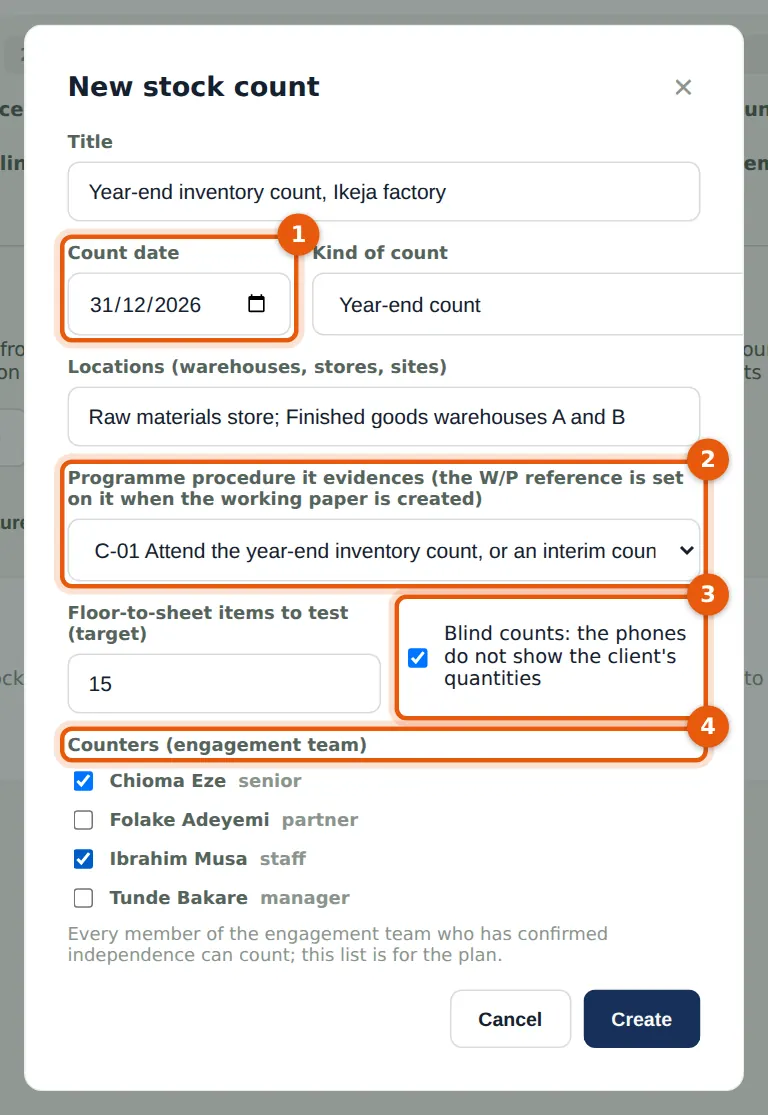
A stock count belongs to the engagement and gets a reference, SC-01 for the first. The count date (1) and the kind of count (year-end, interim rolled forward to the year end, or continuous) go into the working paper. The programme procedure (2) is the one the count evidences, normally C-01 "Attend the year-end inventory count"; it gets the working paper's reference when the paper is created. Blind counts (3) are on by default: the phones never receive the client's quantities, so the counters record what they find (ISA 501.A1–A8). The counters (4) are for the plan only. Every member of the engagement team who has confirmed their independence can count.
Who
Manager or senior, on a computer.
What to do
- Open the engagement's Field work tab and choose New stock count.
- Enter the title, the count date (1), the kind of count and the locations (warehouses, stores, sites).
- Choose the procedure (2), the number of items to test from the floor to the sheet, and leave Blind counts (3) ticked.
- Tick the counters (4) and choose Create.
24.3 Import the client's count listing
Why
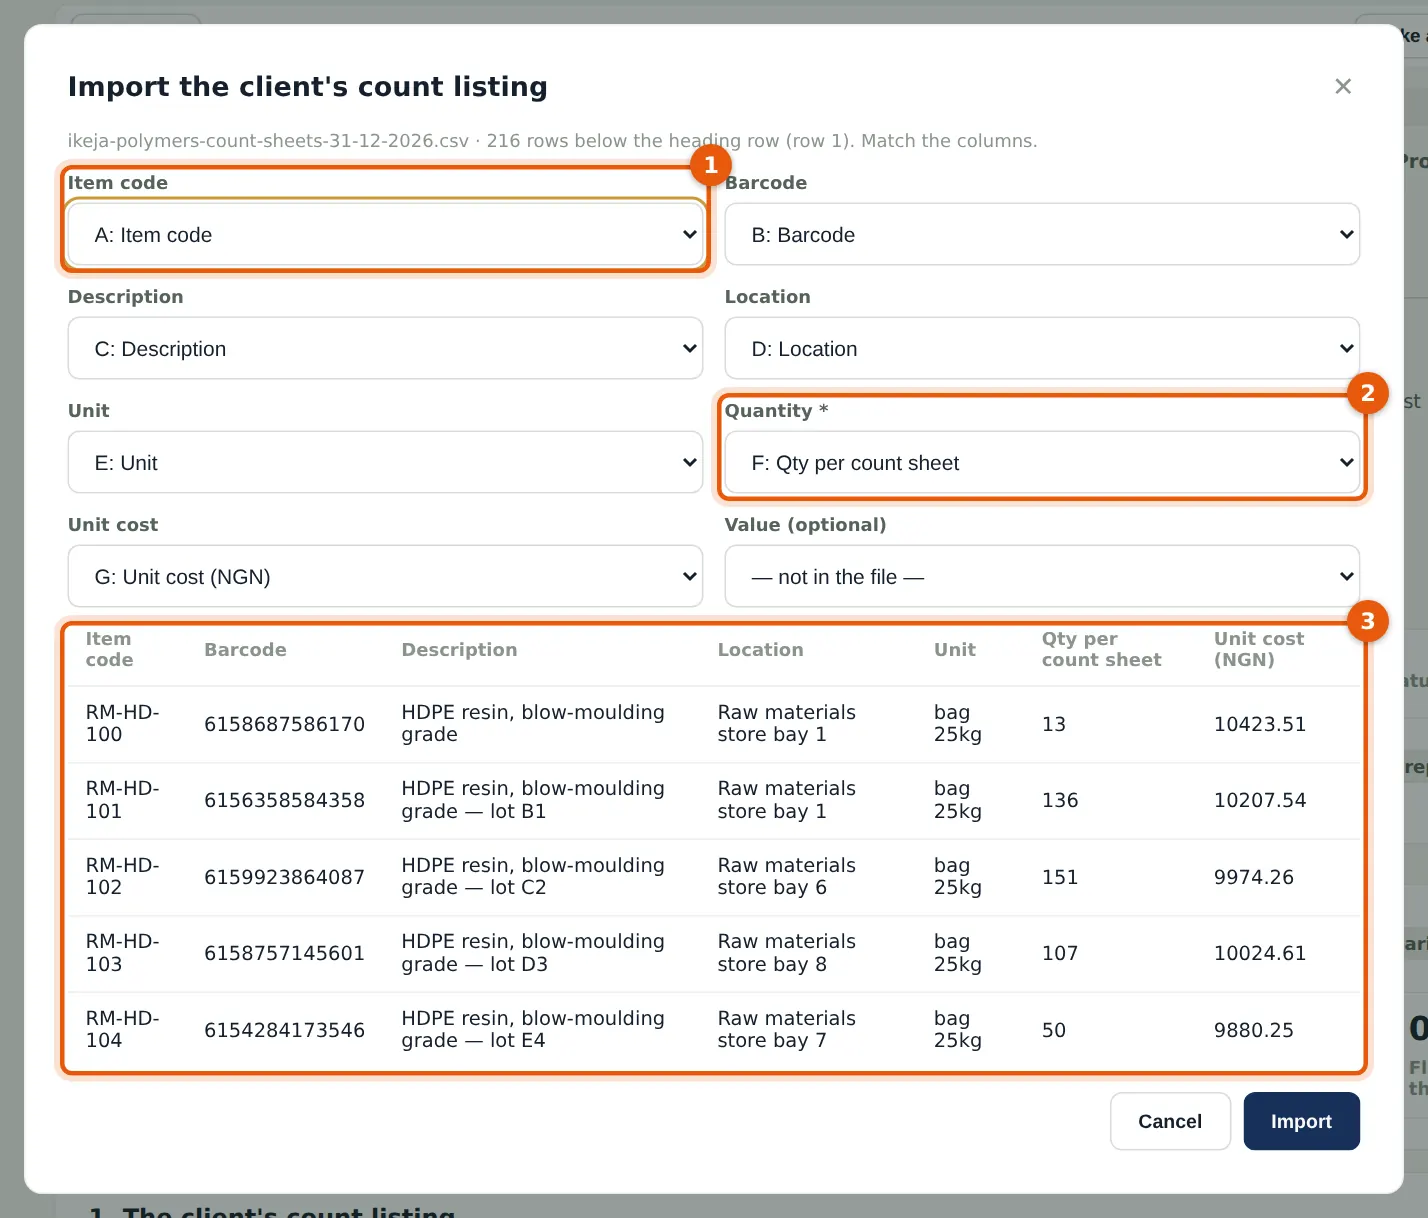
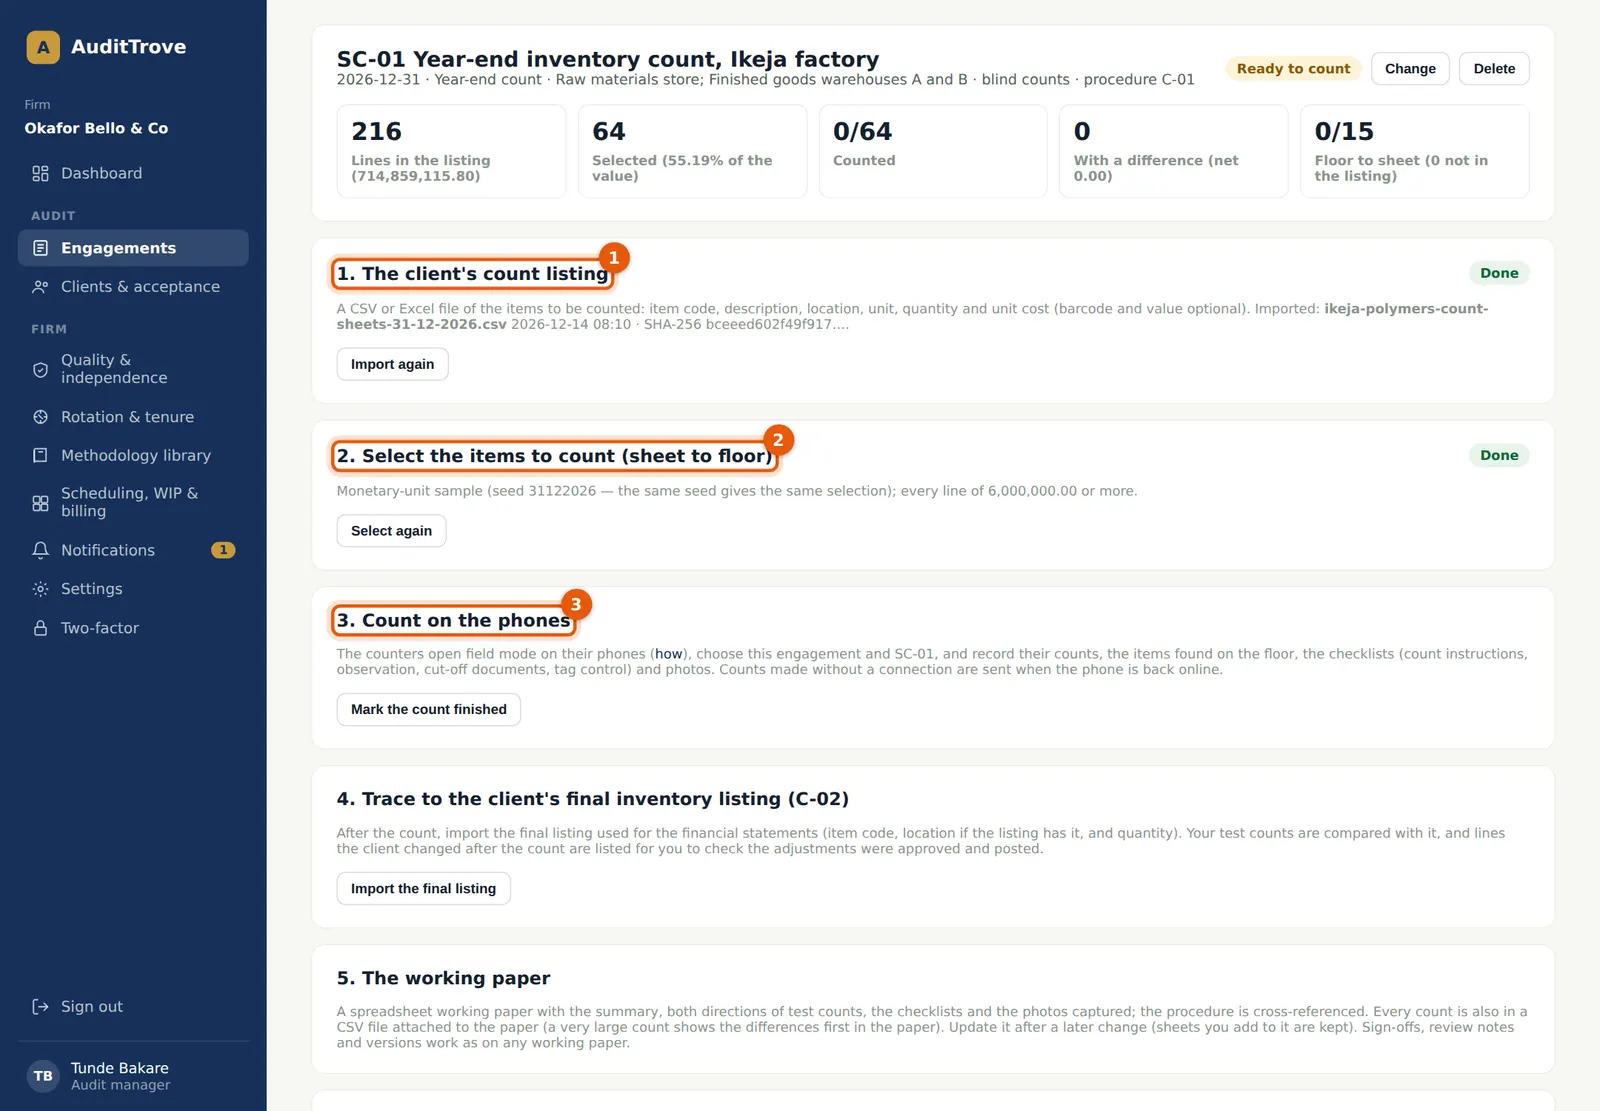
The listing is the client's list of the items to be counted: their count sheets, normally exported from the stock system shortly before the count. A CSV or Excel file is accepted, with up to 20,000 lines. The columns are matched by their headings and can be changed: item code (1), barcode, description, location, unit, quantity (2, required) and unit cost or value. The first rows (3) show how the file will be read. The file's SHA-256 fingerprint is kept with the count. Ikeja Polymers' count sheets have 216 lines worth NGN 714,859,115.80.
Who
Manager or senior.
What to do
- Choose Import the listing in step 1 of the count and pick the client's file.
- Check the columns (1, 2) against the first rows (3) and choose Import.
24.4 Select the items to count
Why
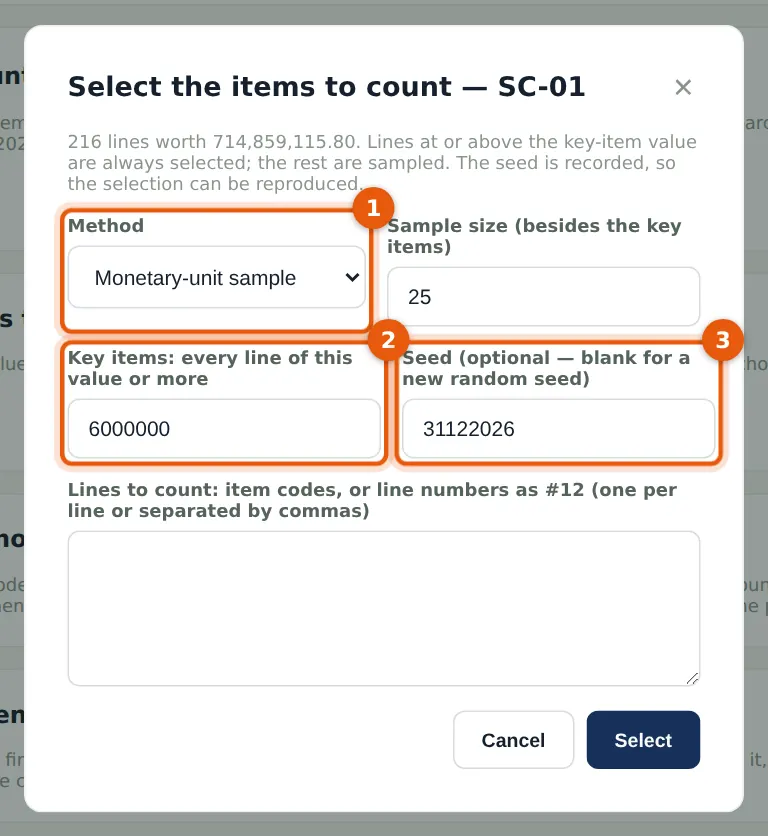
These are the lines the team counts from the sheet to the floor. Every line at or above the key-item value (2) is always selected. The rest is a sample: monetary-unit (the default, so higher-value lines are more likely to be chosen), random or systematic, or every line, or a list the team chooses by item code or line number (#12). The seed (3) is recorded with the selection, so the same seed gives the same selection; leave it blank for a new random seed. For Ikeja Polymers, Tunde selects every line of NGN 6,000,000 or more and a monetary-unit sample of 25 more: 64 lines, 55.19% of the listing's value.
Who
Manager.
What to do
- Choose Select items in step 2.
- Choose the method (1), the sample size, the key-item value (2) and, if you want, the seed (3), and choose Select.
24.5 The count is ready
Why
The count shows its steps in order: 1 the listing (1), 2 the selection (2), 3 counting on the phones (3), 4 tracing to the final listing and 5 the working paper. The figures at the top show the lines and value, the selection, the progress of the counts, the differences found and the floor-to-sheet items. The listing and the selection can still be changed until a counter downloads the count to a phone. From then on the count is "Counting" and they are fixed, so counts made offline still match their lines.
Who
Manager.
What to do
- Check the selection and tell the counters the count is ready.
- If the client sends a corrected listing before the count, choose Import again and then Select again.
24.6 Open field mode on a phone
Why
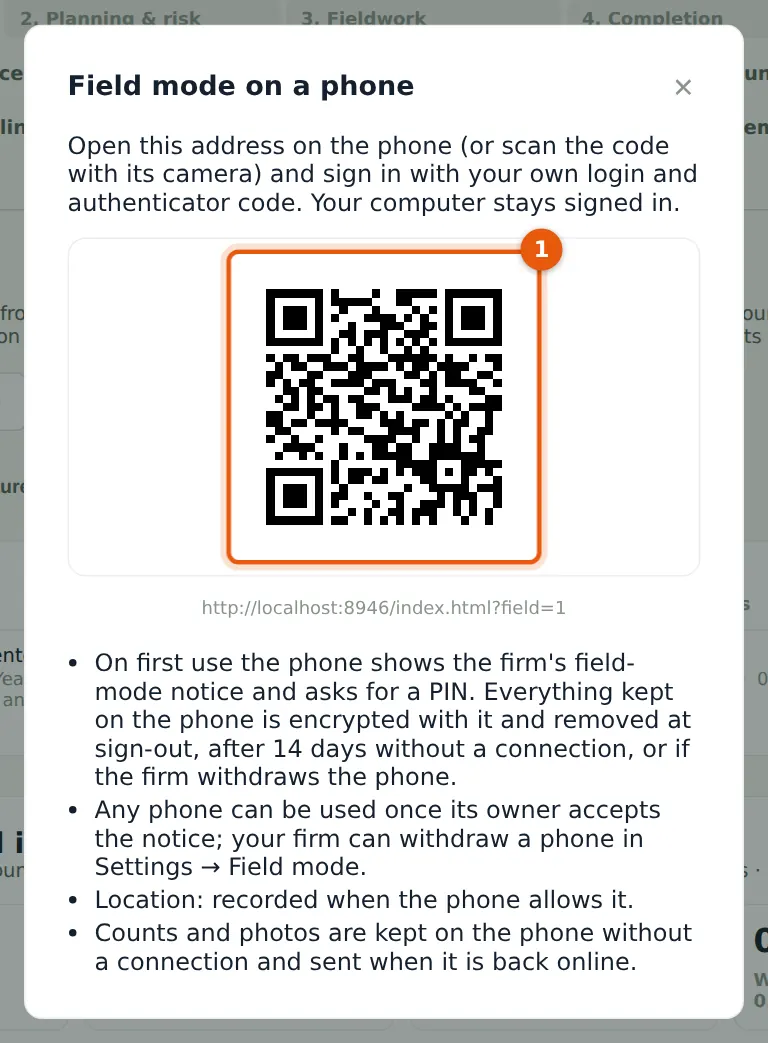
The code (1) opens the field sign-in page of the firm's AuditTrove. The same address is shown under the code and in Settings → Field mode. Each person uses their own login and authenticator code; a computer that is signed in stays signed in. A plan with one device per user allows one computer and one field phone at the same time.
Who
Each counter.
What to do
- Choose Use field mode on a phone on the Field work tab.
- Scan the code (1) with the phone's camera, or type the address in the phone's browser. Add it to the home screen if you will use it often.
24.7 Sign in on the phone
Why
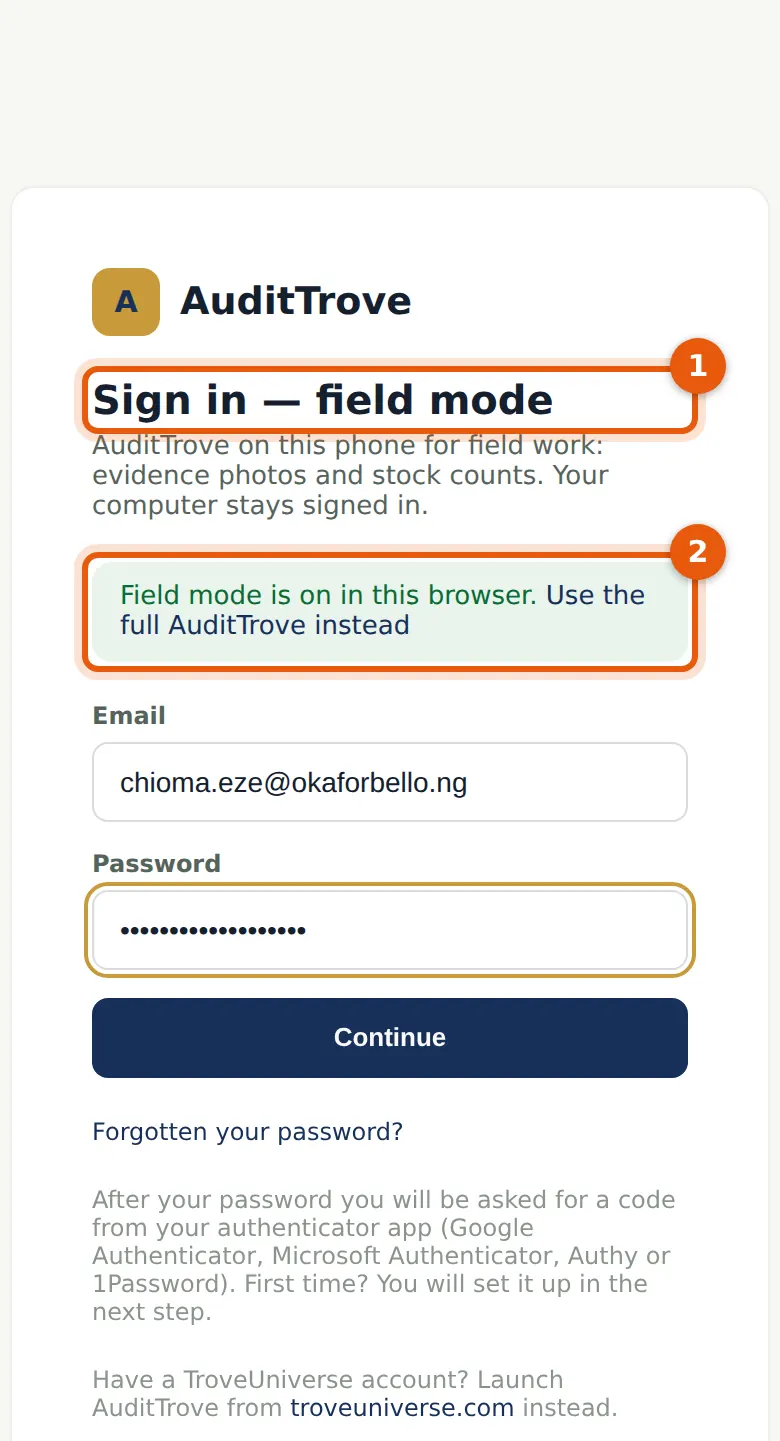
The page says it is the field sign-in (1). The note (2) says field mode is on in this browser; Use the full AuditTrove instead turns it off. Sign-in works as on a computer: password and authenticator code, Microsoft or Google, or the troveuniverse.com sign-in. A field sign-in reaches only the field app and the routes it needs. The rest of AuditTrove, such as settings, working papers and other engagements' pages, is refused.
Who
Each counter, on their phone.
What to do
- Enter your email and password and choose Continue.
- Enter the code from your authenticator app.
24.8 The field-mode notice
Why
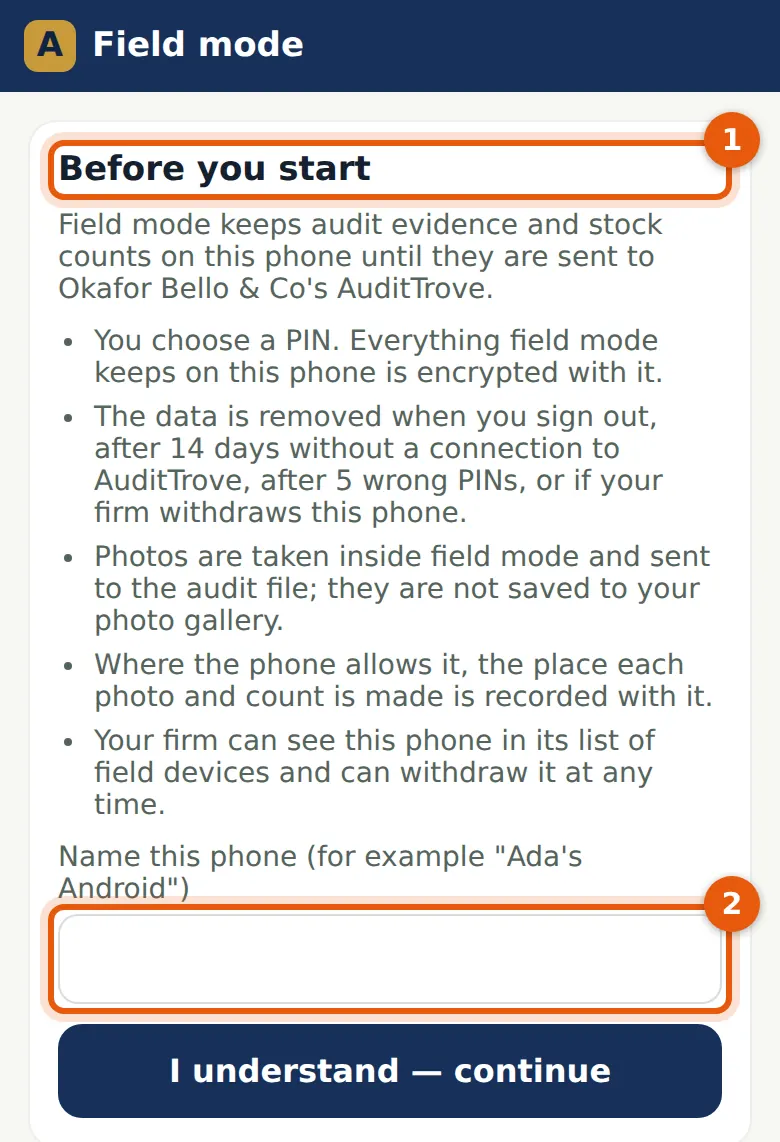
The first time a phone opens field mode, the notice (1) explains what happens on it. You choose a PIN, and everything field mode keeps is encrypted with it. The data is removed when you sign out, after 14 days without a connection to AuditTrove, after 5 wrong PINs, or if your firm withdraws the phone. Photos are taken inside field mode and are not saved to the gallery. The place of each photo and count is recorded where the phone allows it. Your firm can see the phone in its list. The phone's name (2) is how the firm sees it. A phone that has accepted the notice is ready to use, unless the firm approves phones first.
Who
The owner of the phone.
What to do
- Read the notice.
- Name the phone (2), for example Chioma's Pixel, and choose I understand — continue.
24.9 Choose a PIN
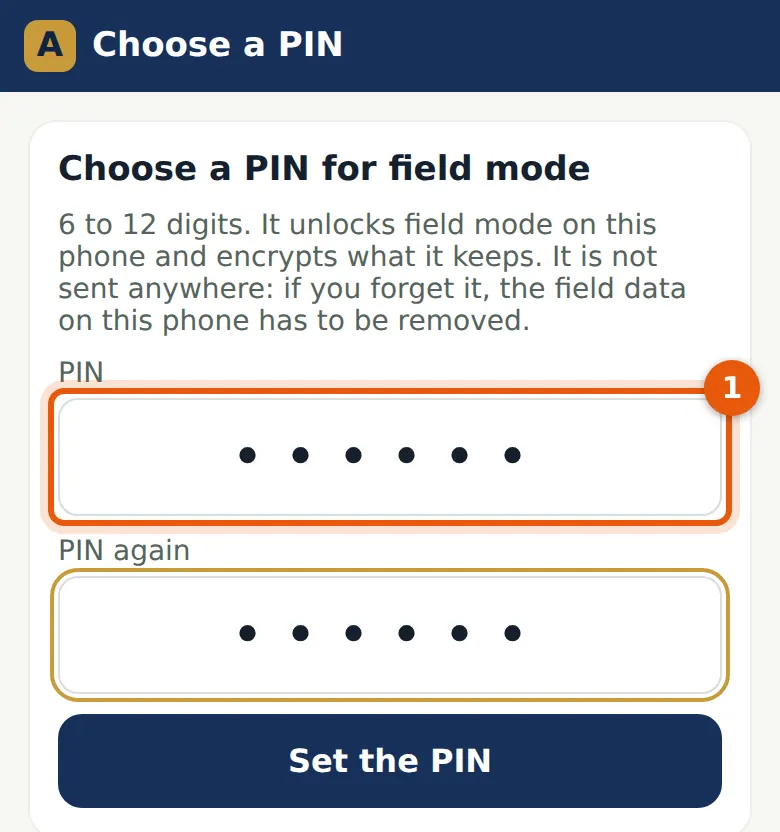
Why
The PIN (1) has 6 to 12 digits; repeated or consecutive digits such as 111111 or 123456 are refused. It never leaves the phone. The data is encrypted with a key made from the PIN (AES-GCM, with PBKDF2 and 310,000 iterations), so if you forget it, the field data on the phone has to be removed. Field mode locks after 10 minutes in the background and asks for the PIN again.
Who
The owner of the phone.
What to do
- Enter the PIN twice and choose Set the PIN.
24.10 Your engagements on the phone
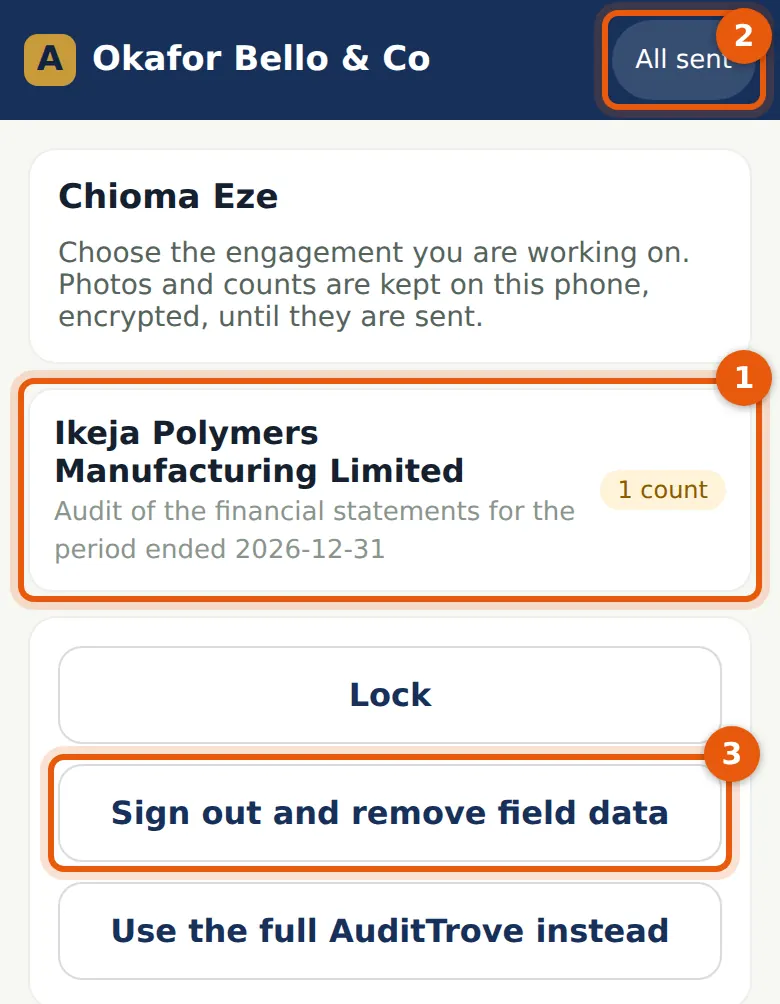
Why
The home page lists the open engagements on whose team you are (1), with the stock counts waiting. The status at the top (2) says whether everything has been sent; tap it to see what is waiting. Lock asks for the PIN again. Sign out and remove field data (3) ends the field session and removes everything field mode keeps on the phone; anything not yet sent is lost, so the app warns first. Use the full AuditTrove instead turns field mode off in this browser.
Who
The counter.
What to do
- Choose the engagement (1).
- At the end of the day, once the status says All sent, choose Sign out and remove field data (3).
24.11 The engagement on the phone
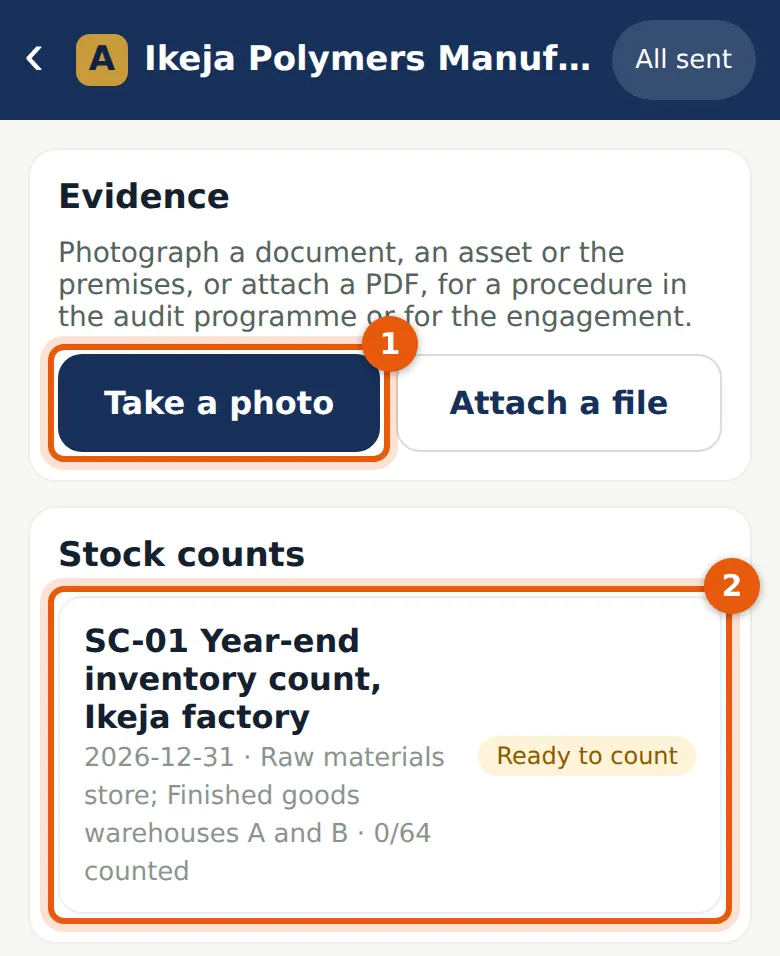
Why
Take a photo (1) opens the camera inside field mode; Attach a file adds a PDF or a picture already on the phone. Below are the engagement's stock counts (2) with their status and progress. A count must have been opened once with a connection before it can be used offline.
Who
The engagement team.
What to do
- Choose Take a photo (1) to photograph evidence, or the count (2) to start counting.
24.12 Photograph evidence for a procedure
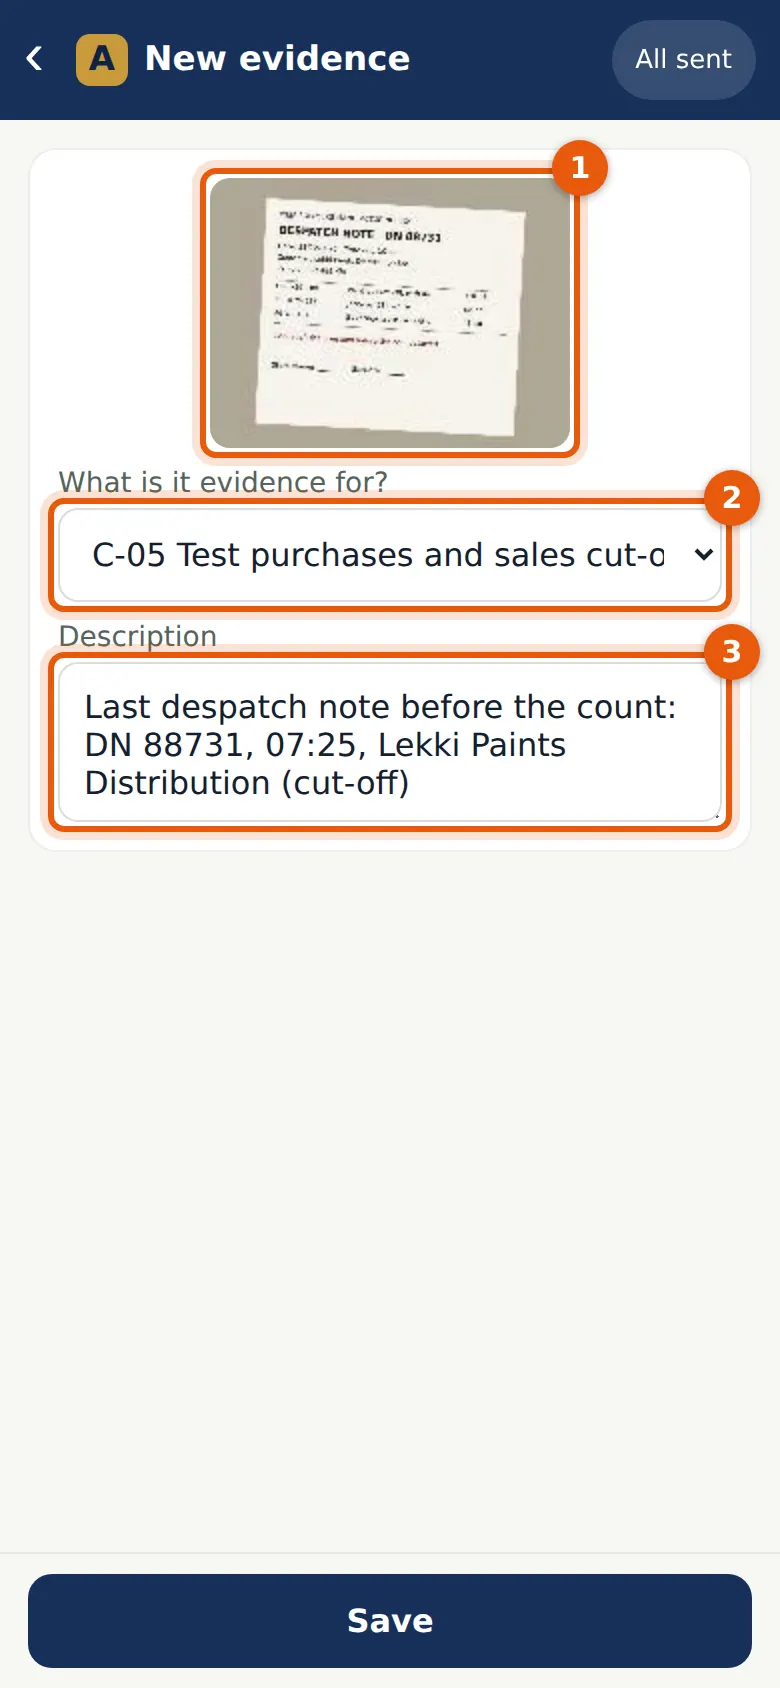
Why
The photo (1) is resized to at most 2,000 pixels and kept encrypted until it is sent. Choose what it is evidence for (2): the engagement in general or a procedure in the programme. Chioma photographs the last despatch note before the count for procedure C-05, the sales cut-off test. The description (3) should say what the photo shows and its reference. The phone sends its own SHA-256 fingerprint of the file; AuditTrove computes it again and refuses the file if the two differ. Each file goes through the usual malware checks, and a file sent twice is stored once.
Who
Any member of the team who has confirmed their independence.
What to do
- Take the photo, choose the procedure (2) and write the description (3).
- Choose Save. The photo is sent at once when there is a connection, or later.
24.13 Count from the sheet to the floor
Why
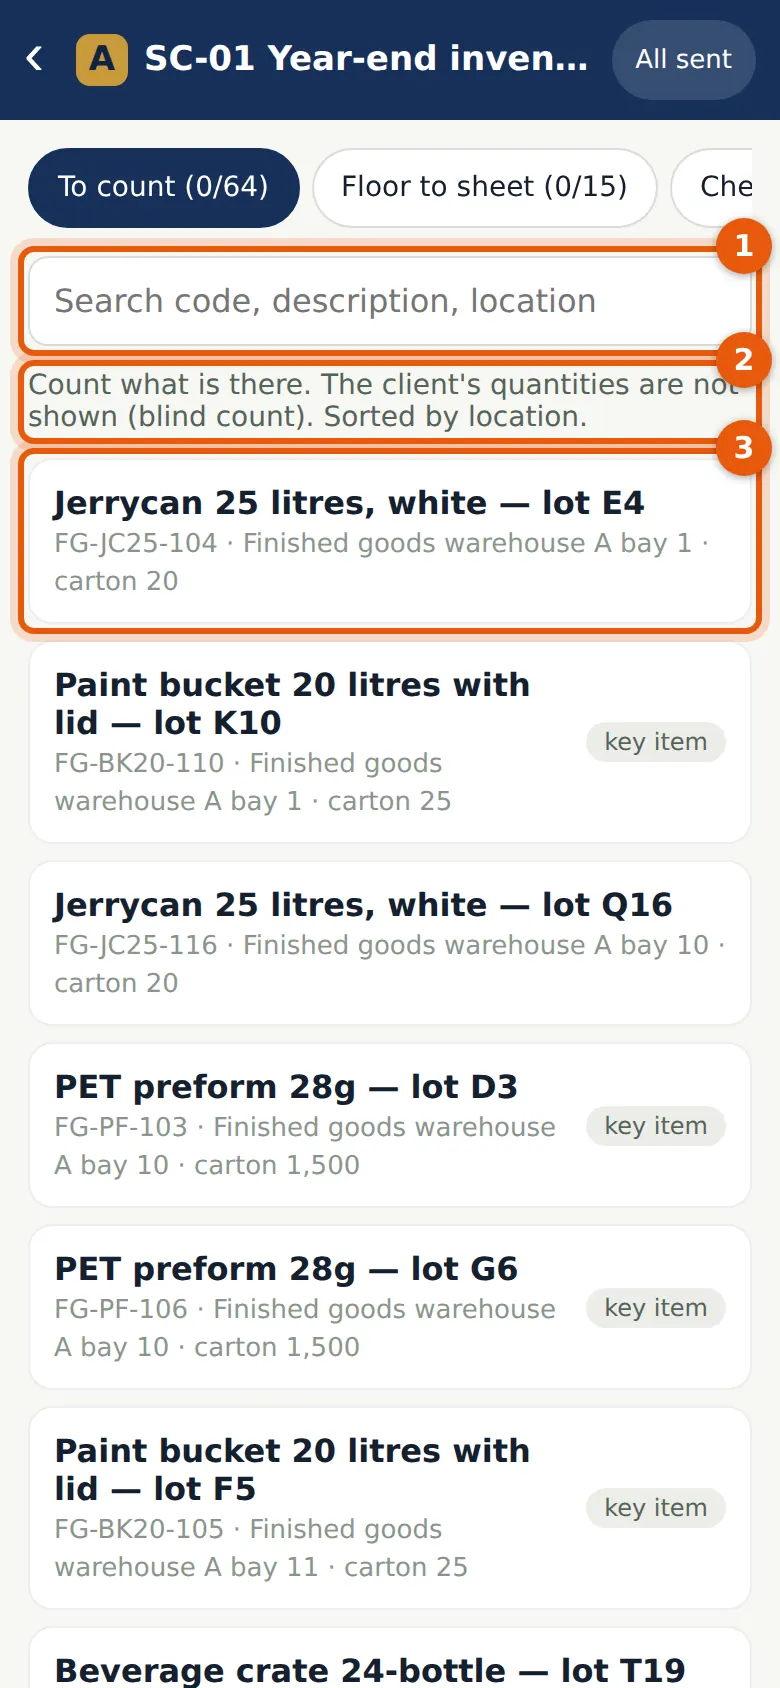
The list holds the selected lines, sorted by location so the counters can walk the stores in order. Search (1) by code, description or location, or choose Scan to read a barcode where the phone's browser can. The note (2) says the counts are blind: the client's quantities are not on the phone. Key items are labelled. Each line (3) shows its code, location and unit, and once counted it shows the quantity in green (sent) or amber (waiting to be sent).
Who
The counters.
What to do
- Go to the line's location, find the item and tap the line (3).
24.14 Record a count
Why
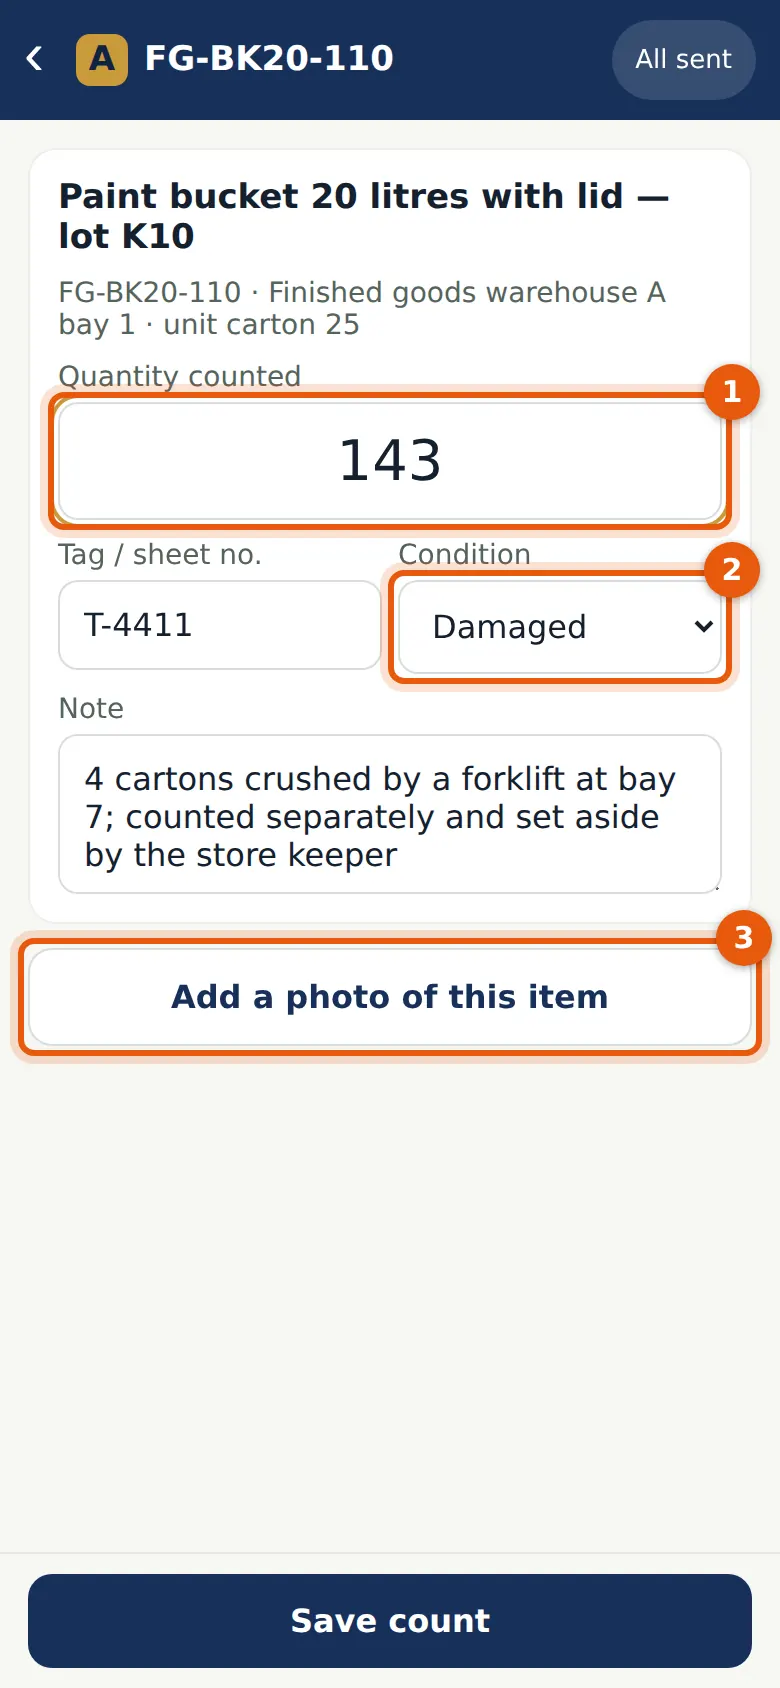
Enter the quantity counted (1) in the line's unit, the tag or count sheet number, the condition (2) — good, damaged, slow-moving, obsolete or belonging to a third party — and a note. Chioma finds 4 cartons crushed by a forklift at bay 7 and records them as damaged (ISA 501.A3). A photo of the item (3) is added to the count. Saving a line again records a recount. Both counts are kept, and the latest by the phone's time is used.
Who
The counters.
What to do
- Enter the quantity (1), the tag number and, if needed, the condition (2) and a note.
- Choose Add a photo of this item (3) for anything unusual, then Save count.
24.15 Count from the floor to the sheet
Why
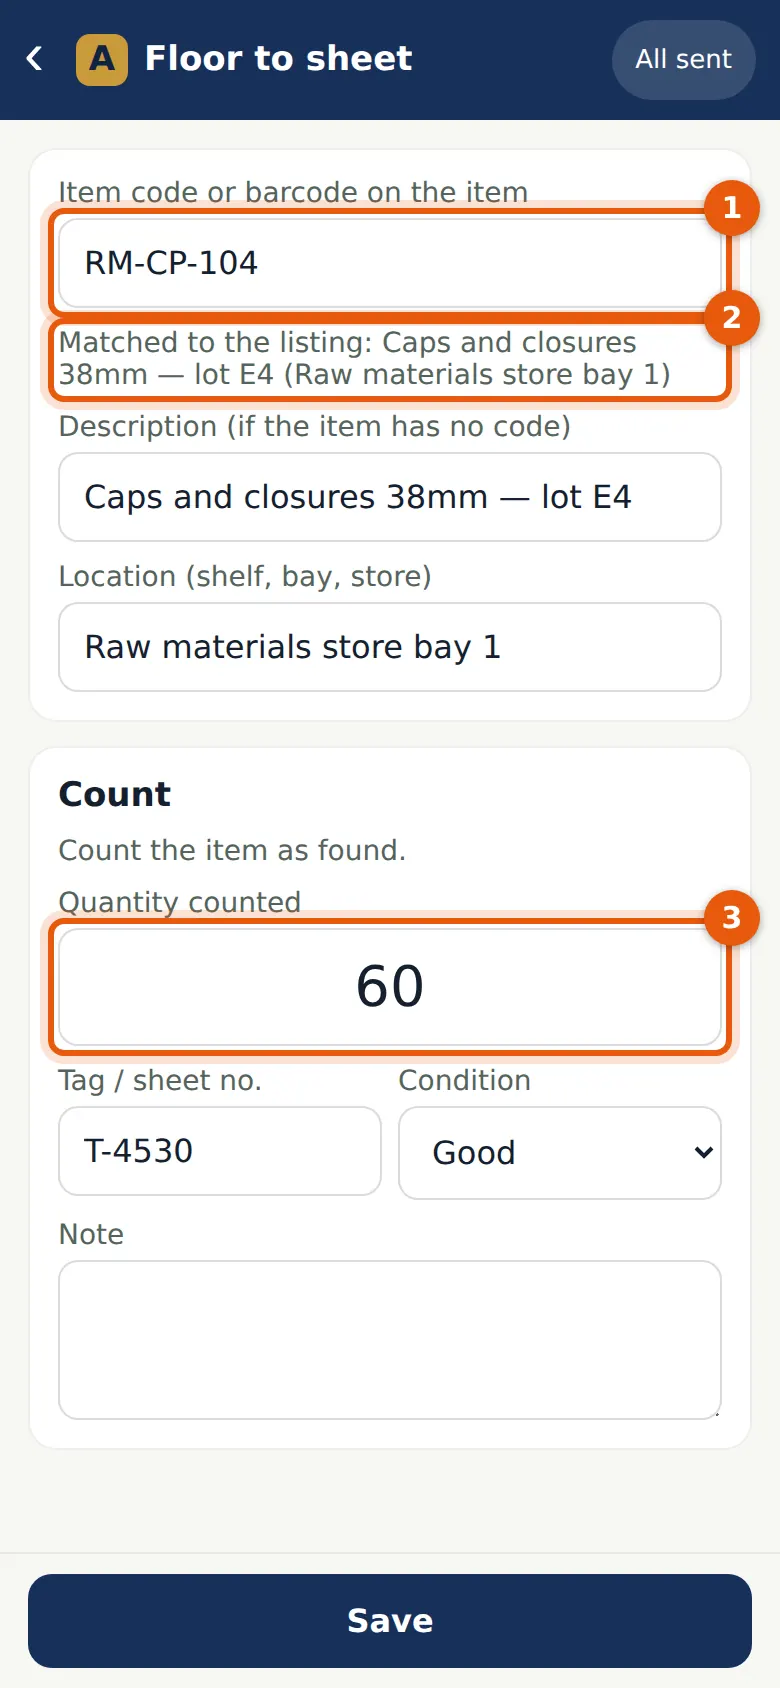
For completeness the counters also pick items from the shelves and check that they are in the listing with the right quantity. Enter or scan the code on the item (1). The phone matches it to the listing by item code or barcode (2). An item that matches nothing is recorded with its description and location, and the working paper shows it as not in the listing. Ibrahim records 36 unlabelled jerrycans in warehouse B that are on no count sheet. The tab shows the progress against the target set for the count.
Who
The counters.
What to do
- Choose Record an item from the floor on the Floor to sheet tab.
- Enter or scan the code (1), check the match (2), enter the count (3) and choose Save.
24.16 The checklists and the cut-off
Why
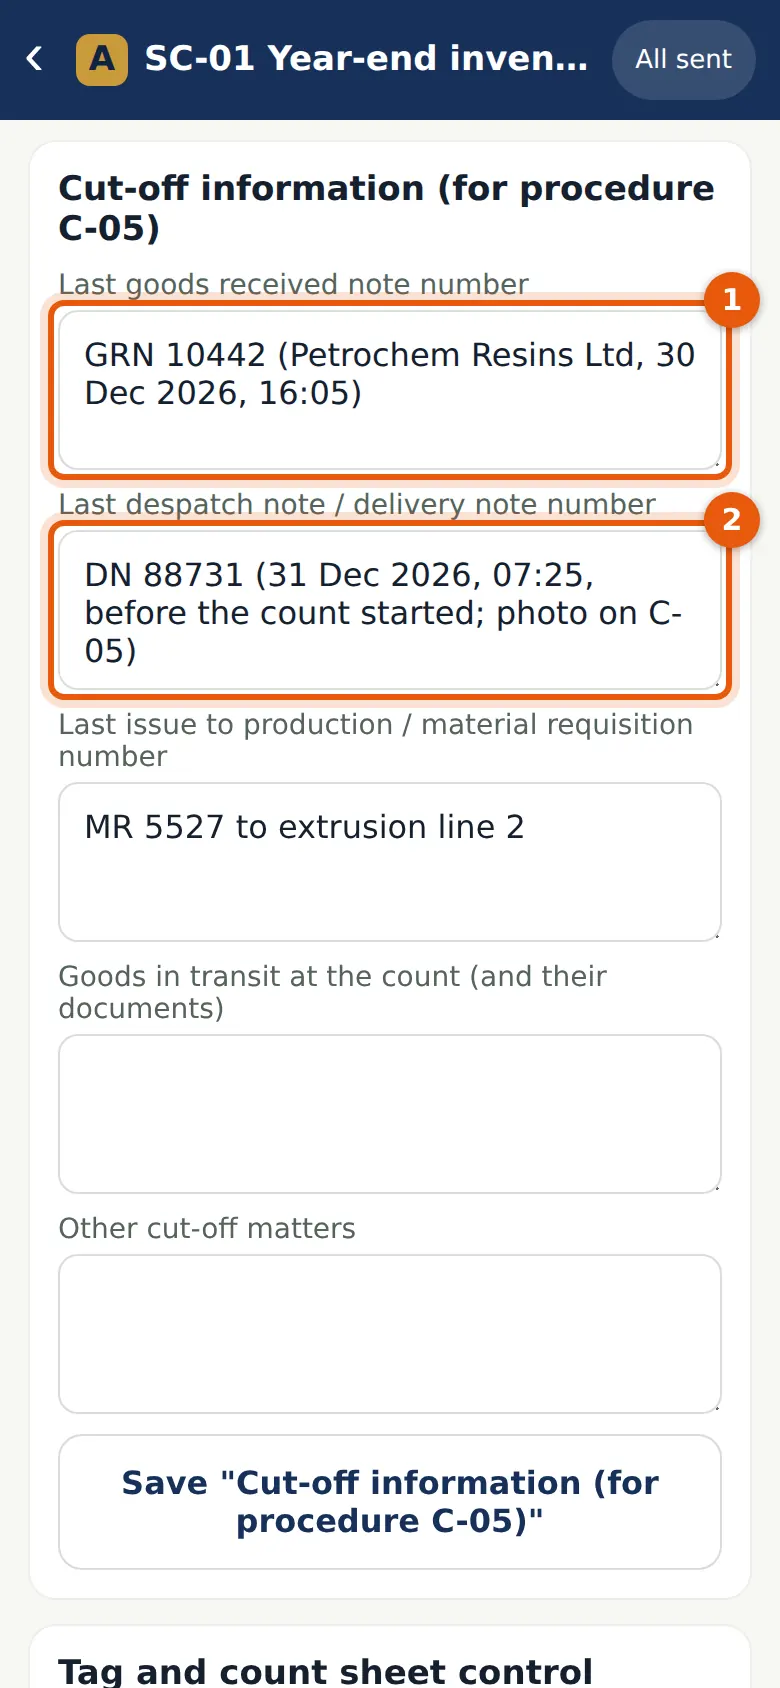
Five checklists record the observation (ISA 501.4(a), A1–A8): the count instructions, the observation of the count, the cut-off information, tag and count sheet control, and the conclusion on the count. The cut-off section takes the last goods received note (1), the last despatch note (2), the last issue to production and any goods in transit. They are the numbers procedure C-05 tests against the records after the year end. Each section is saved on its own, and the latest answers are used.
Who
The senior in charge of the count.
What to do
- Open the Checklists tab and complete each section during the count.
- Record the last documents (1, 2) before leaving, and choose Save under each section.
24.17 Counting without a signal
Why
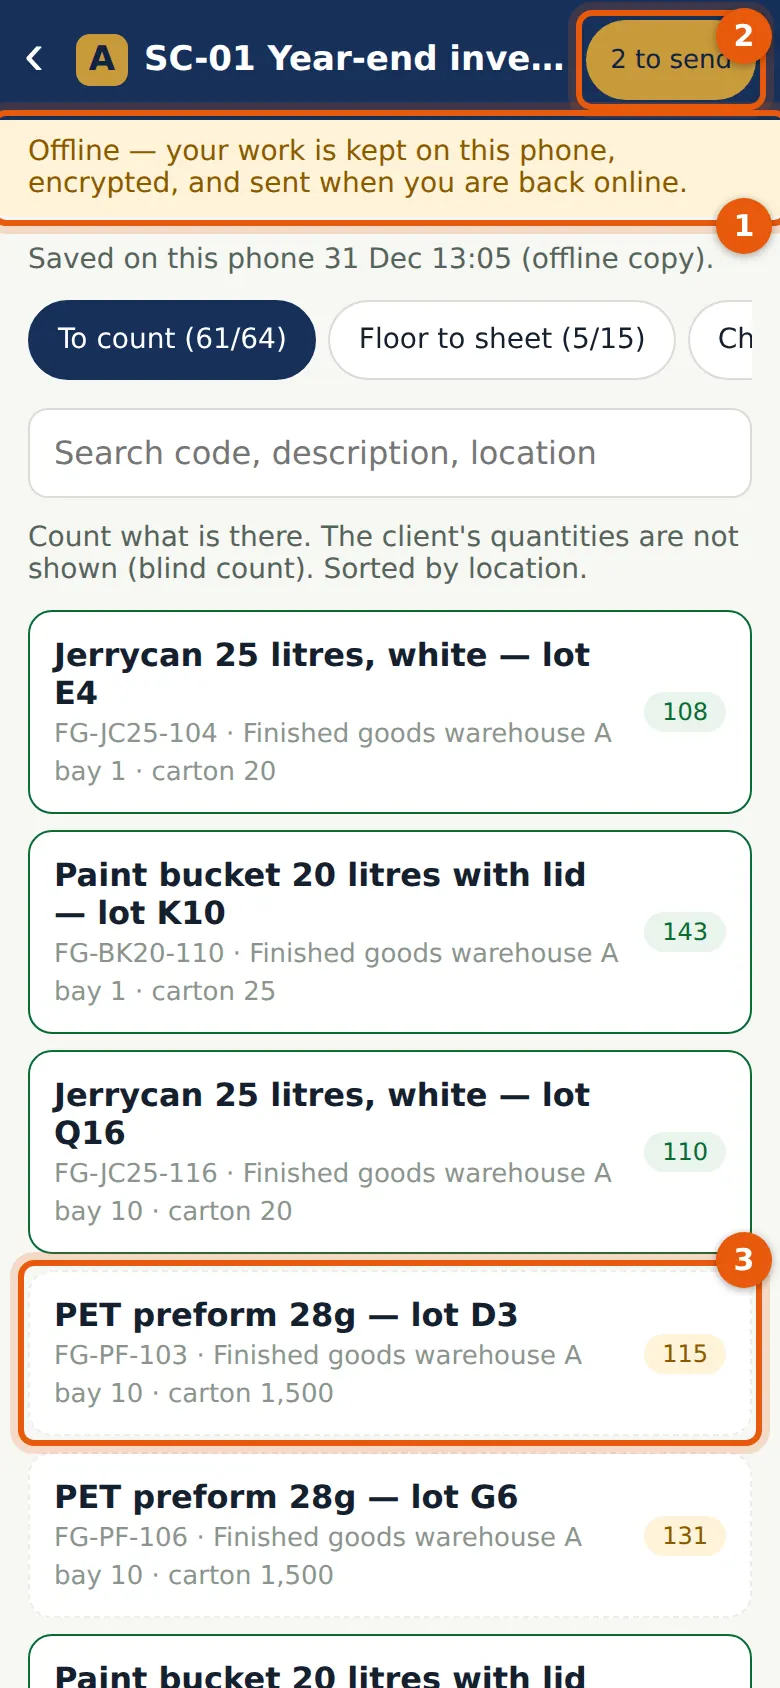
Without a connection the banner (1) says the work is kept on the phone, encrypted, and sent when the phone is back online. The status (2) counts the items waiting, and the counts not yet sent show in amber (3). When the signal returns, they are sent in the order they were made. Each count carries its own operation id, so a count sent twice is recorded once. An item AuditTrove refuses shows in the list with Retry and Remove.
Who
The counters.
What to do
- Keep counting as usual.
- Before signing out, go back to a place with a signal and check that the status says All sent.
24.18 Finish the count
Why
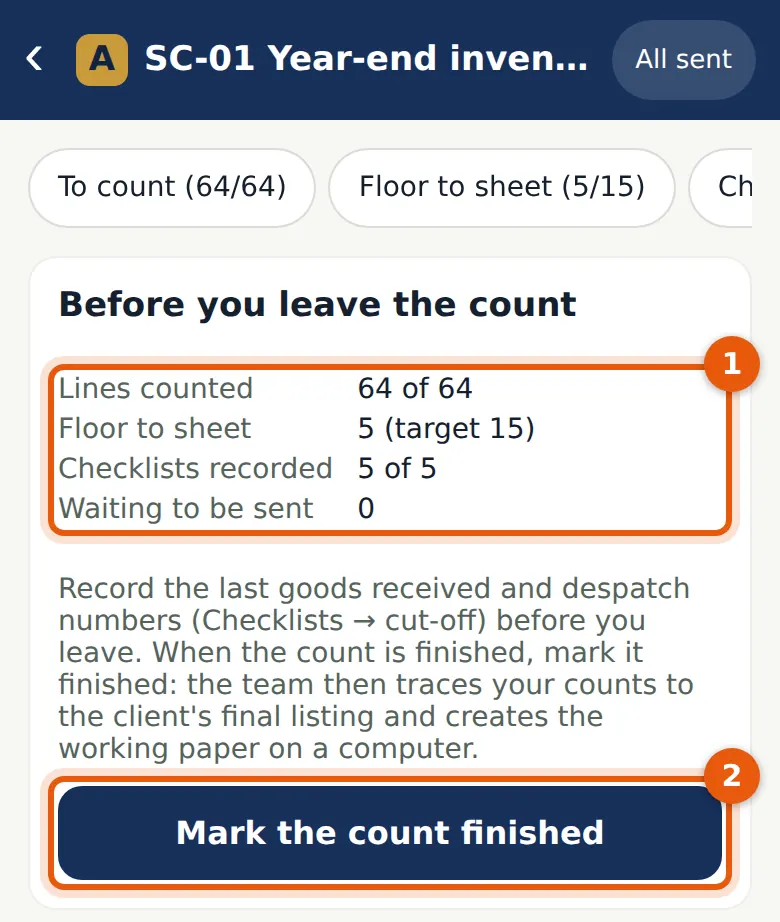
The summary (1) shows the lines counted, the floor-to-sheet items against the target, the checklists recorded and anything waiting to be sent. Marking the count finished (2) tells the manager that the team has left the count. Counts can still be added until the working paper is created; after that the count has to be reopened.
Who
The senior in charge of the count.
What to do
- Check the summary (1), complete the cut-off checklist if it is still blank, and choose Mark the count finished (2).
24.19 Lock and unlock
Why
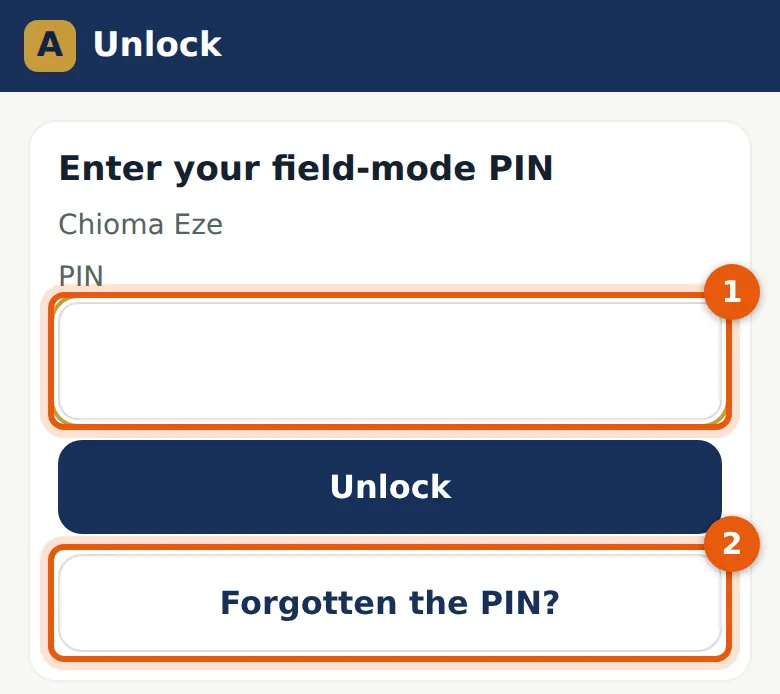
Field mode locks when you choose Lock, after 10 minutes in the background, and when it is opened again. Five wrong PINs remove the field data. Forgotten the PIN? (2) removes the field data so that you can sign in and choose a new PIN; anything not yet sent is lost.
Who
The owner of the phone.
What to do
- Enter the PIN (1) and choose Unlock.
24.20 The count back at the office
Why
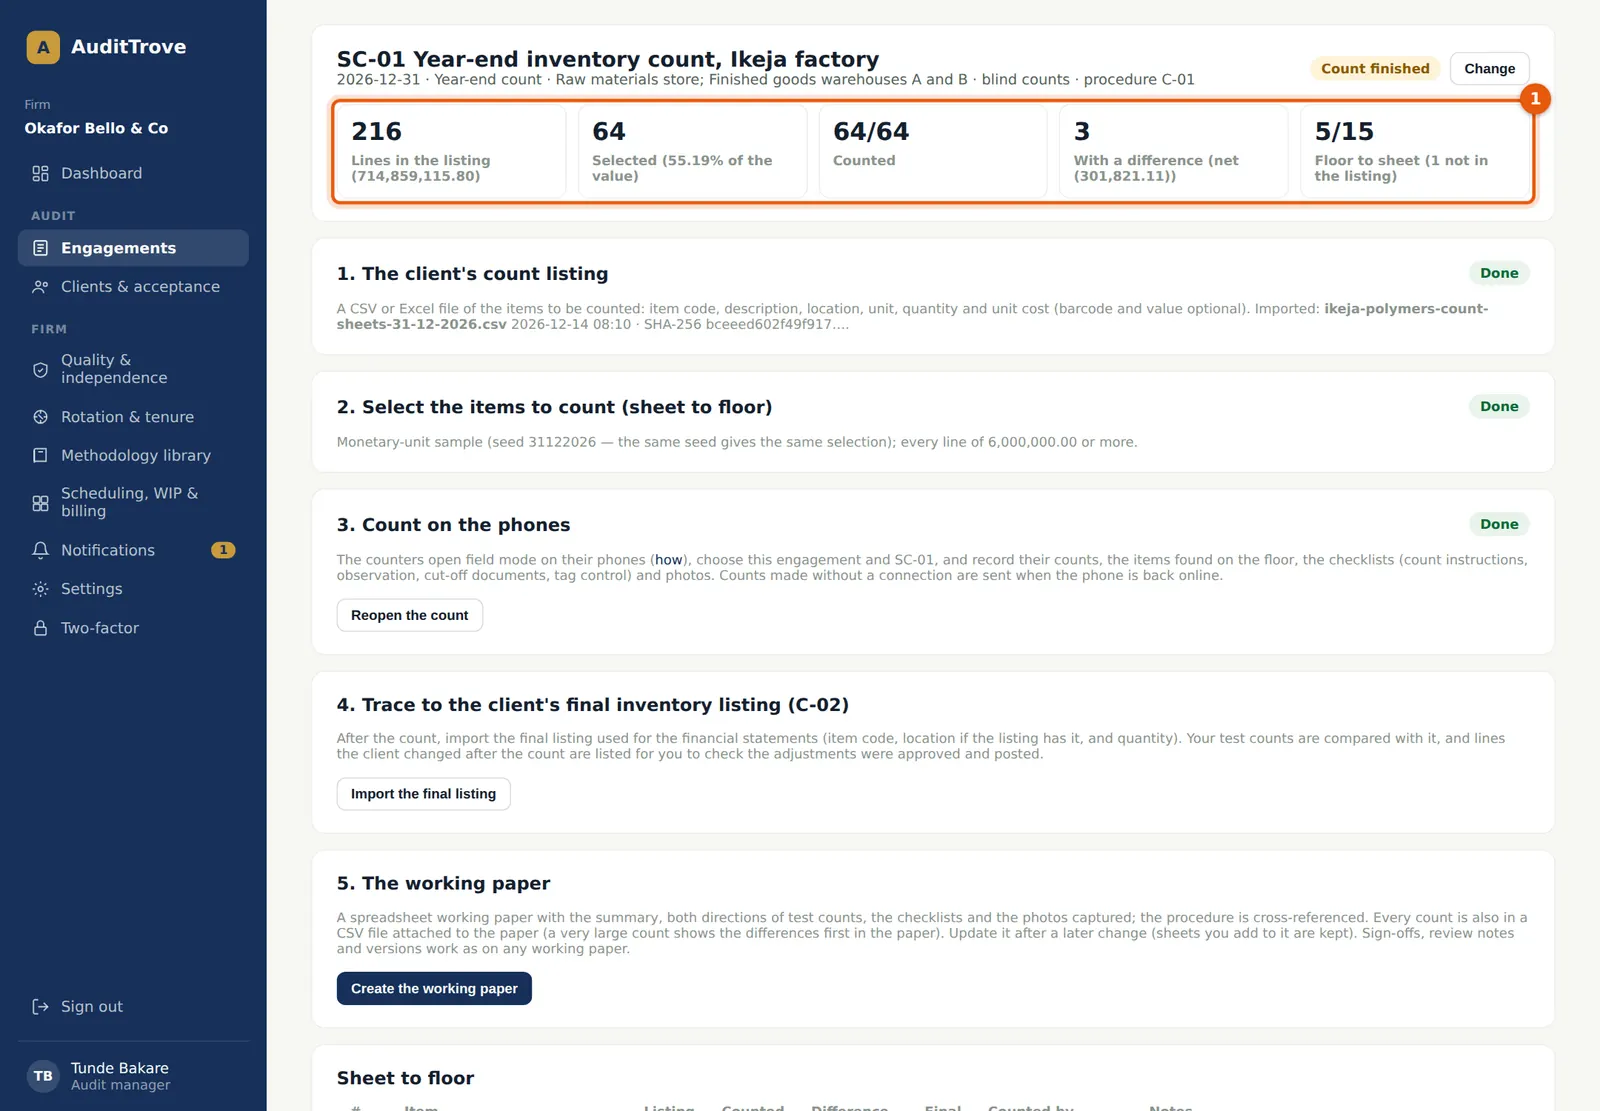
On the computer the Field work tab shows the count as Count finished. The figures (1) show all 64 selected lines counted, 3 with a difference, and 5 floor-to-sheet items, 1 of them not in the listing. Differences are valued at the line's unit cost. Below them are the test counts from the sheet to the floor and from the floor to the sheet, with who counted, when and where.
Who
Manager.
What to do
- Open Field work and choose the count.
- A partner or manager can choose Reopen the count, with a reason, if counts have to be added.
24.21 The test counts
Why
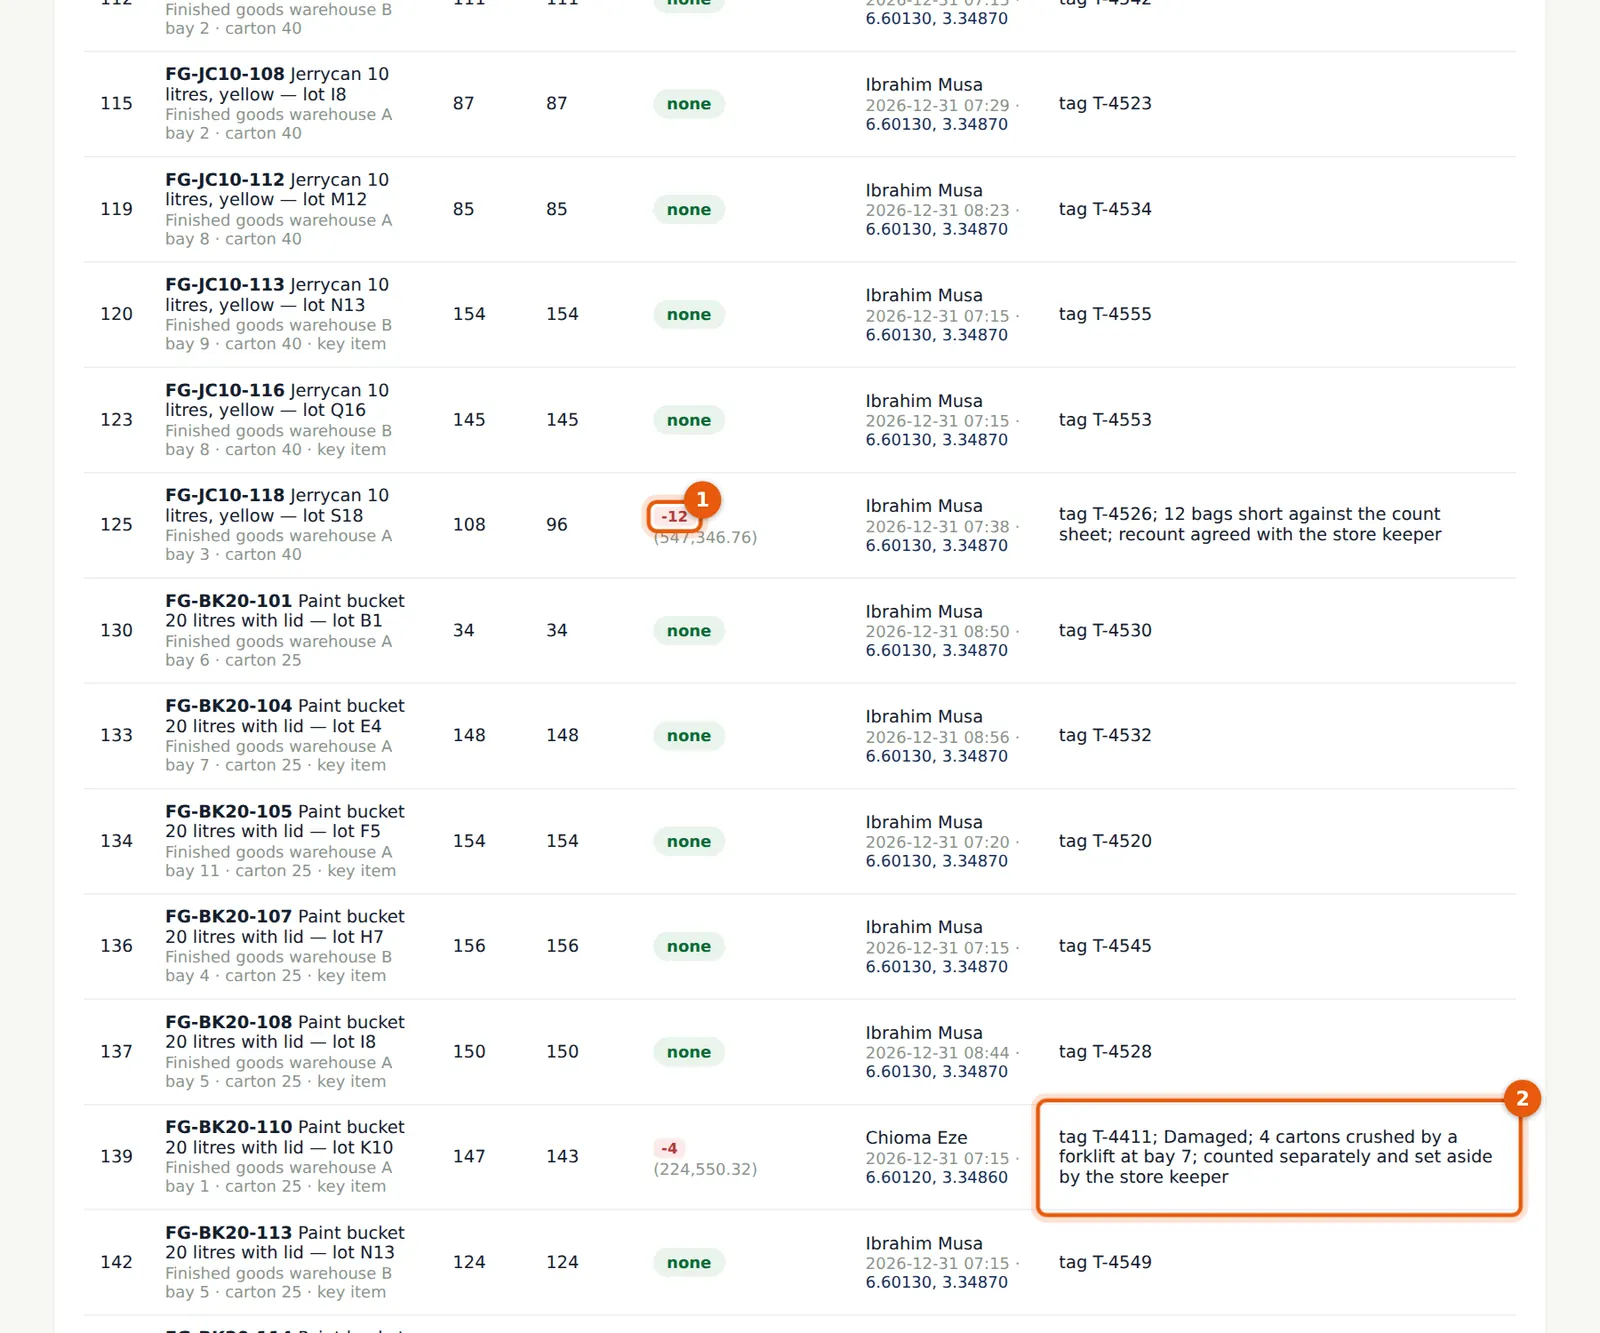
Each line shows the client's quantity, the count and the difference (1), valued at the line's unit cost, with the counter, the phone's time, the place and the notes (2). Ibrahim found 12 bags short on one line and agreed a recount with the store keeper. Chioma recorded the 4 crushed cartons as damaged. Differences are followed up with the client and in the misstatements and inventory valuation work.
Who
Manager and senior.
What to do
- Review the differences (1) and the notes (2).
- Follow up each difference with the client; take damaged and obsolete items into the inventory valuation work.
24.22 Trace to the client's final inventory listing
Why
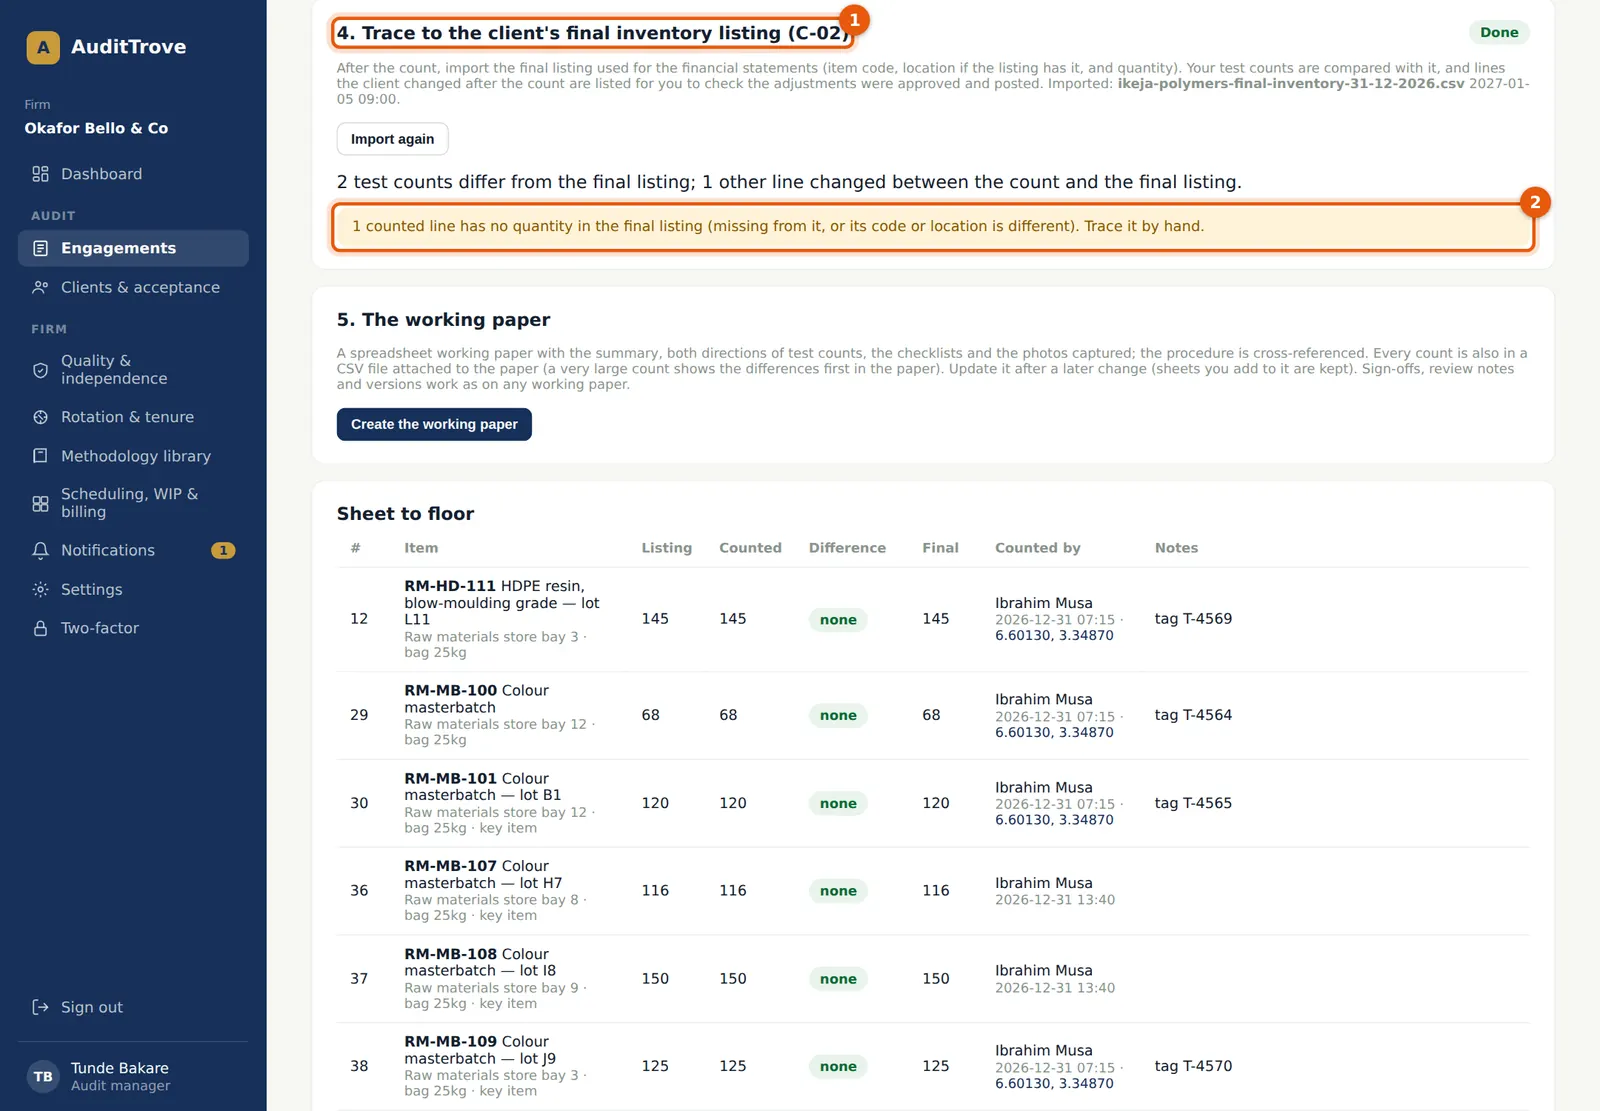
The final inventory listing is the one used for the financial statements (procedure C-02). Import it in step 4 (1); the whole file is read in one go, up to 20,000 rows. Rows of the same item are added together. Each row is matched by item code and location, or by code alone when the item has a single line in the count listing. The step reports the test counts that differ from the final listing and the lines changed between the count and the final listing. Counted lines with no quantity in the final listing are reported as not traced (2) and are never shown as clean. Rows that match nothing are listed with their row numbers.
Who
Manager or senior.
What to do
- Choose Import the final listing in step 4 and match the columns: item code, location if the listing has it, and quantity.
- Follow up each line reported (2), and check that the adjustments after the count were approved and posted.
24.23 Create the working paper
Why
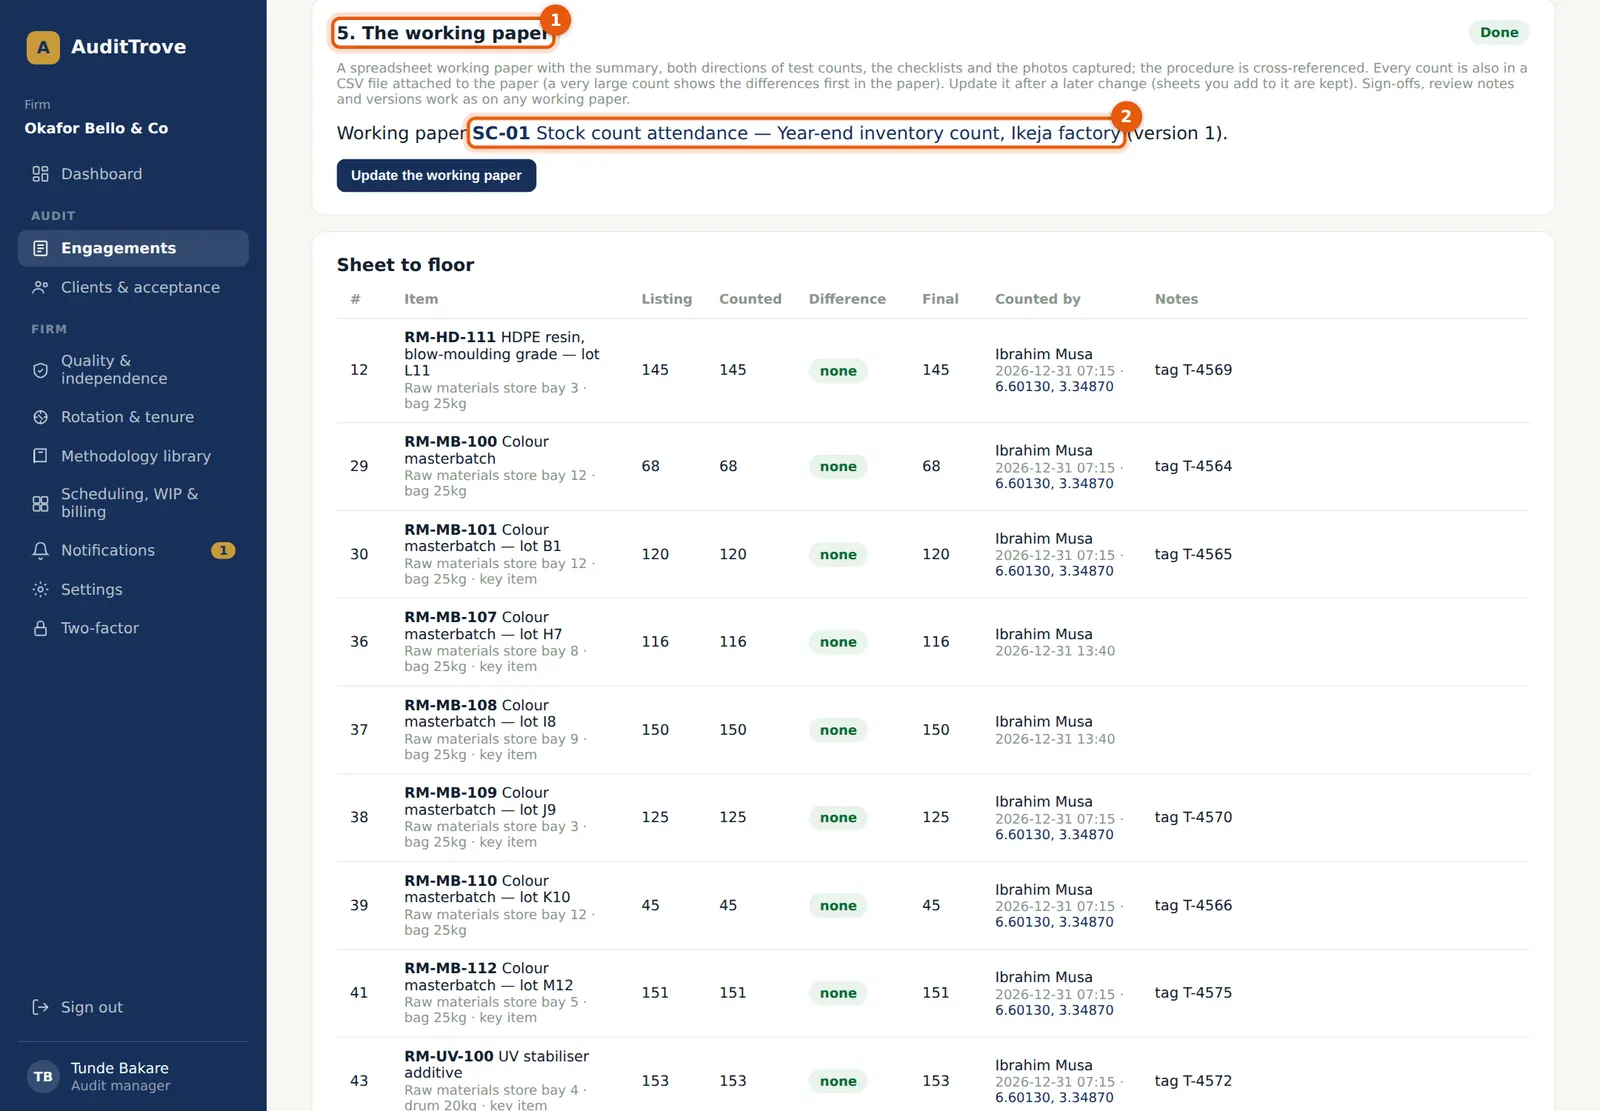
Create the working paper (1) builds a spreadsheet working paper, SC-01 (2), with four sheets: Summary, Sheet to floor (with the difference formulas), Floor to sheet, and Observations (the checklists and the list of photos). Every count is also in a CSV file attached to the paper. A new version of the CSV is attached on each update. Procedure C-01 gets the W/P reference if it has none and is not signed. Once the paper exists, counts and checklists are closed until the count is reopened. Update the working paper rewrites the four sheets and keeps any sheets the team added.
Who
Manager.
What to do
- Choose Create the working paper (1).
- Open the paper with its link (2).
24.24 The stock count working paper
Why
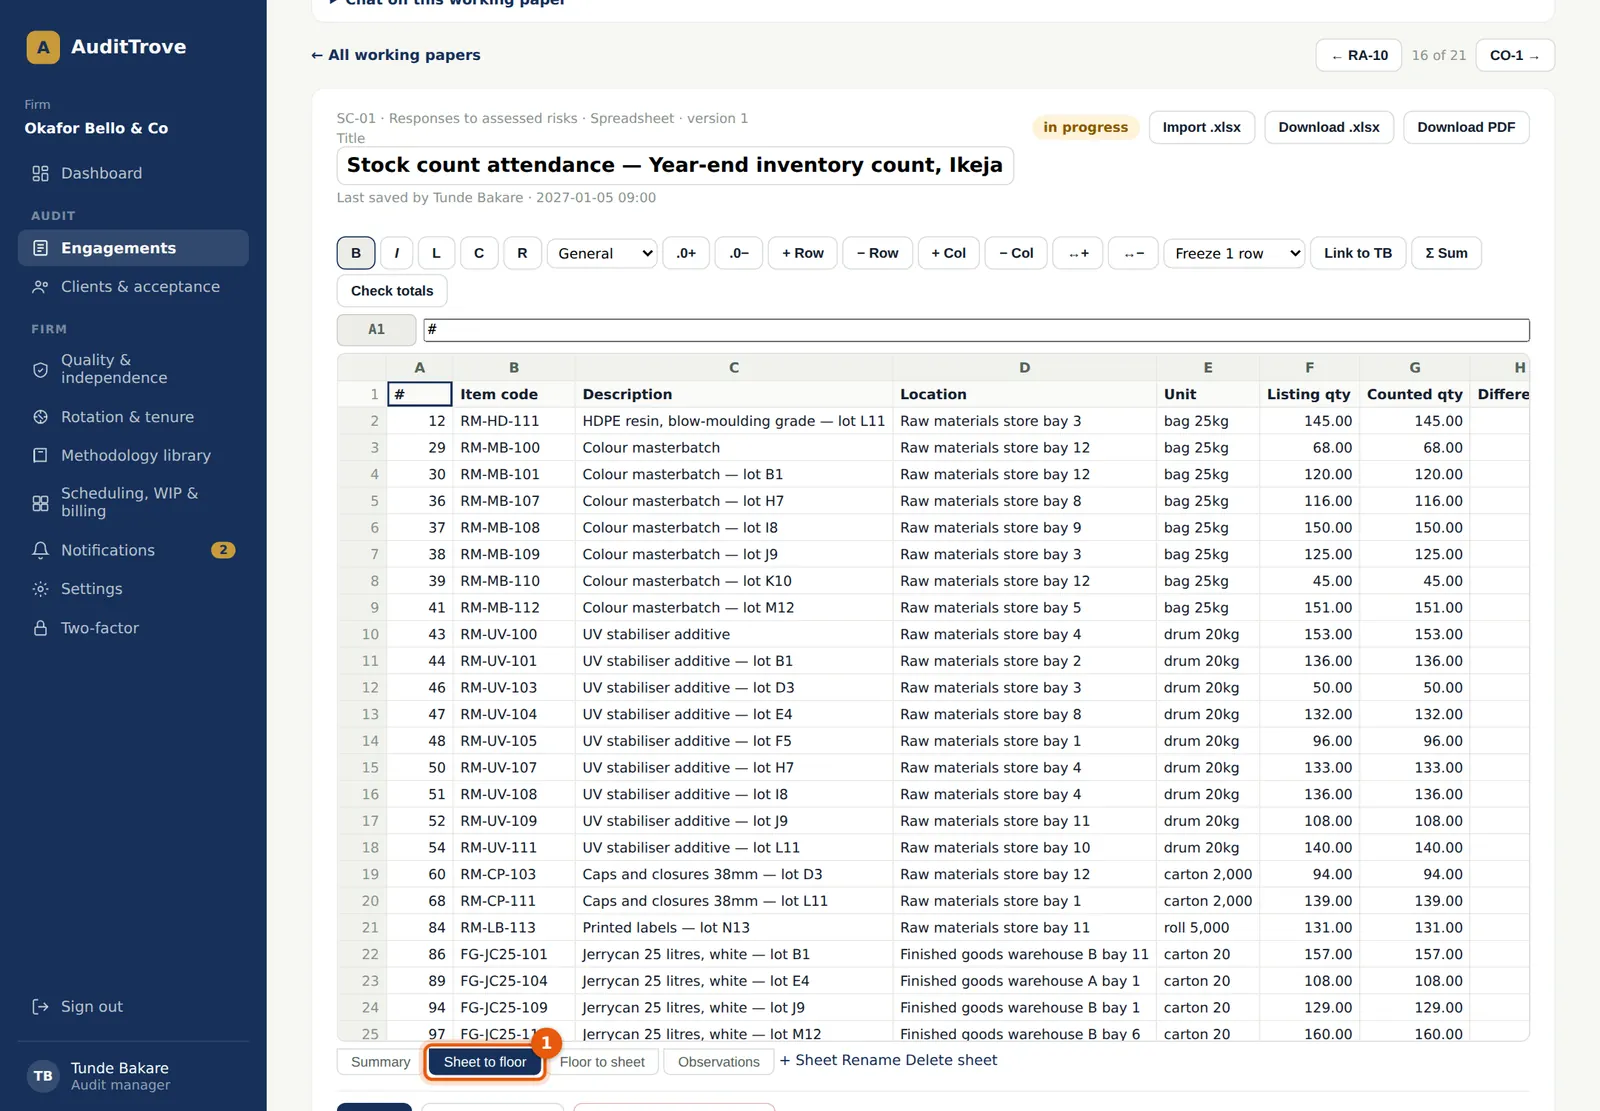
The paper is an ordinary spreadsheet working paper: it has versions, review notes and sign-offs, and a change after sign-off clears them. When a count has more lines than a spreadsheet paper can hold (20,000 cells, 400 KB), the paper shows the differences and the lines not traced first and says so. The totals are still for all lines, and every line is in the attached CSV.
Who
The team prepares and reviews it as any working paper.
What to do
- Open each sheet with its tab (1) and write the conclusion.
- Prepare and sign off the paper; the reviewer signs as reviewed (chapter 10).
24.25 Captured evidence
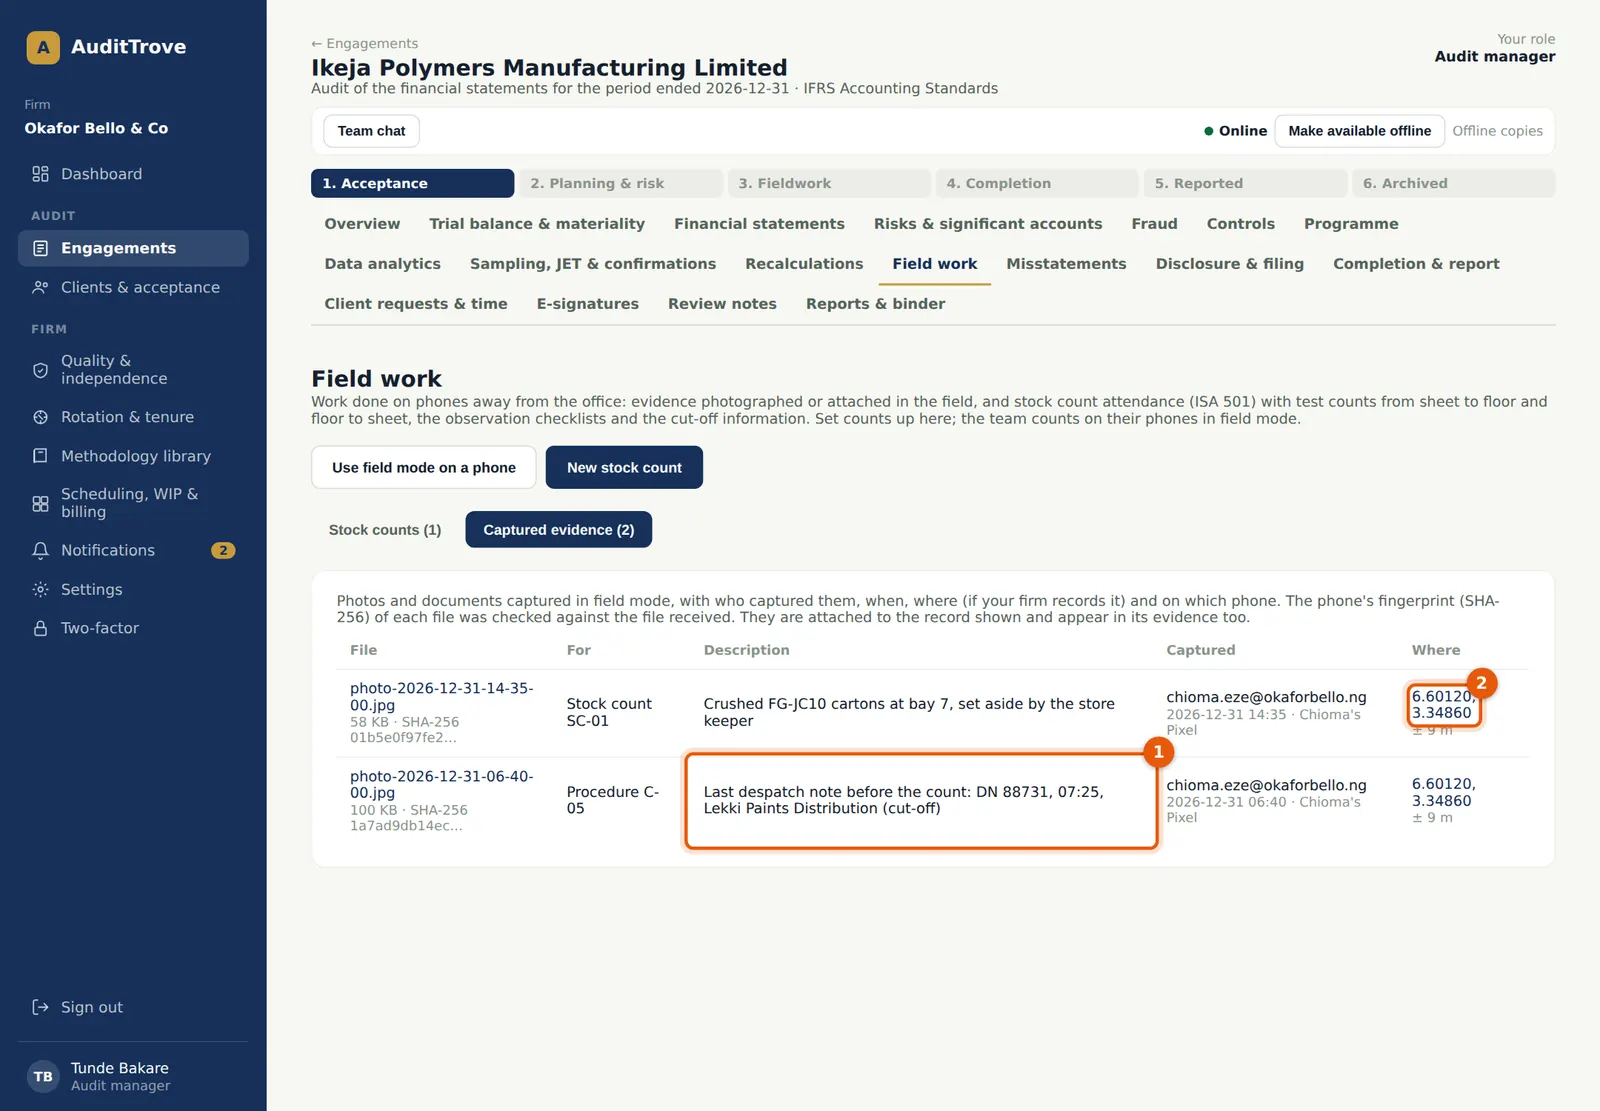
Why
Every photo and document captured in field mode is listed with the record it is attached to, the description (1), who captured it, when, on which phone, its fingerprint and, where recorded, the place (2) with a link to a map. The files are attached to the procedure or the count, so they also appear in that procedure's evidence and in the binder.
Who
The engagement team; reviewers and inspectors can read it.
What to do
- Choose Captured evidence on the Field work tab.
- Open a file with its name, or the place with its link (2).
24.26 The firm's phones
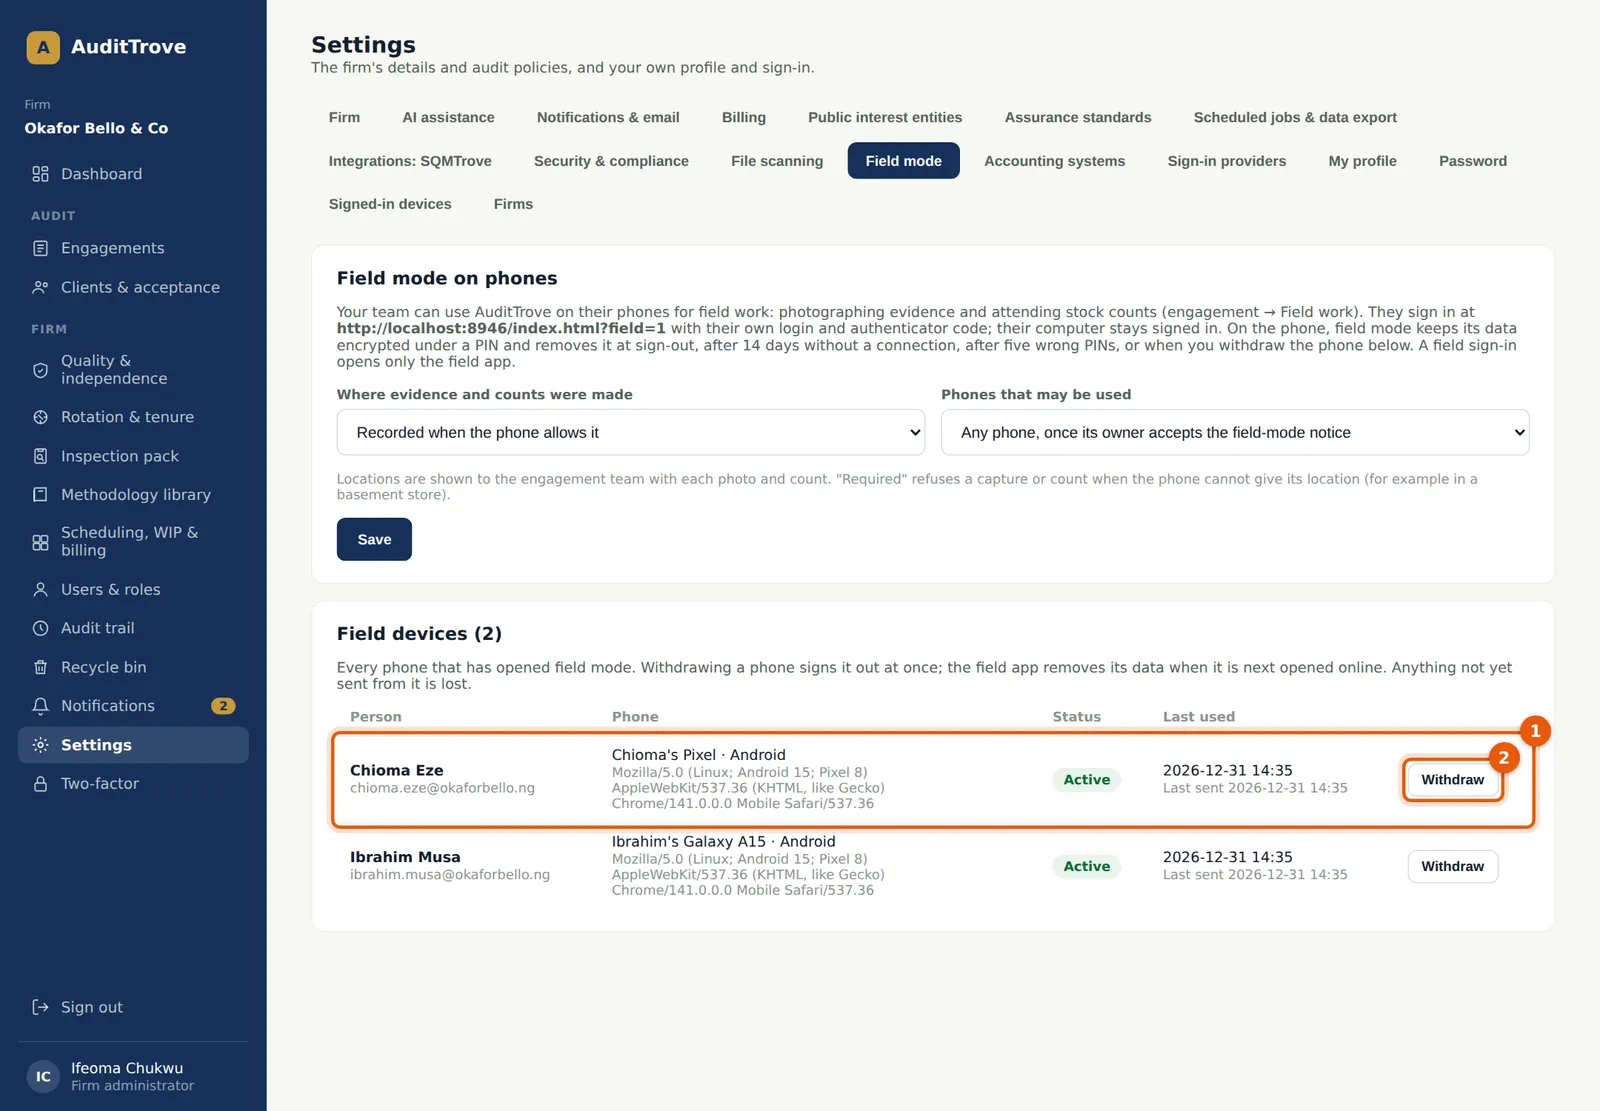
Why
The list shows each phone (1) with its owner, its name and browser, its status (pending, active or withdrawn) and when it was last used and last sent work. Each phone also has its own secret, kept in a cookie the field app cannot read. A copy of the phone's browser storage on another device is therefore refused, and that device has to sign in as a new phone.
Who
Owner or firm administrator.
What to do
- Open Settings → Field mode and check the list.
- Choose Approve for a pending phone under the approval policy, or Withdraw (2) for a phone that is lost, stolen or no longer used.
24.27 Withdraw a phone
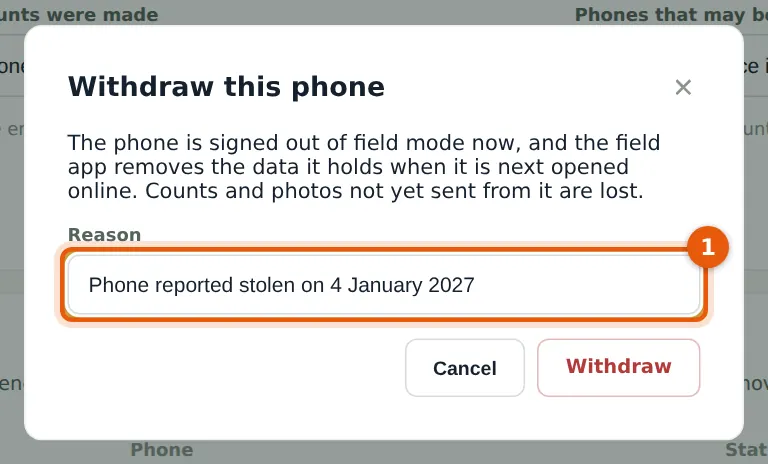
Why
Withdrawing a phone needs a reason (1), which goes into the audit trail. The phone's field sessions end at once. The next time the phone opens AuditTrove online it is told that it has been withdrawn, and field mode removes its data. Counts and photos not yet sent from it are lost. A withdrawn phone can be allowed again later.
Who
Owner or firm administrator.
What to do
- Enter the reason (1) and choose Withdraw.
- If the person also used the phone for their authenticator, reset their two-factor authentication too (step 1.13).