Steps in this chapter (22)
Run payroll for several client companies, bill them, set up AI assistance with your own provider, and work offline.
Accounting firms that run payroll for several client companies use practice mode. Companies can also switch on AI assistance with their own AI provider, and people can keep an offline copy of their data on their device.
In the illustration, Nkechi Okafor of Okafor Bello & Co (a fictional firm of chartered accountants) runs payroll for two clients and has a read-only login at Savannah Harvest for her review work.
14.1 Sign in to several companies
Why
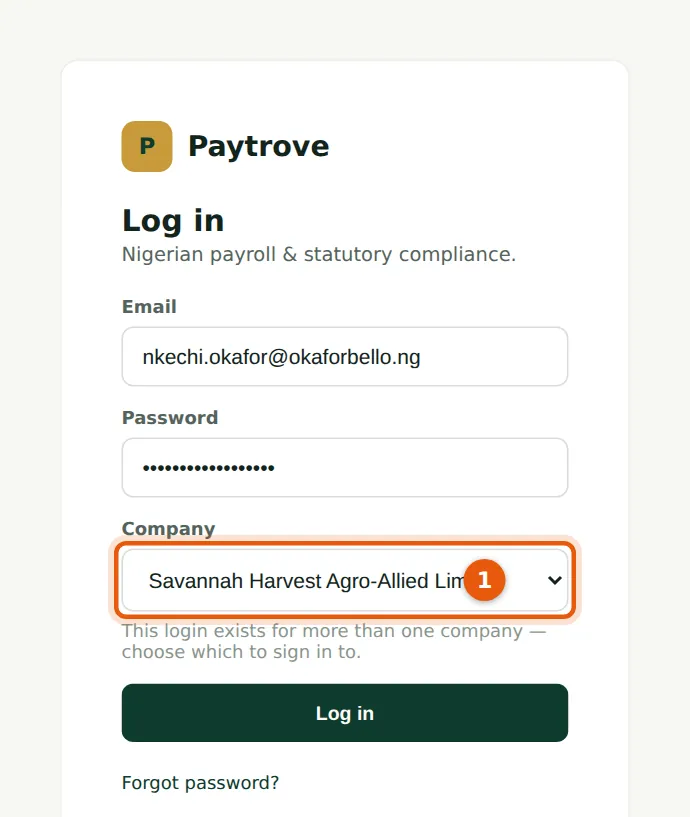
Each company has its own logins, so an accountant holds a login in each client company with the same email address. When the password opens more than one company, PayTrove asks which to open. Each company's login has its own authenticator entry, and switching into a company asks for that company's code once per session.
Who
Accountants running payroll for clients.
What to do
- Enter your email and password and choose Log in. Choose the company (1) and Log in again, then enter that company's code.
- Switch to another company with the company name at the top of the menu, and give its code. The practice view then includes it.
14.2 Switch between companies
Why
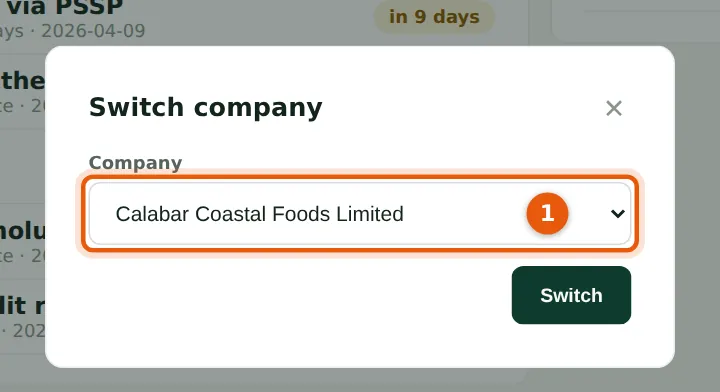
Anyone with a login in more than one company sees the current company's name at the top of the menu. Choosing it opens Switch company. A company already opened at sign-in switches without the password; otherwise enter your password for that company. Each company asks for its own two-factor code once per session.
Who
Anyone with logins in several companies.
What to do
- Choose the company name at the top of the menu, pick the company (1) and choose Switch.
14.3 The practice view
Why
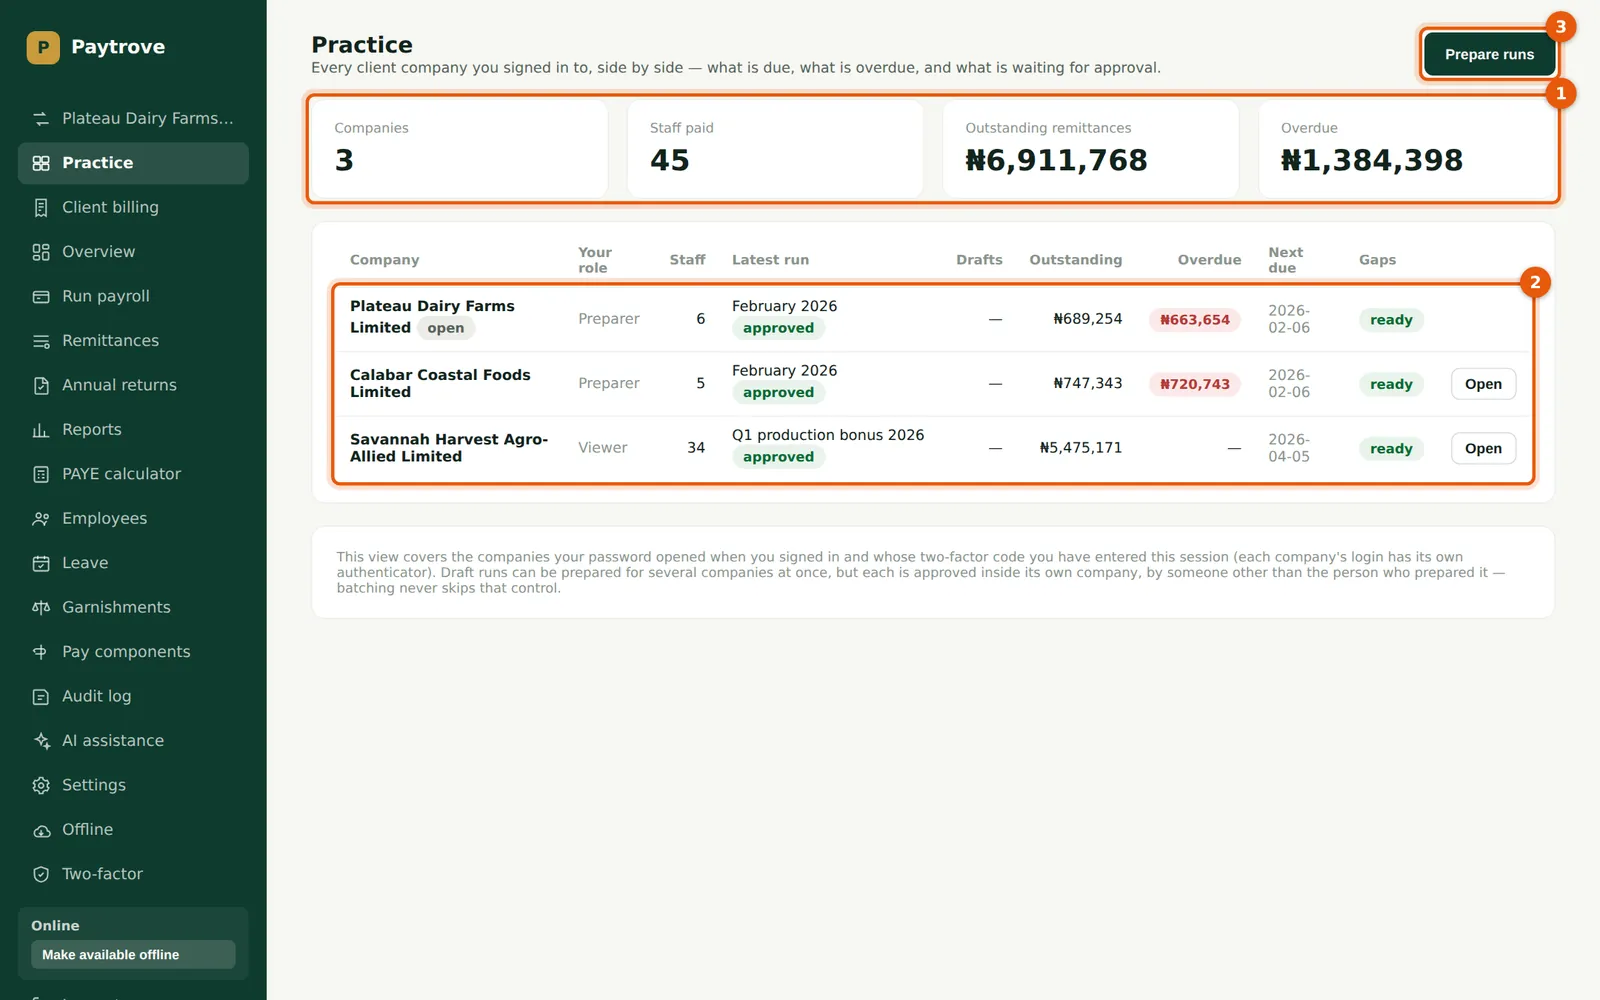
The practice view shows each company you have signed in to this session: your role, staff, latest run, drafts waiting for approval, outstanding and overdue remittances, the next due date and whether any records have gaps. Overdue remittances are shown in red, so a client that has not paid PAYE or pension stands out.
Who
Accountant with logins in more than one company.
What to do
- Read the totals (1) and the table (2). Choose Open to switch to a company.
- Choose Prepare runs (3) to create drafts for several companies at once.
14.4 Prepare runs for several companies
Why
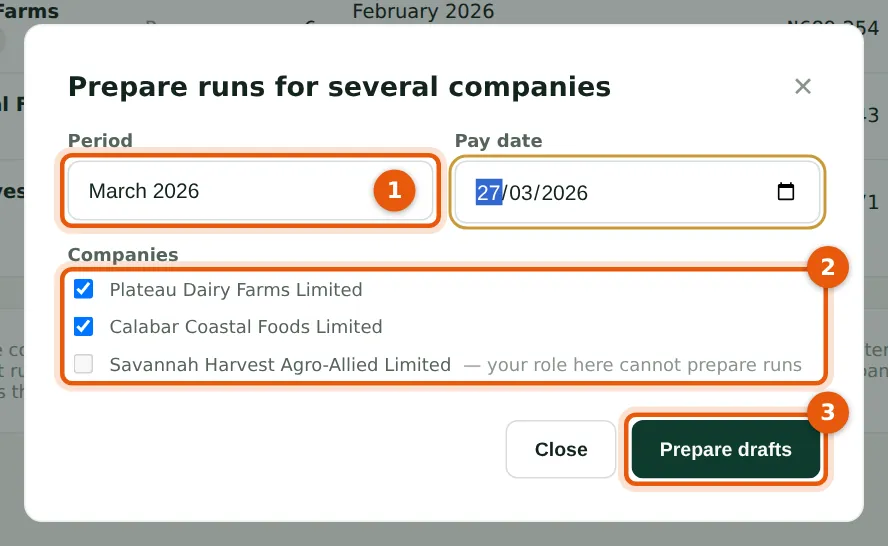
Draft runs can be prepared for several companies in one go, but approval is never batched: each run is approved inside its own company, by someone other than the person who prepared it. A company where your role cannot prepare runs (here, Viewer at Savannah Harvest) cannot be picked.
Who
Accountant (Preparer or Admin in the client companies).
What to do
- Enter the period (1) and pay date.
- Tick the companies (2) and choose Prepare drafts (3).
14.5 The drafts are ready
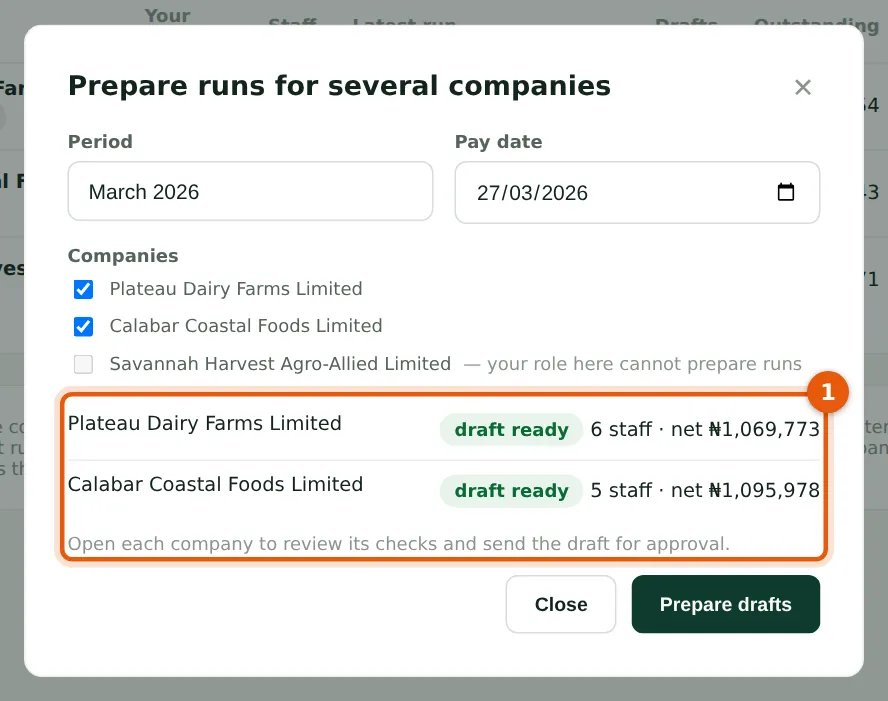
Why
Each result (1) shows the staff count and net pay of the new draft. Open each company to review the checks and send the draft for approval.
Who
Accountant.
What to do
- Open each company, check the draft and write the memo for the client's approver.
14.6 Bill your clients
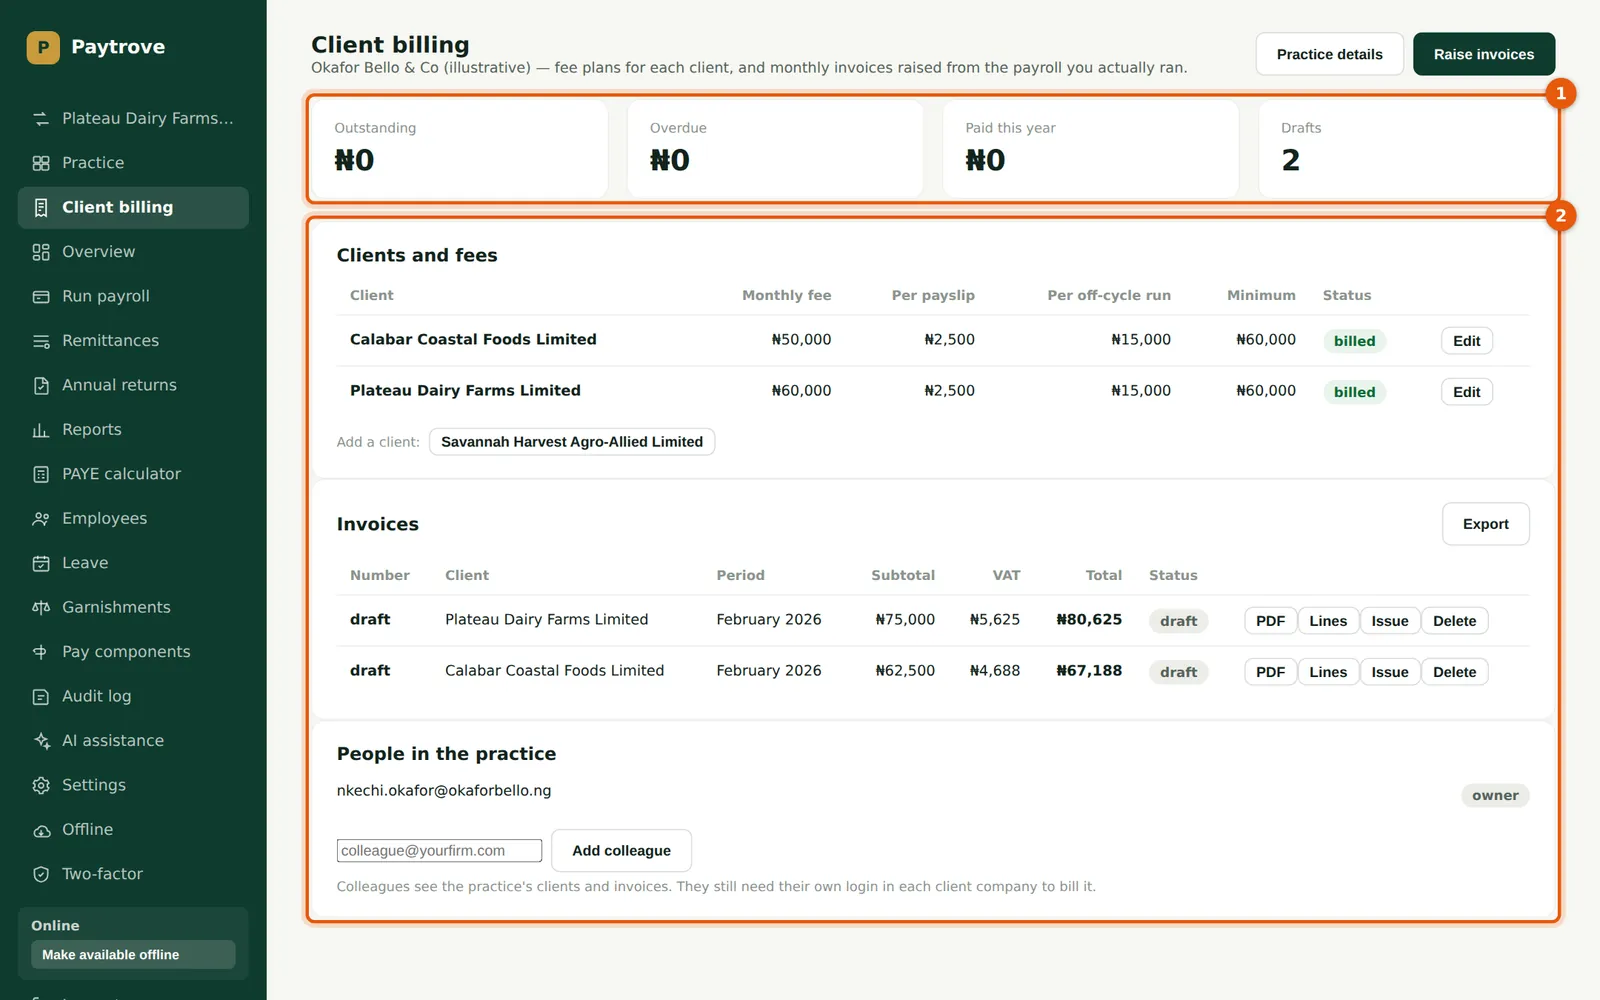
Why
A practice sets up its firm details and a fee plan per client — monthly fee, per payslip, per off-cycle run and a minimum — and raises monthly invoices from the approved runs actually processed, with VAT (7.5% by default). Numbers are given when an invoice is issued and are never reused.
Who
Accountants in the practice.
What to do
- Check the totals (1): outstanding, overdue, paid and drafts.
- Under Clients and fees (2) choose Edit to set each client's fee plan. Choose Raise invoices for a month to create drafts, then Lines to add one-off lines, Issue to number and send, PDF for the invoice and Mark paid when paid.
14.7 Raise the month's invoices
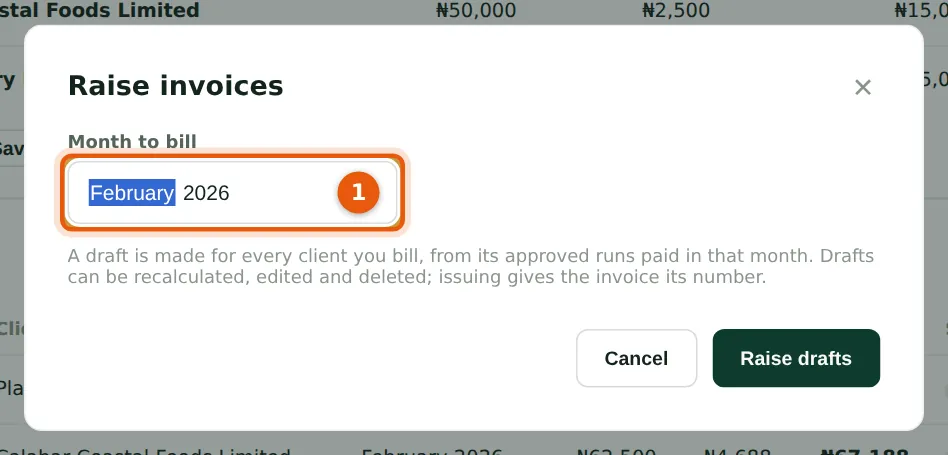
Why
PayTrove makes a draft invoice for every client you bill, from its approved runs paid in the chosen month: the monthly fee, payslips at the per-payslip fee, off-cycle runs, the minimum, and VAT.
Who
Accountant in the practice.
What to do
- Choose Raise invoices, choose the month (1) and confirm. Drafts can be recalculated, edited with Lines, or deleted.
14.8 Issue an invoice
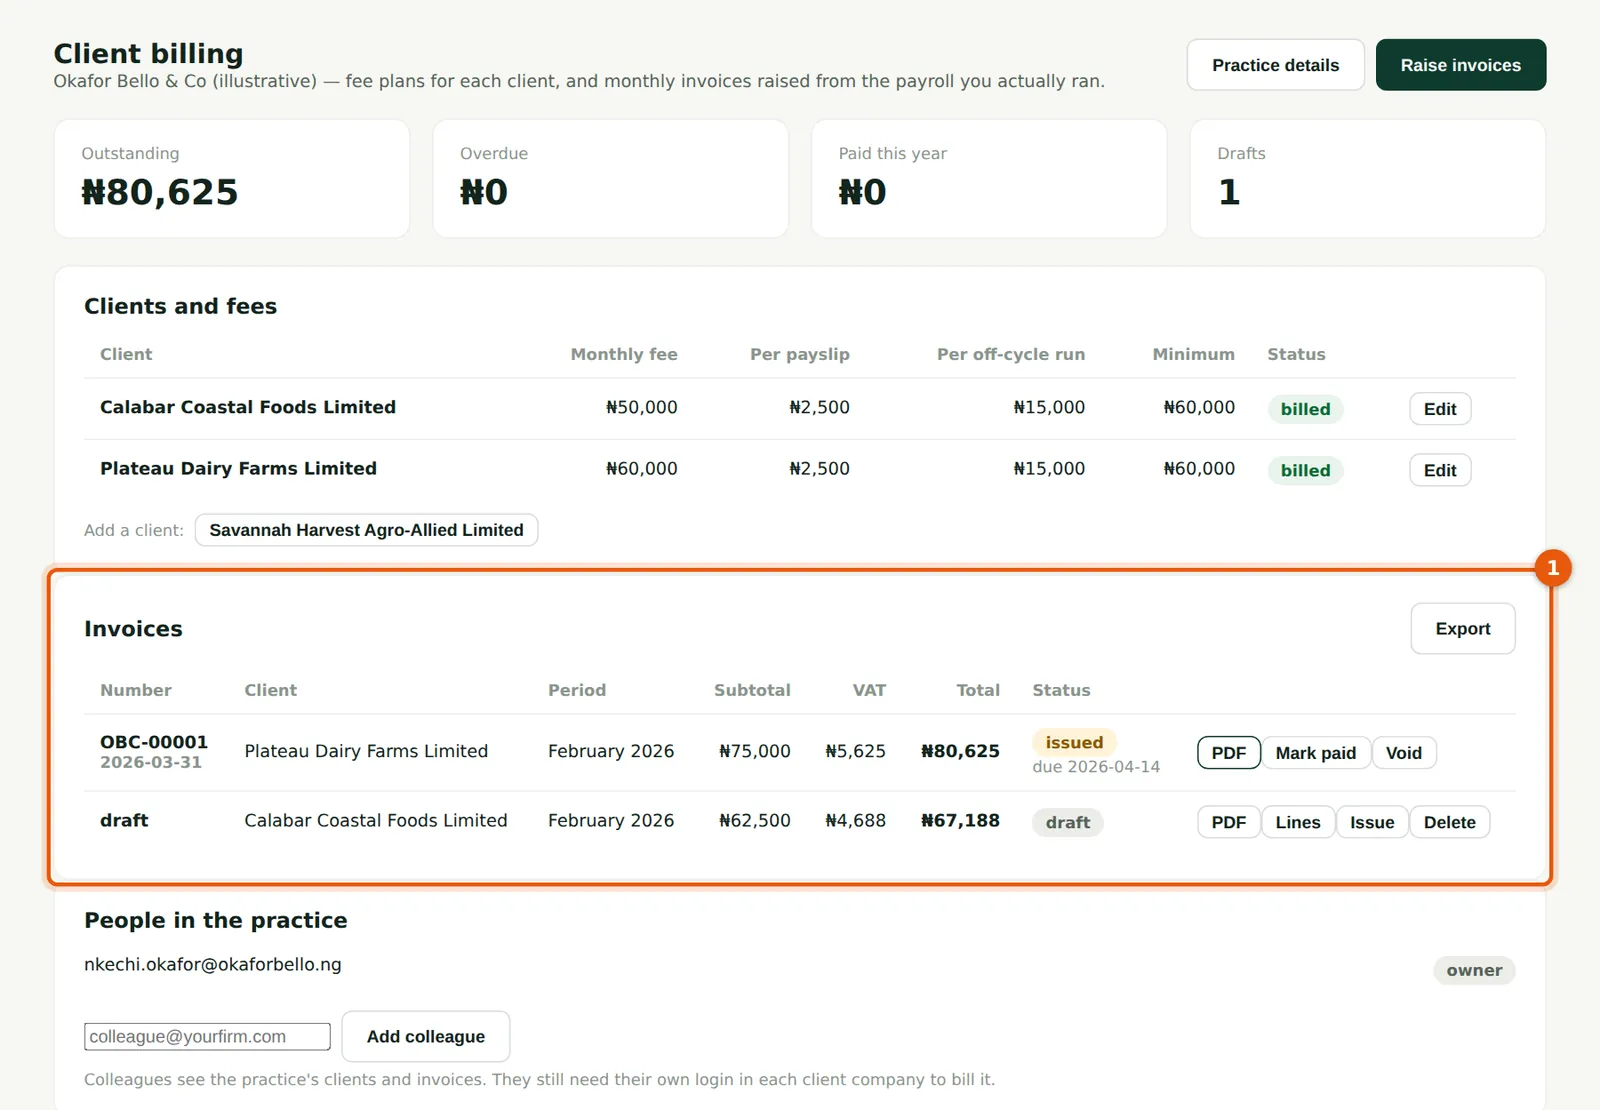
Why
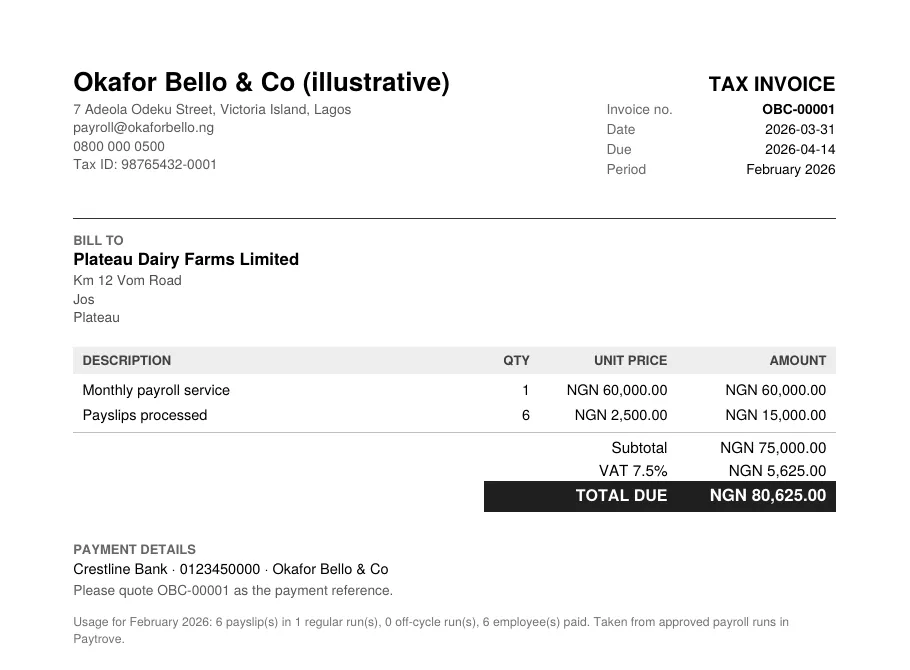
Issuing gives the invoice its number (here OBC-00001) and due date. Mark it paid with the date and reference when the client pays; an issued invoice can be voided with a reason, and its number is never reused.
Who
Accountant in the practice.
What to do
- Choose Issue on a draft (1), then PDF to download the invoice for the client.
14.9 The invoice PDF
Why
The invoice shows the practice's details, the client, the lines, VAT and the total, with the payment details from Practice details.
Who
Accountant in the practice.
What to do
- Send the PDF to the client with your usual covering email.
14.10 Set up AI assistance
Why
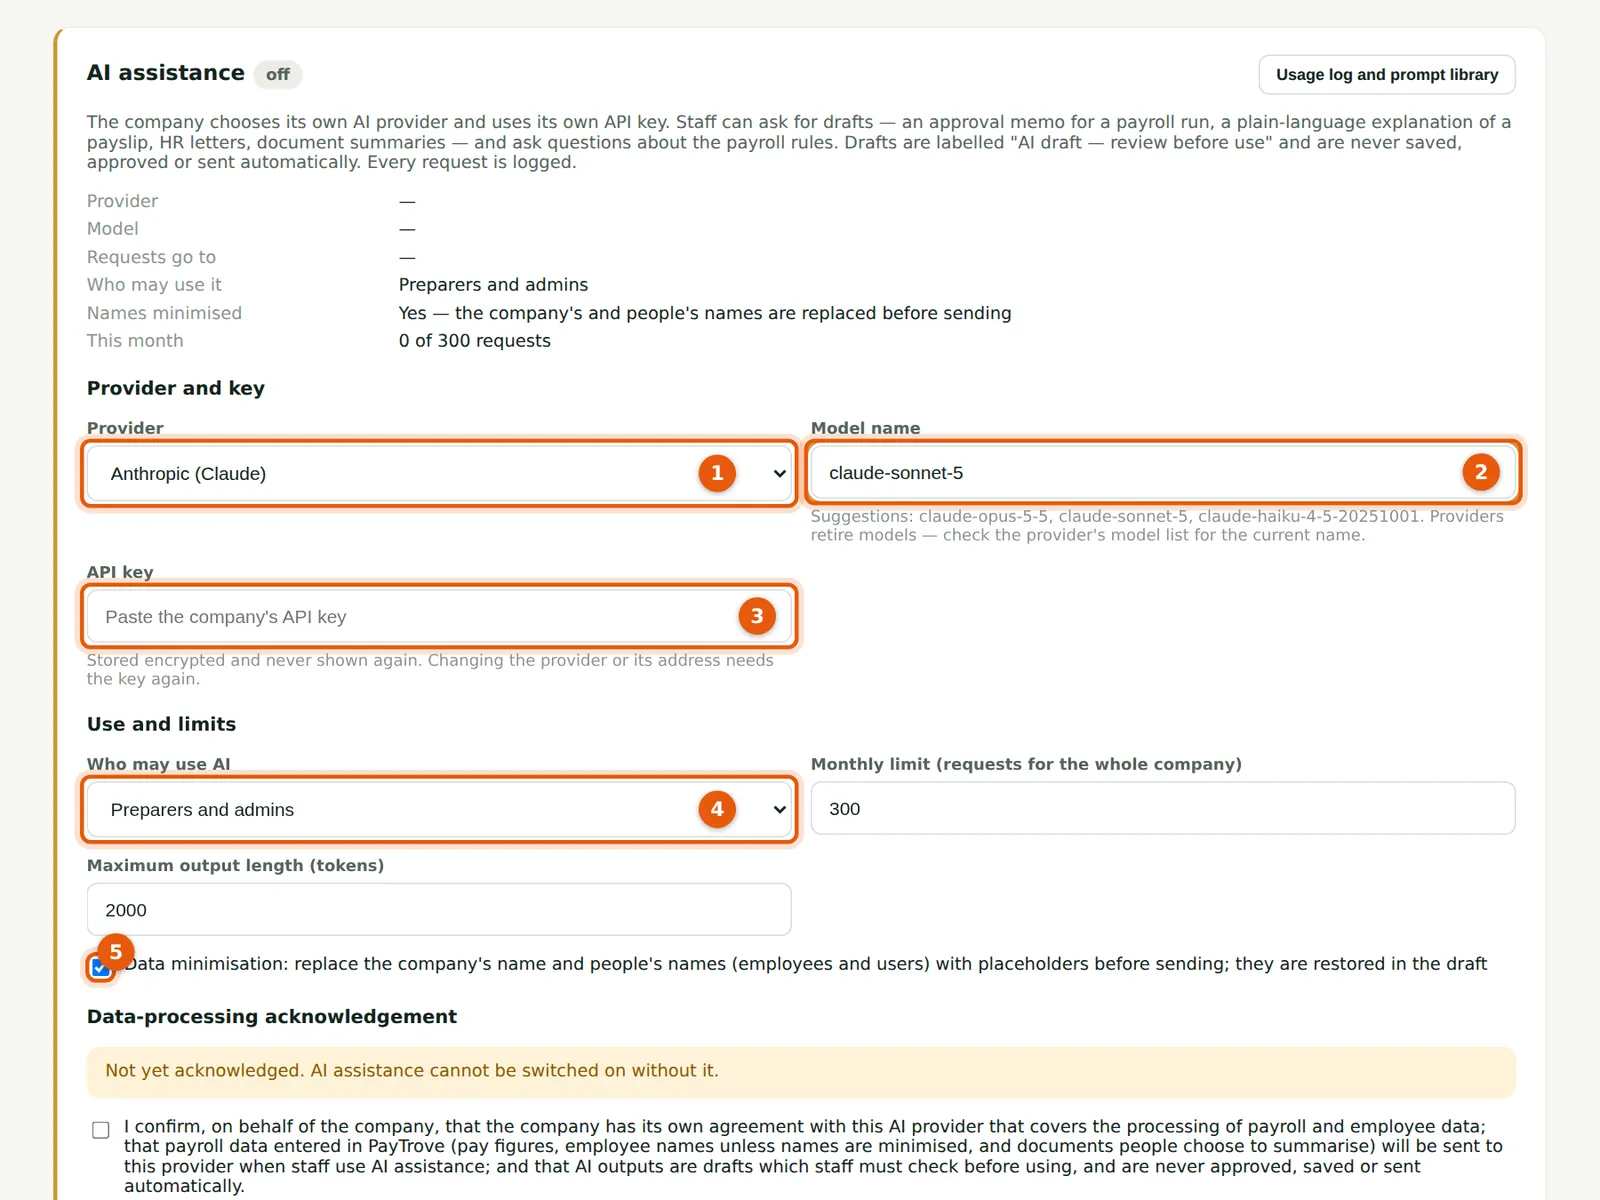
AI assistance is off until an Admin sets it up with the company's own AI provider and API key: Anthropic (Claude), OpenAI, Google Gemini, Azure OpenAI or an OpenAI-compatible service. The key is stored encrypted and never shown again. The company must confirm it has its own agreement with the provider covering payroll data. Savannah Harvest has not set AI up, so this manual shows the settings but no AI output.
Who
Admin.
What to do
- Choose the provider (1) and the model name (2) — the field suggests current models. Paste the company's API key (3).
- Choose who may use AI (4): employees, viewers, preparers or admins and above; the monthly limit (requests for the whole company) and the maximum length of answers.
- Leave data minimisation ticked (5): names of the company and people are replaced with placeholders before anything is sent, and restored in the draft.
14.11 Acknowledge, switch on and test
Why
Where to get a key: Anthropic — console.anthropic.com (API keys); OpenAI — platform.openai.com (API keys); Google Gemini — aistudio.google.com (Get API key); Azure OpenAI — the Azure portal (your Azure OpenAI resource → Keys and Endpoint); another OpenAI-compatible service — its own dashboard, with its https base address. The key belongs to your company and usage is billed to you by that provider, not by TroveUniverse. Keep the key secret; PayTrove stores it encrypted and shows only its last characters.
Who
Admin.
What to do
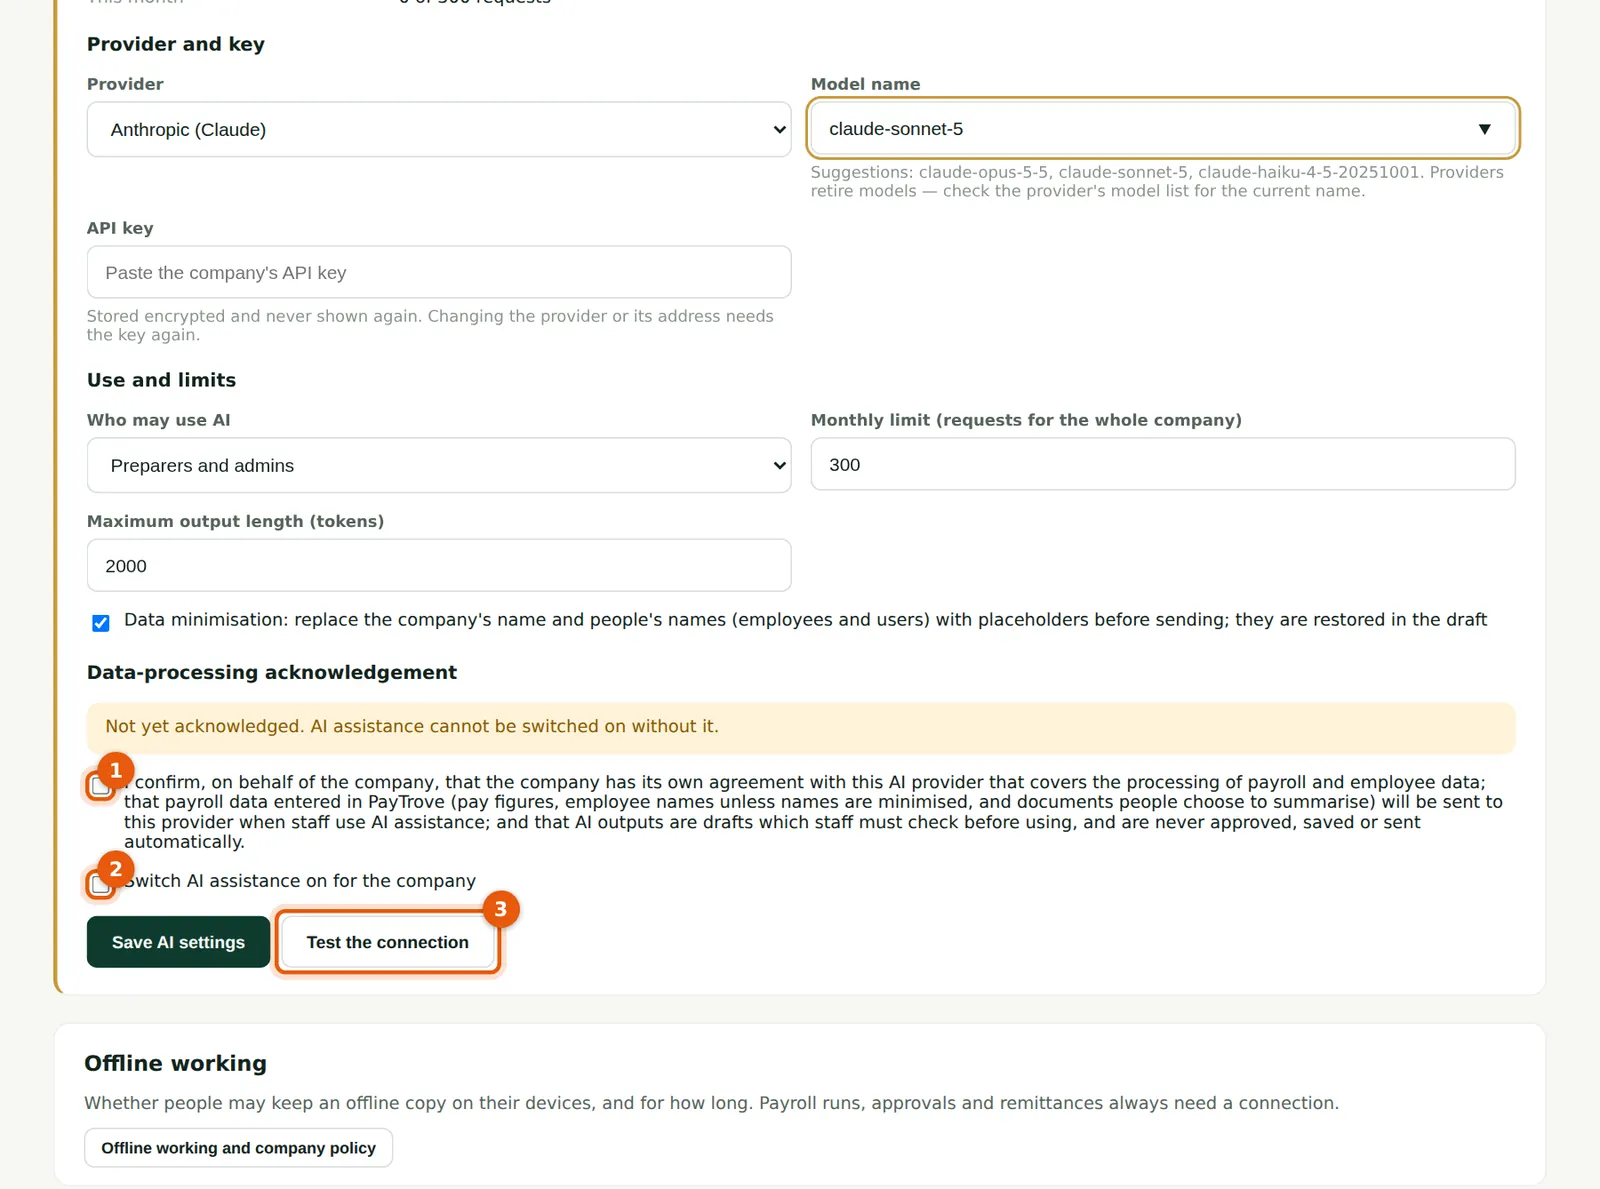
- Read and tick the data-processing acknowledgement (1): it confirms your company has its own agreement with the provider covering payroll data.
- Tick Switch AI assistance on for the company (2) and choose Save AI settings.
- Choose Test the connection (3). If the test fails, check the key, the model name and, for Azure, the resource and deployment names. Remove the key at any time with Remove the key.
14.12 Azure OpenAI settings
Why
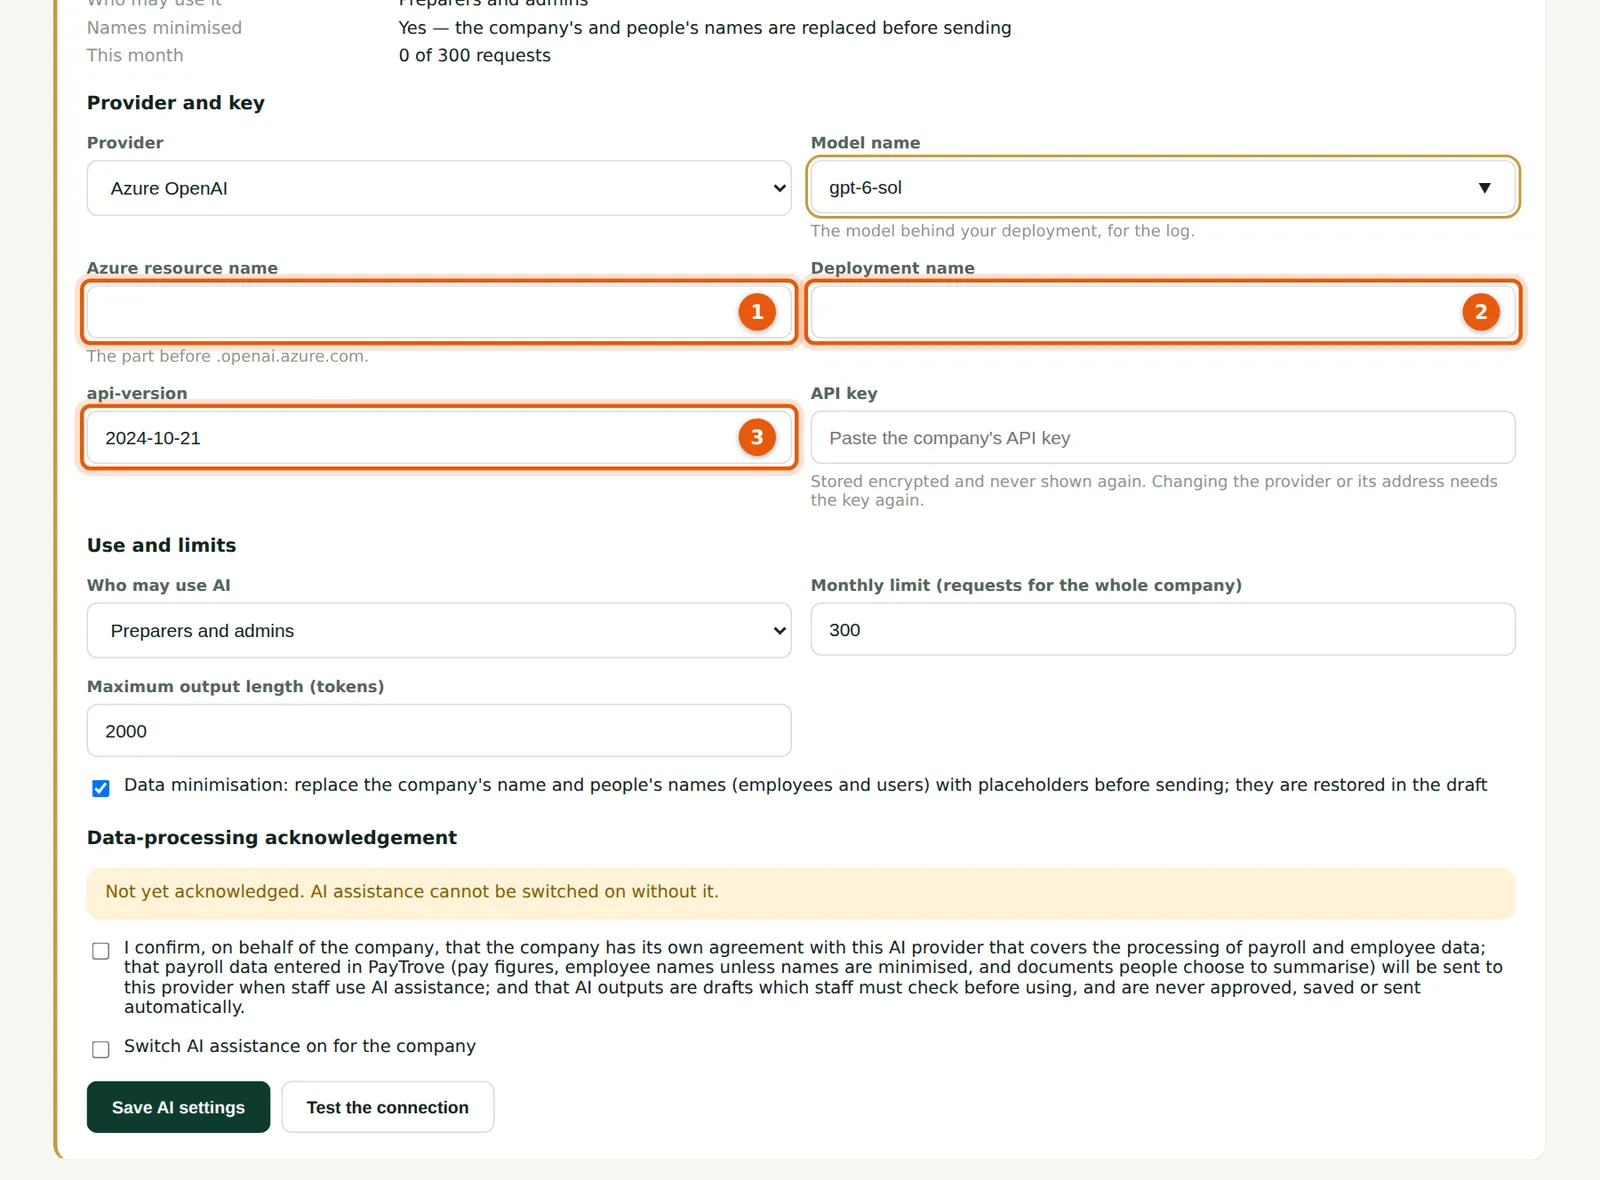
For Azure OpenAI, PayTrove also needs the resource name (the part before .openai.azure.com) (1), the deployment name you created for the model (2) and the api-version (3). For an OpenAI-compatible service, it asks for the service's base address instead.
Who
Admin.
What to do
- Copy these values from the Azure portal, then paste the key and save as above.
14.13 What AI assistance does
Why
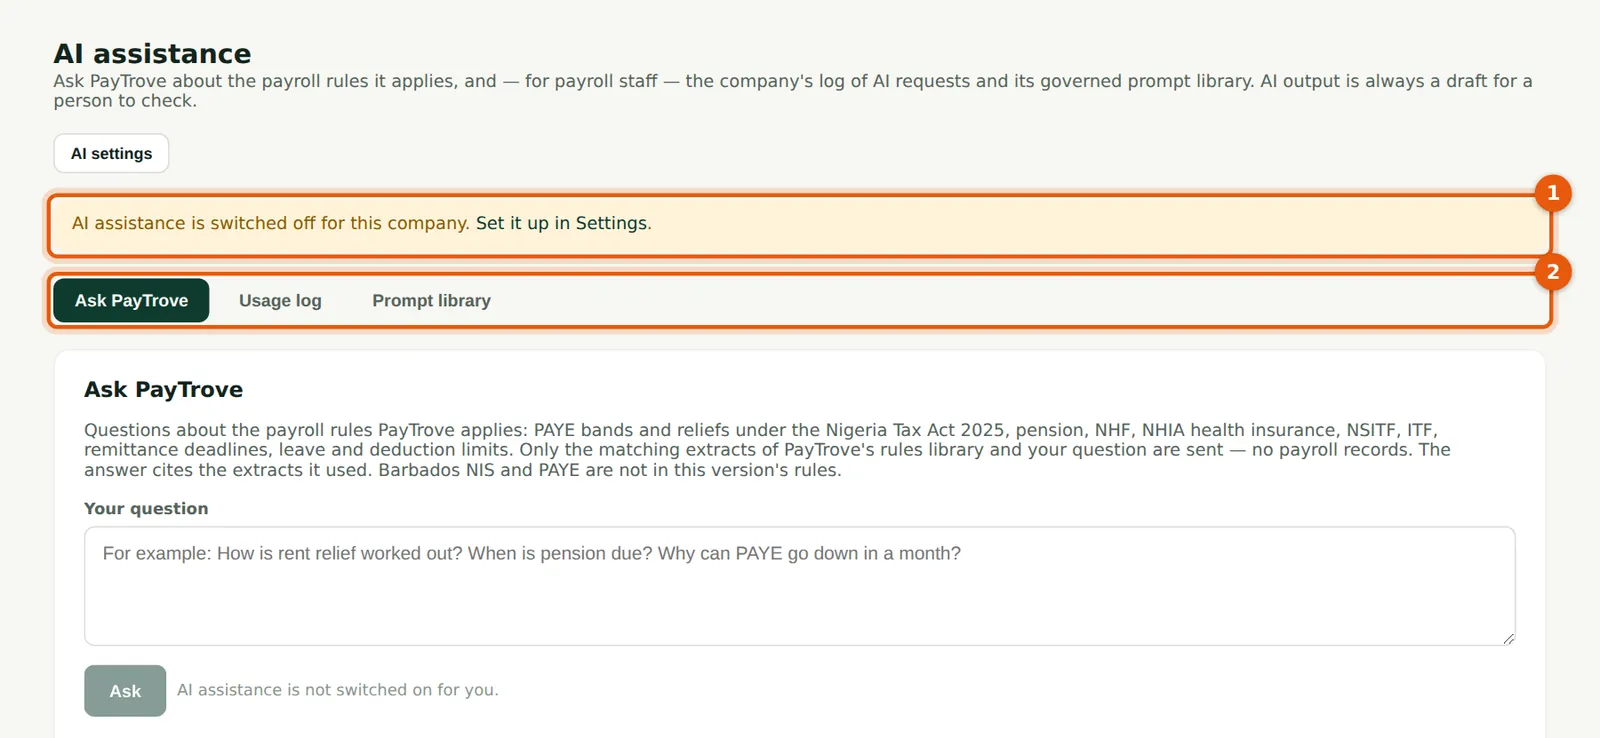
Once switched on, AI drafts — always labelled 'AI draft — review before use' and never saved or sent automatically — an approval memo for a run, a plain-language explanation of a payslip's changes, HR letters (salary change, confirmation of employment, loan deduction notice), and summaries of documents on an employee's file. Ask PayTrove answers questions about the rules PayTrove applies and cites its sources. Every request is logged, and the prompts used need an Admin's approval.
Who
Roles allowed by the company's AI settings; employees see Ask PayTrove only.
What to do
- The status bar (1) says whether AI is on.
- Use the tabs (2): Ask PayTrove, the Usage log (with each draft marked accepted, edited or rejected) and the Prompt library.
14.14 The AI usage log
Why
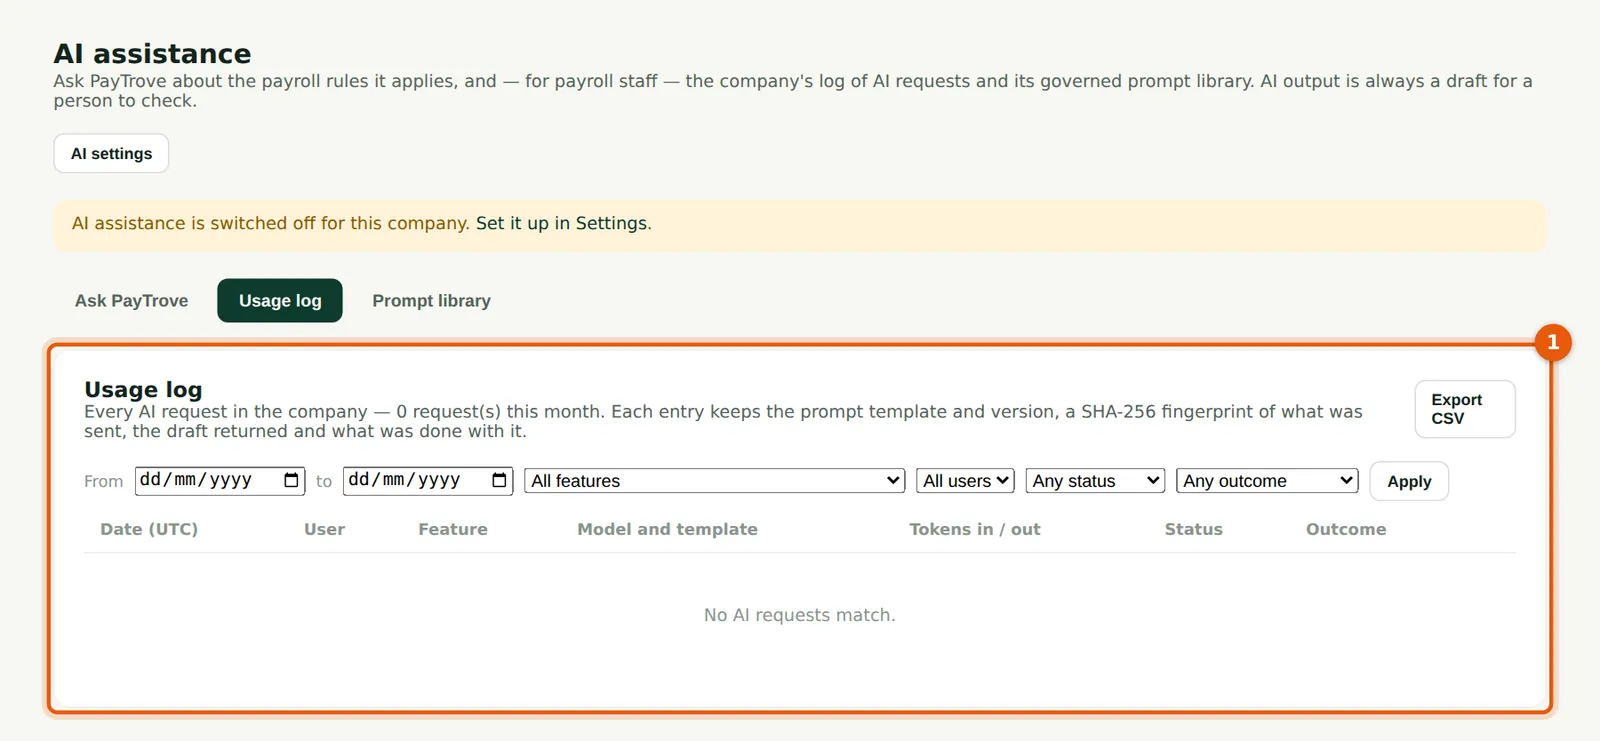
Every AI request is logged: who asked, for which feature and record, the provider and model, the prompt version, size, tokens, time taken, status, and whether the person accepted, edited or rejected the draft. Admins see the whole company's log; others see their own. It is empty at Savannah Harvest because AI has not been switched on.
Who
Admin (whole company); others (their own).
What to do
- Export the log as CSV for review.
14.15 The prompt library
Why
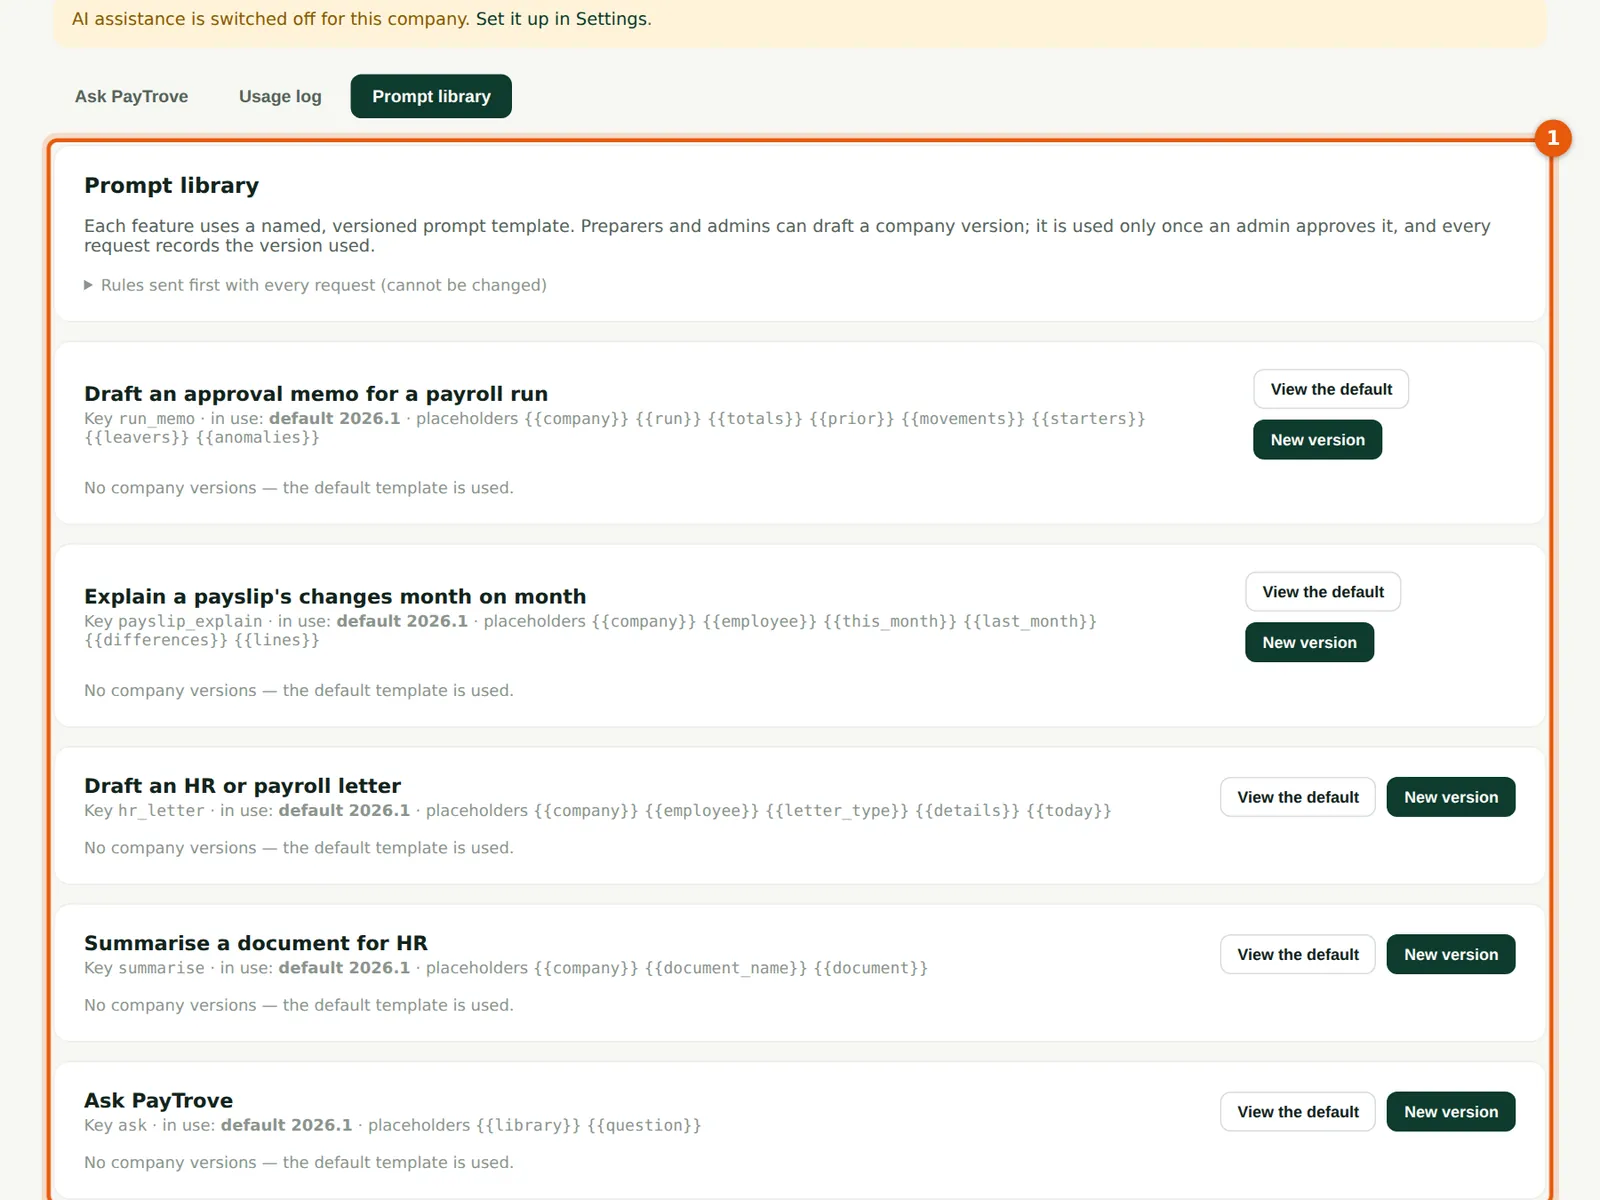
Each AI feature uses a prompt from this library. Preparers and admins can draft a new version; only an Admin can approve or retire one, and the version used is recorded with each request.
Who
Admin; Preparer (drafts).
What to do
- Open a feature's prompt to see its versions; approve a draft version to put it into use.
14.16 Make your data available offline
Why
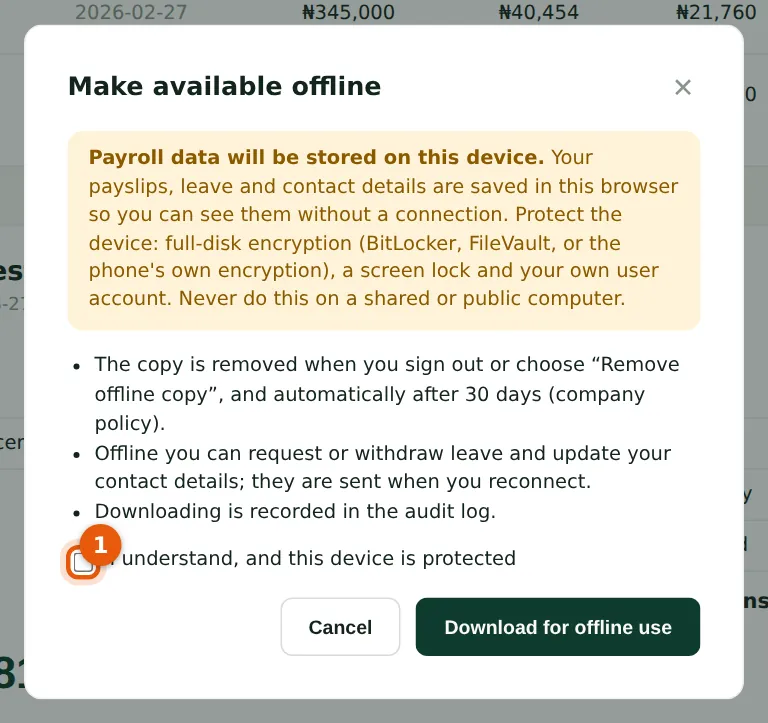
An offline copy lets an employee read their payslips and leave, request leave and update contact details without a connection, and lets payroll staff read the employee list and current run. The copy is stored on the device, so the device must be encrypted and locked. Payroll runs, approvals and remittances always need a connection.
Who
Anyone, on their own device, if the company allows it.
What to do
- Choose Make available offline at the bottom of the menu.
- Read the warning, tick I understand, and this device is protected (1), and choose Download for offline use.
14.17 The Offline page
Why
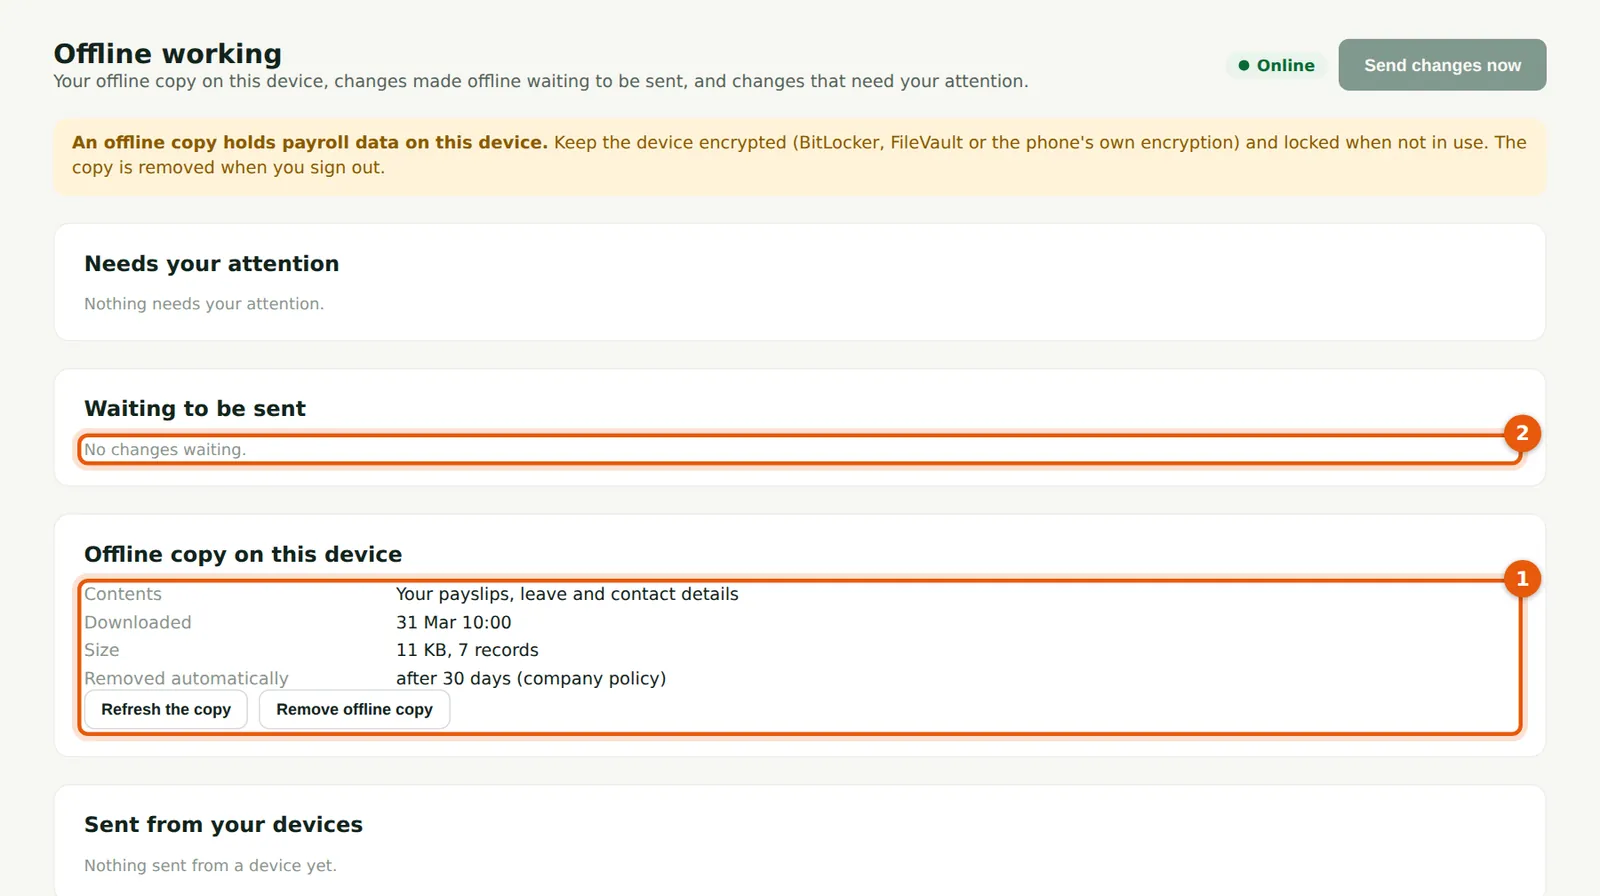
The Offline page shows what is on the device (1), changes made offline that are waiting to be sent (2), anything that needs your attention and what has been sent. Signing out sends what it can and then wipes the copy from the device.
Who
Anyone with an offline copy.
What to do
- Choose Refresh the copy when connected, or Remove offline copy to delete it.
- If a change you made offline clashes with a change made by payroll meanwhile, it appears under Needs your attention; choose which version to keep, Try again or Discard.
14.18 Working without a connection
Why
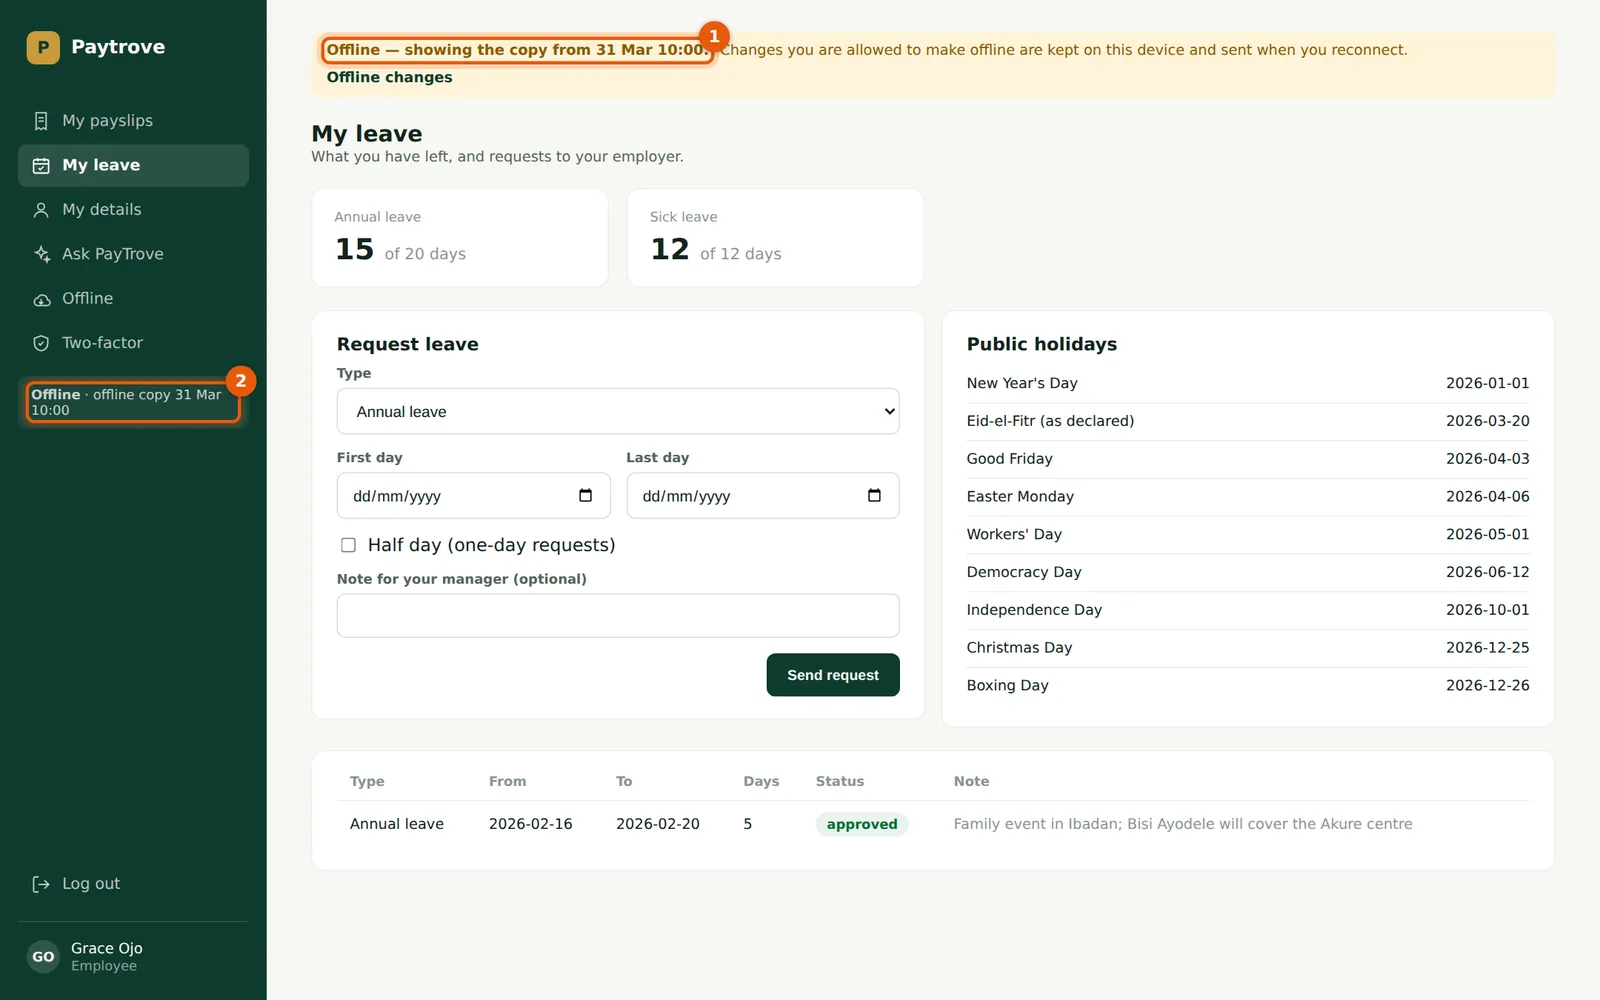
Without a connection, pages are shown from the copy with a banner (1) giving its date, and the menu shows the status (2). Leave requests and contact-detail changes are kept on the device and sent when the connection returns.
Who
Anyone with an offline copy.
What to do
- Work as usual; when you reconnect, PayTrove sends waiting changes automatically, or choose Send changes now on the Offline page.
14.19 Changes made offline wait to be sent
Why
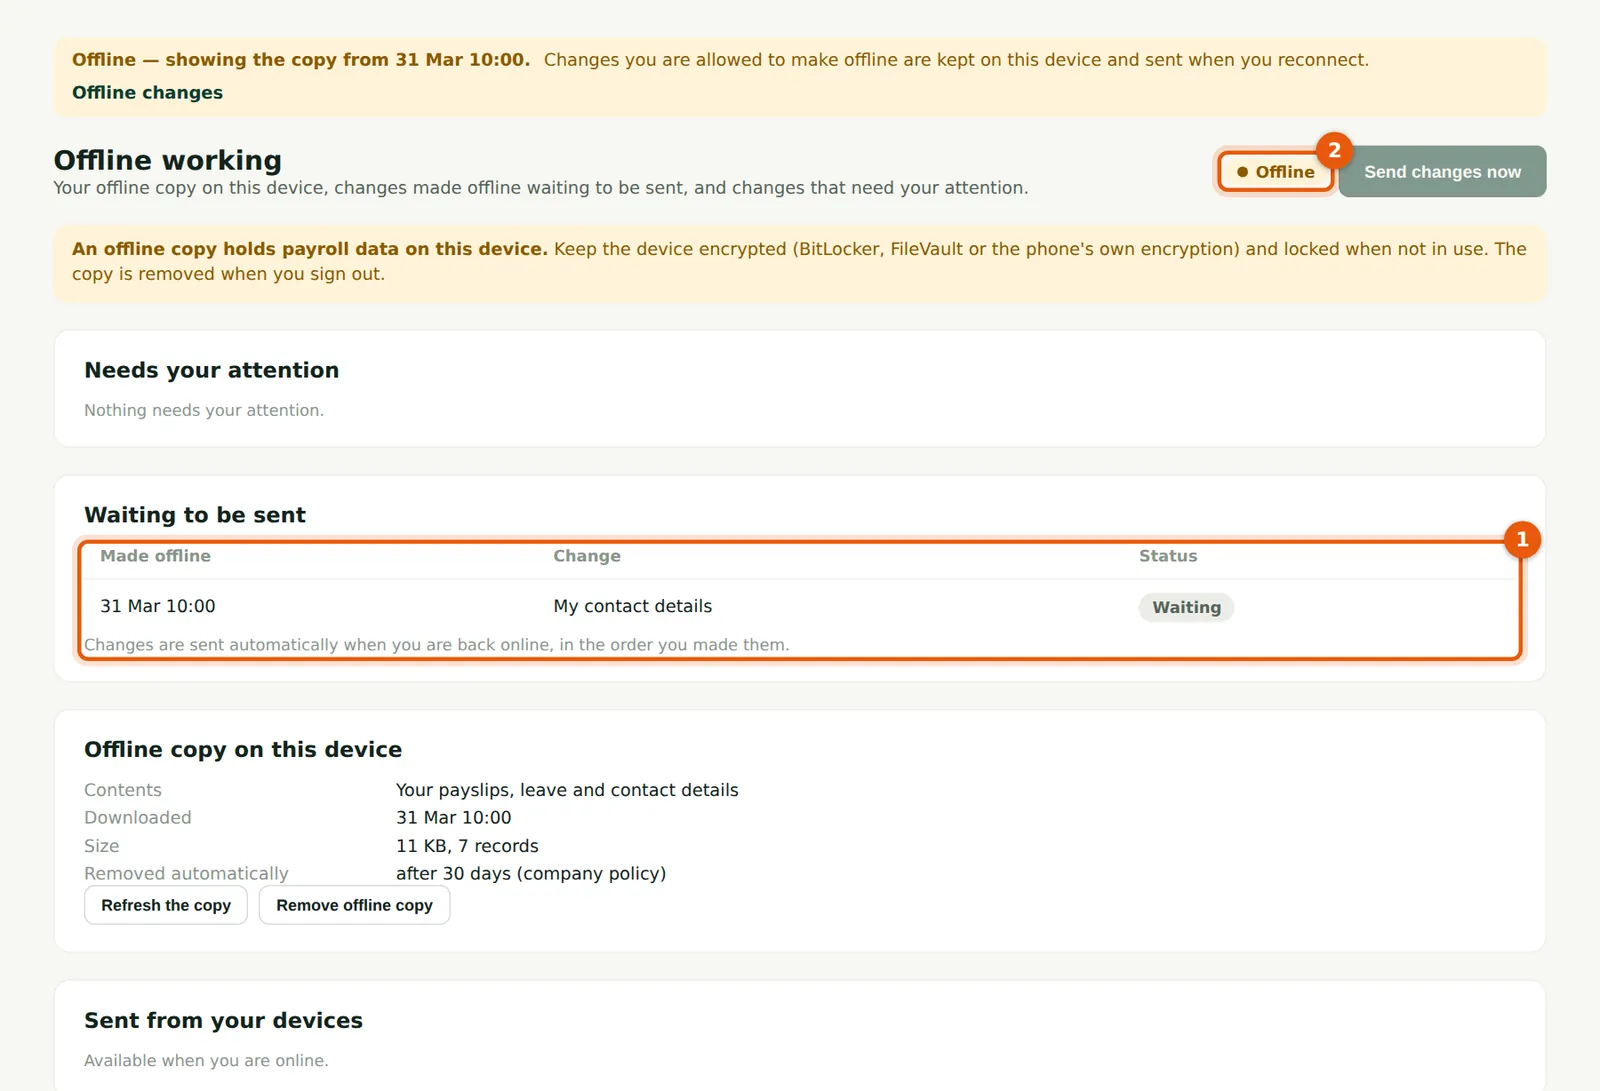
Offline, Grace changes her phone number on My details. The change is kept on the device and listed under Waiting to be sent (1); the status (2) shows she is offline.
Who
Anyone with an offline copy.
What to do
- Keep working; the change is sent when the connection returns.
14.20 When an offline change clashes
Why
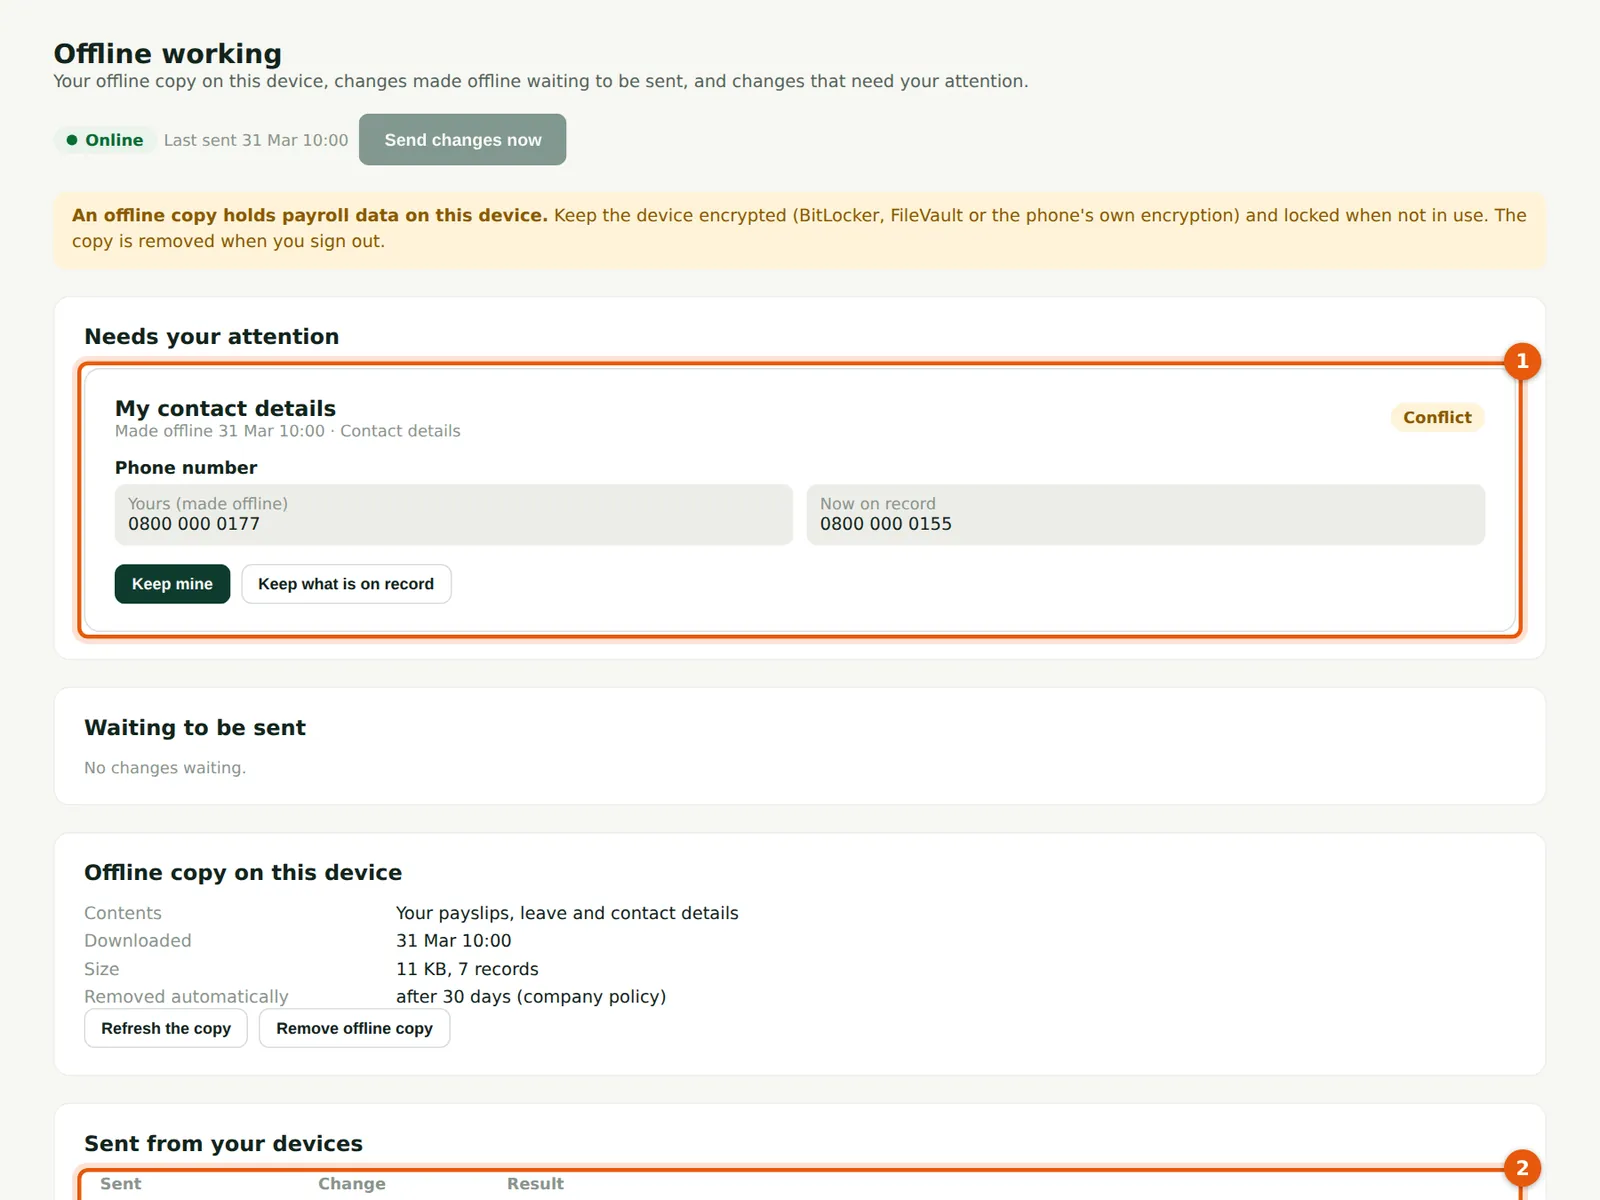
While Grace was offline, payroll corrected her phone number on her record. When her change is sent, PayTrove sees that the field changed on both sides and asks her which to keep (1), instead of overwriting either. Changes that went through are listed under Sent from your devices (2).
Who
Anyone with an offline copy.
What to do
- Choose Keep mine or Keep what is on record, or Try again or Discard for a refused change.
14.21 The company's offline policy
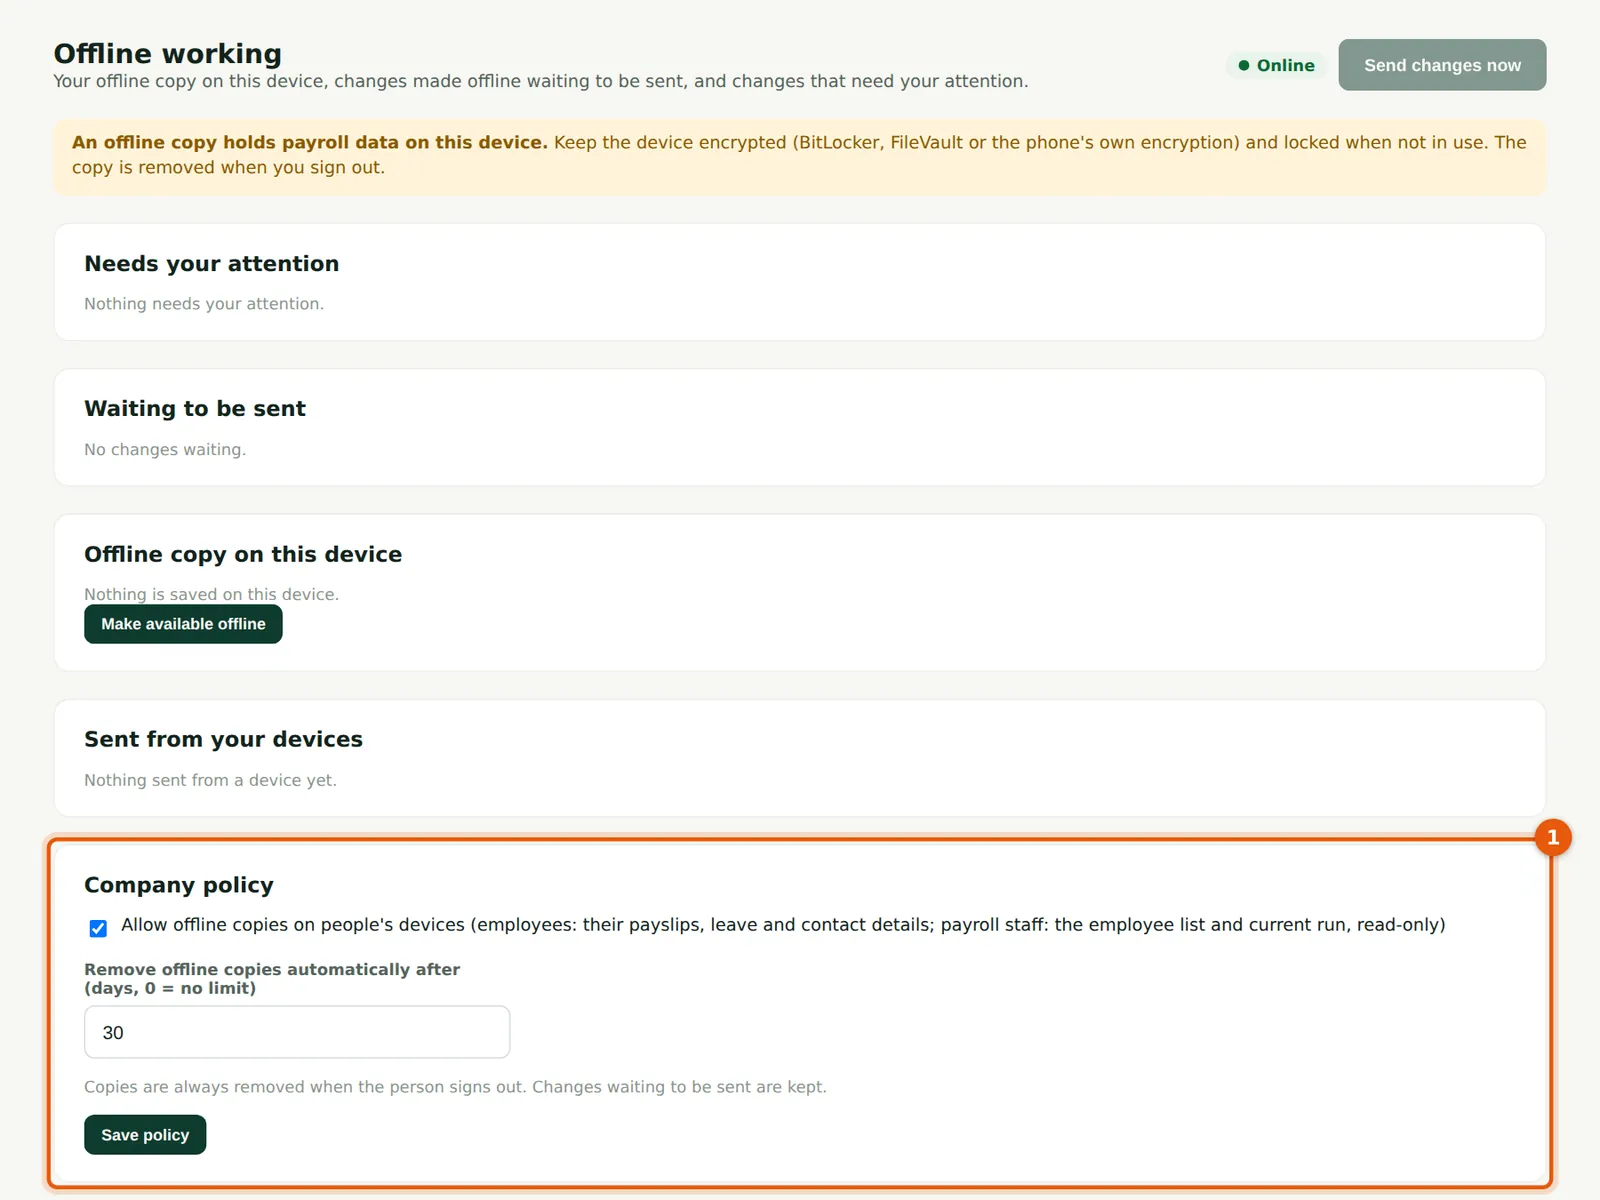
Why
Admins decide whether offline copies are allowed and how long a copy may be kept before it is removed automatically (0 to 90 days; 30 by default).
Who
Admin.
What to do
- On the Offline page, set the policy (1) and save it.
14.22 Where to find the offline policy

Why
Settings has a link (1) to the Offline page, where Admins set the company policy.
Who
Admin.
What to do
- Choose Offline working and company policy.