Steps in this chapter (20)
Line managers and the organisation chart, letters signed electronically, onboarding and exit checklists, queries, documents, training, HMO and group life, with reminders of dates coming up.
The HR add-on extends PayTrove from paying people to looking after their employment records. It is bought for the company on troveuniverse.com for a flat monthly price, whatever the number of employees, and adds four pages to the menu: HR, Attendance & overtime and Appraisals for staff, and My HR for employees on self-service. It works on the same employee records as payroll, so nothing is typed twice.
Admins set the add-on up (settings, offices, shifts and checklist templates) and approve overtime and appraisal results. Preparers keep the records, draft and send letters, and enter times. Viewers can read everything. Employees use My HR to clock in, sign letters, answer queries and rate themselves.
In April 2026 Savannah Harvest adds HR. Chukwudi Okeke switches it on and sets it up on 1 April; Blessing Etim records line managers and HMO details, sends an offer letter to a new Quality Control Officer, Adaeze Nwankwo, who signs it on her phone, starts her onboarding, issues a query and keeps documents and training up to date.
23.1 Before the add-on is switched on
Why
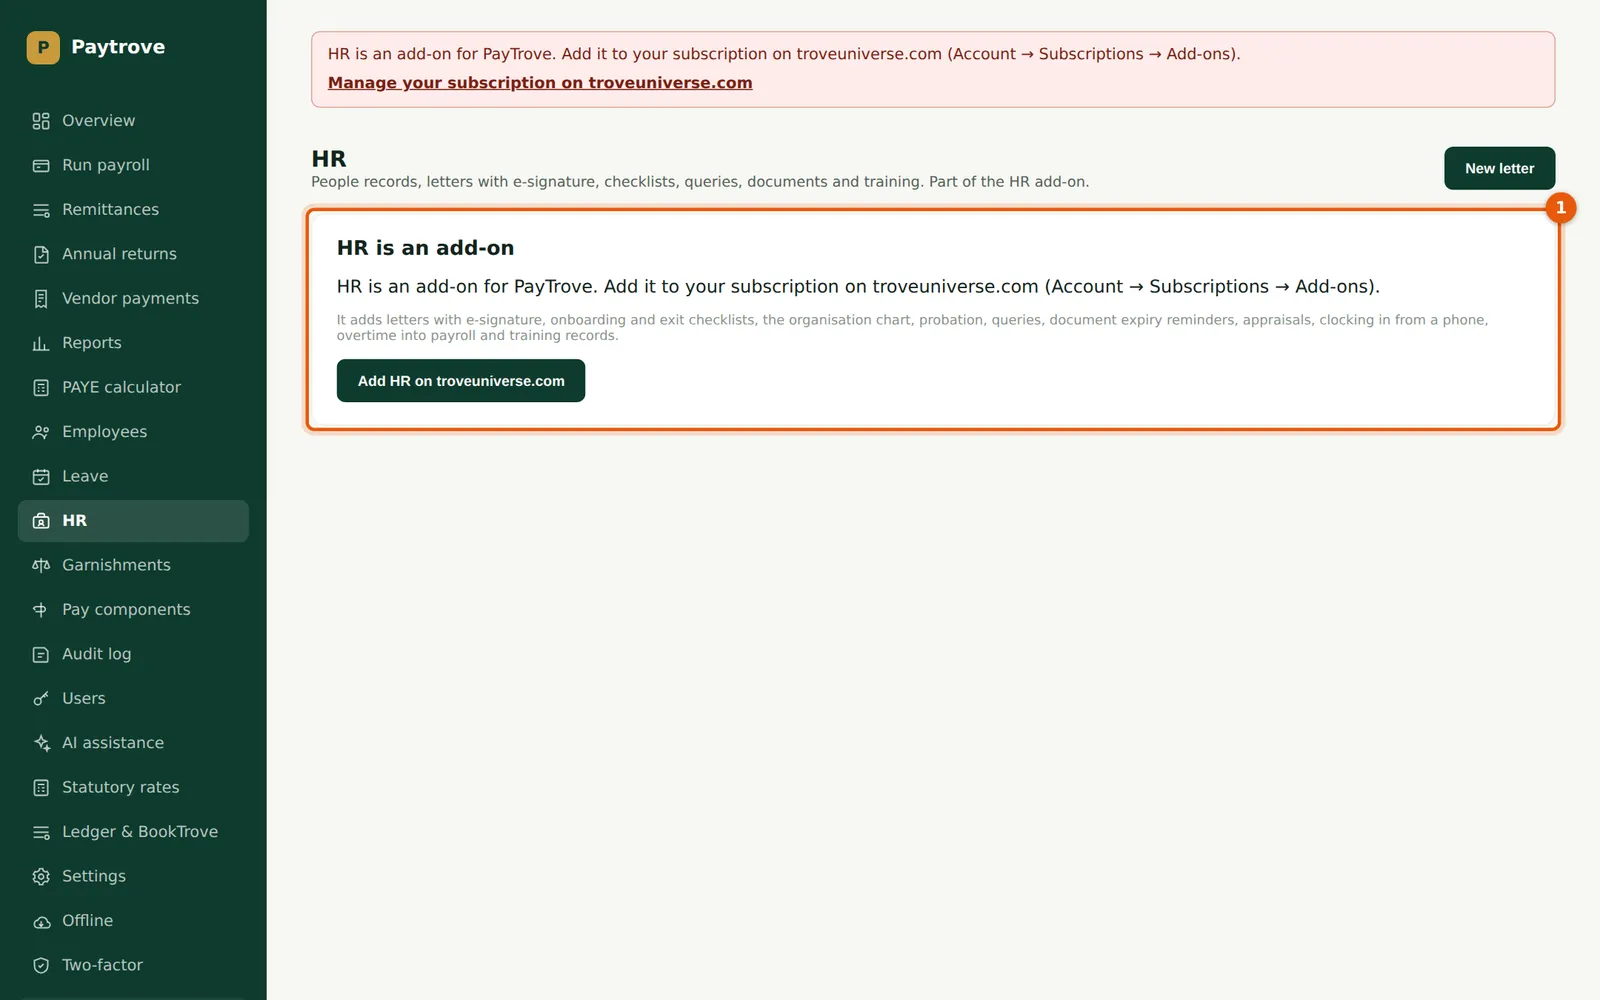
Without the add-on, the HR pages say so (1) and link to your subscription on troveuniverse.com; the menu shows HR, Attendance & overtime, Appraisals and My HR only once the company has the add-on. The add-on is a flat monthly price for the company, added on the TroveUniverse account page under Subscriptions → Add-ons. It reaches PayTrove within about a minute of being paid. Payroll itself is not affected either way.
Who
The TroveUniverse account holder buys it; anyone can see this page.
What to do
- Choose Add HR on troveuniverse.com (1), or go to troveuniverse.com/account.html → Subscriptions → Add-ons and add HR to the PayTrove subscription.
- Once the invoice is paid, sign in to PayTrove again (or reload the page): the HR pages appear in the menu.
- If the add-on is later removed, the HR pages close but the records are kept, and come back when it is added again. While the subscription is suspended, everything can be read but nothing changed or sent for signature.
23.2 Set up HR
Why
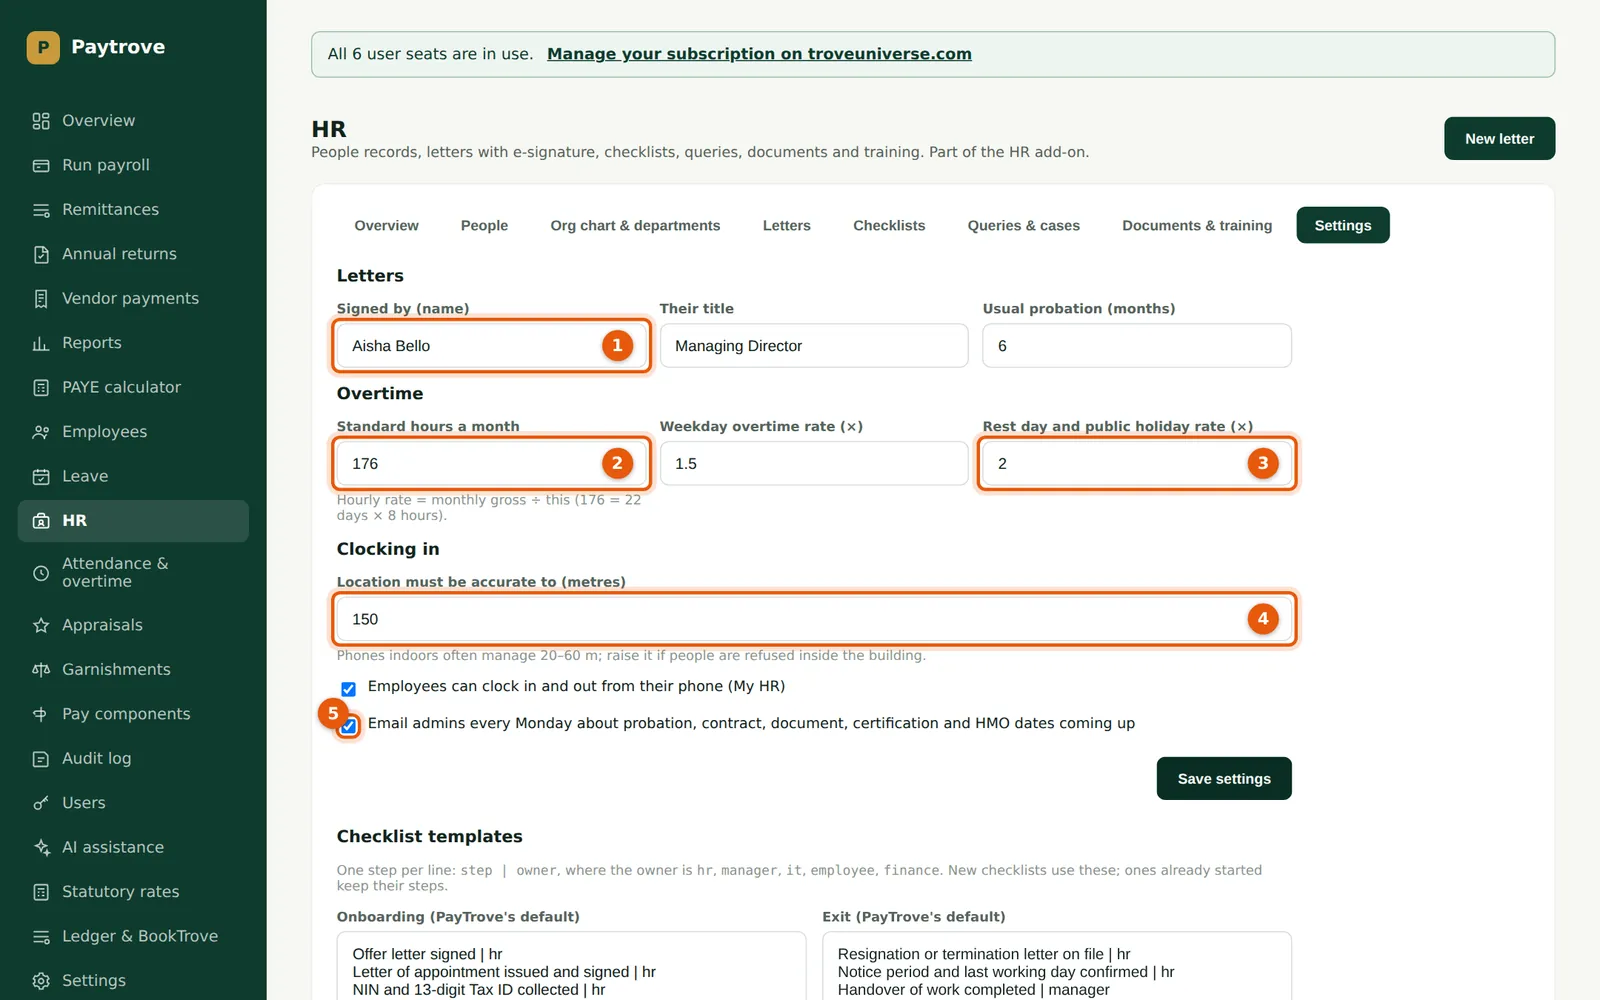
Settings hold the few choices the add-on needs. The name and title in Signed by (1) close every letter: Savannah Harvest's letters are signed by Aisha Bello, Managing Director. Standard hours a month (2) turns monthly pay into an hourly rate for overtime: 176 hours (22 days × 8 hours) is the usual figure. Overtime is paid ×1.5 on working days and ×2 on rest days and public holidays (3) unless your contracts or a collective agreement say otherwise. Location must be accurate to (4) sets how precise a phone's position must be to clock in. The Monday email (5) lists probation, contract, document, certification and HMO dates coming up in the next 60 days. Below are the steps of the onboarding and exit checklists, which you can change.
Who
Admin.
What to do
- Open HR → Settings.
- Enter who signs letters and their title (1), and the usual probation in months.
- Check the standard hours (2) and the overtime rates (3).
- Leave the accuracy at 150 m (4) unless people are refused inside the building; raise it a little if so.
- Keep Employees can clock in and out from their phone ticked if you will use clocking in, and the Monday email (5) ticked. Choose Save settings.
- Change the checklist templates if you wish: one step per line, then a bar and who does it (hr, manager, it, employee or finance).
23.3 Record a person's line manager, office, shift and cover
Why
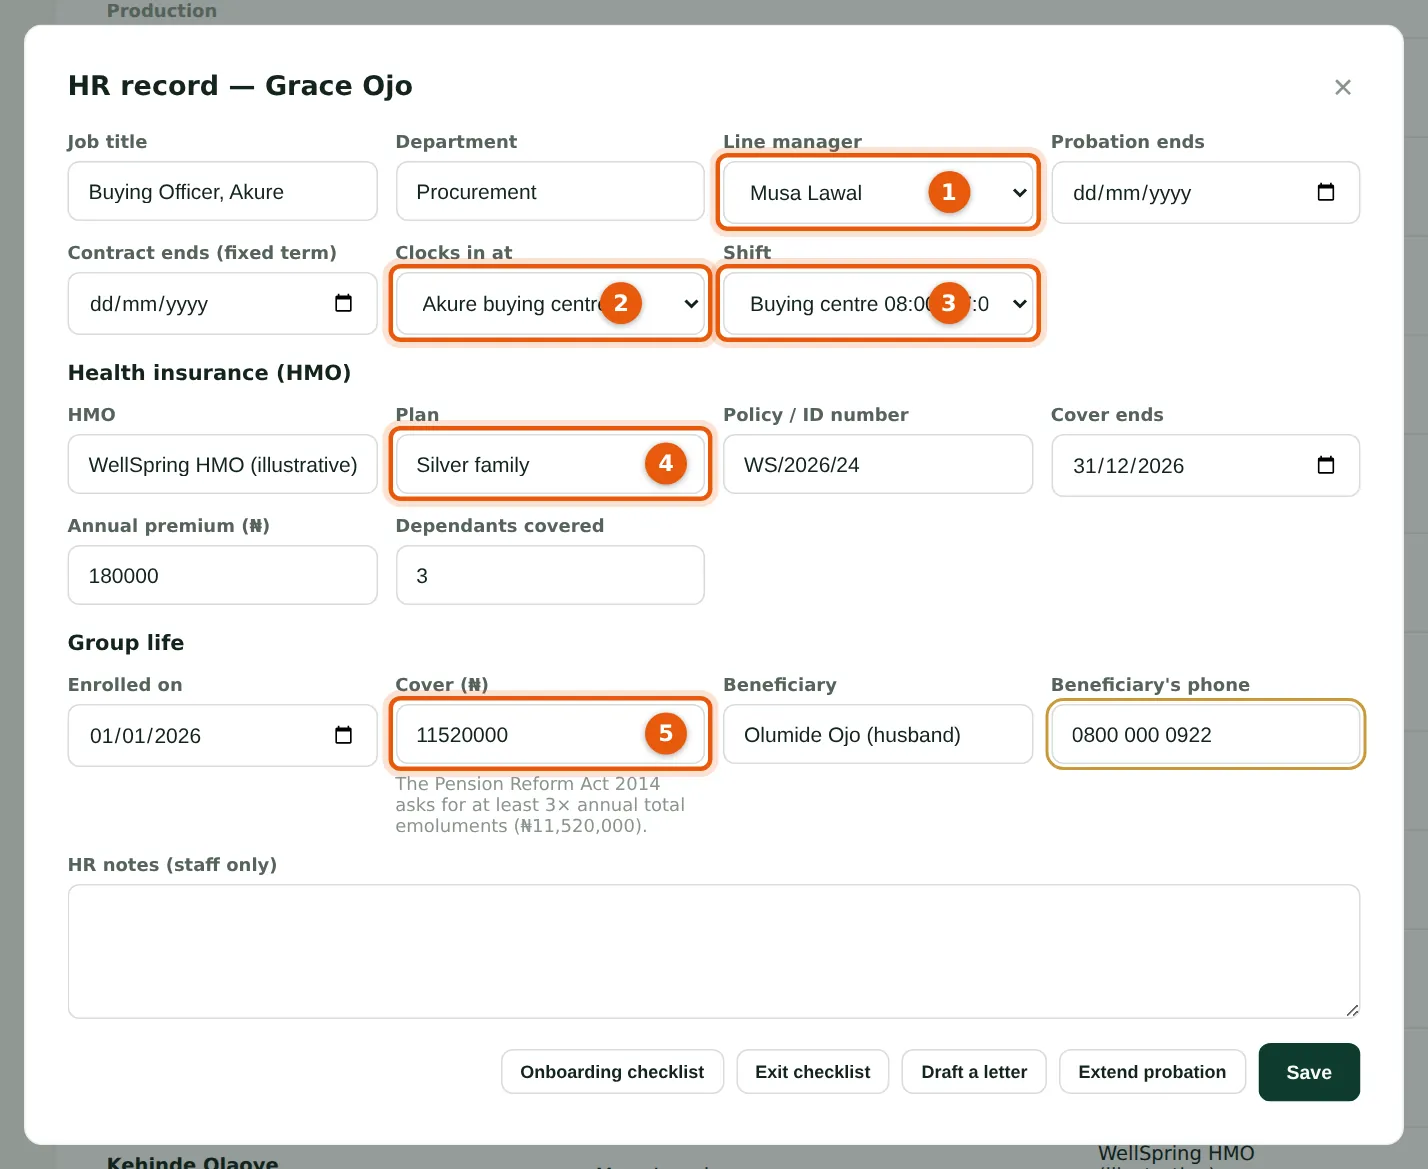
Each employee's HR record adds what payroll does not need: the line manager (1), the office they clock in at (2), their shift (3), probation and fixed-term contract dates, health insurance (HMO) plan and dependants (4), and group life cover with the beneficiary (5). The line manager builds the organisation chart and decides who reviews the person's appraisal and sees their attendance in My HR. Grace Ojo, Buying Officer at Akure, reports to Musa Lawal, now Lead Buying Officer at Lafia. Her group life cover is ₦11,520,000: the Pension Reform Act 2014 requires group life assurance of at least three times annual total emoluments, which PayTrove works out under the field. Blessing set the other line managers the same way.
Who
Preparer or Admin.
What to do
- Open HR → People and choose Edit on the person.
- Choose the line manager (1). PayTrove refuses a choice that would put someone above their own manager.
- Choose the office (2) — or Any office — and the shift (3).
- Enter probation and contract end dates, the HMO plan, policy number, cover end and dependants (4), and the group life enrolment, cover (5) and beneficiary.
- Choose Save. The buttons at the bottom start an onboarding or exit checklist, draft a letter or extend probation for this person.
23.4 Departments and the organisation chart
Why
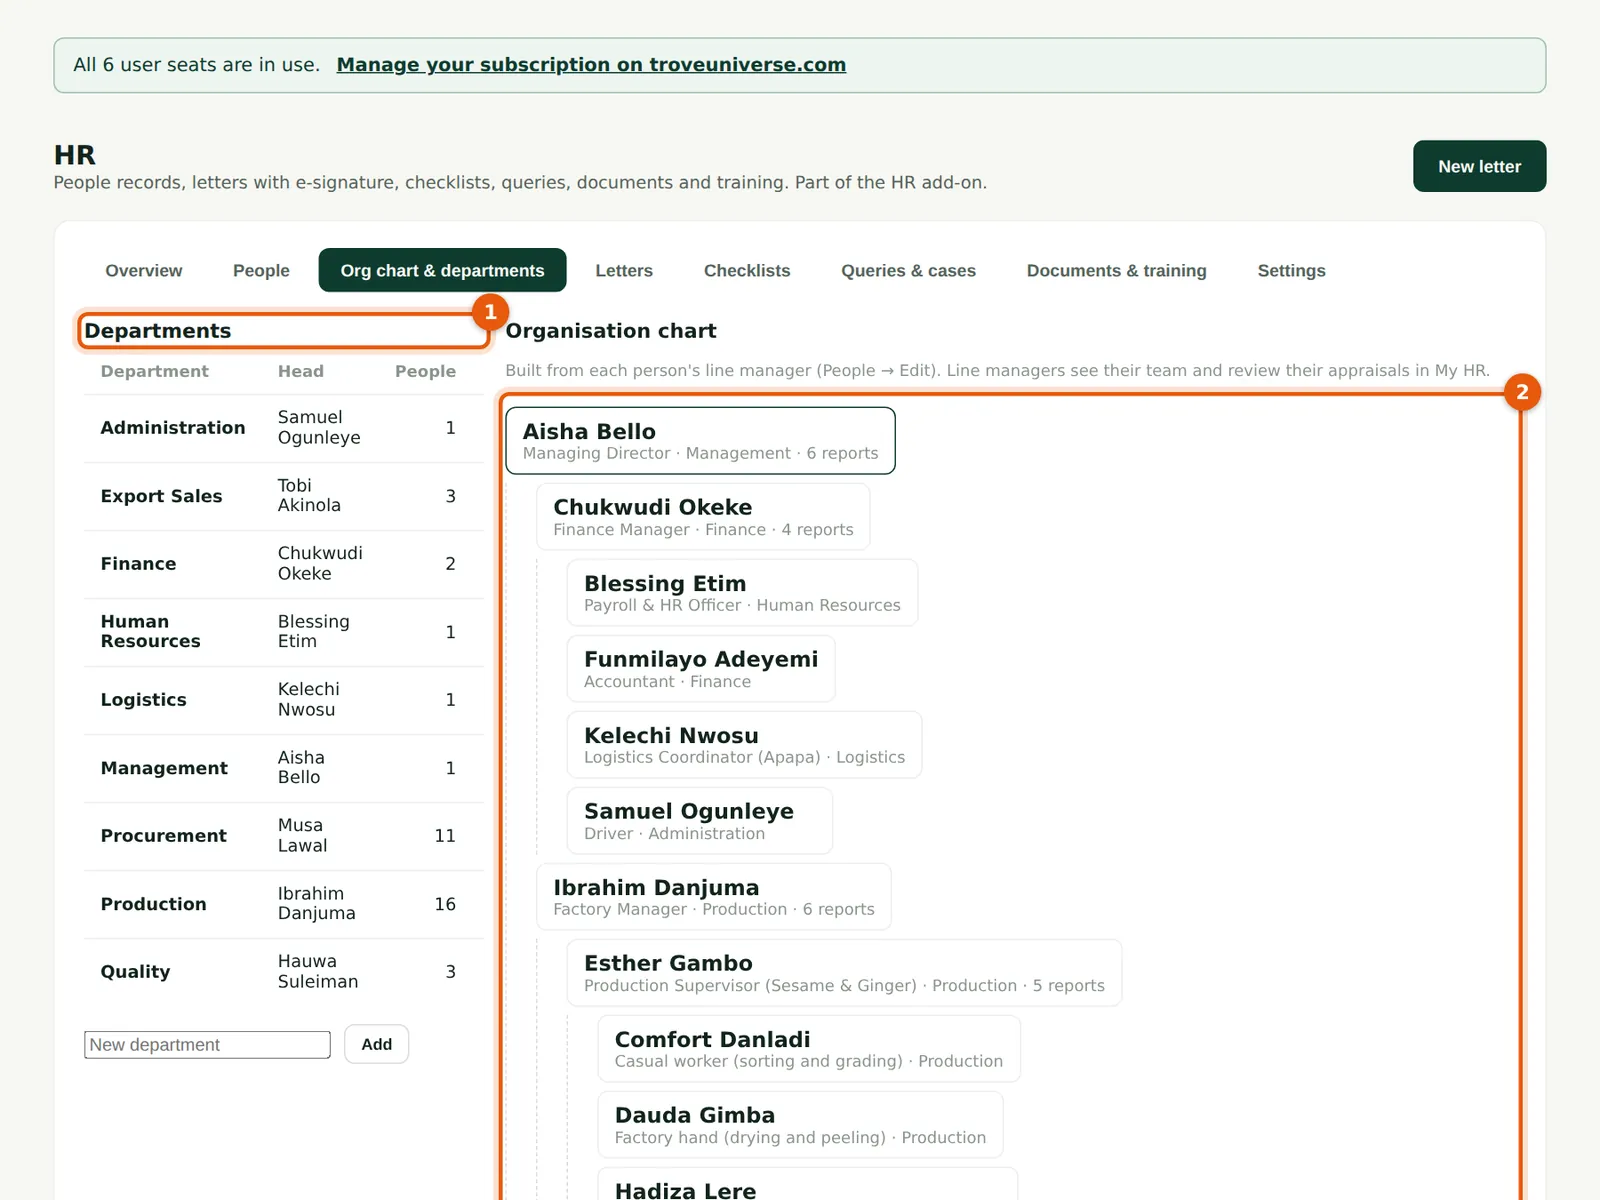
Departments (1) come from the employees' records; give each a head. The organisation chart (2) is drawn from the line managers: Aisha Bello at the top, her direct reports below her, and so on down to the factory floor. Anyone without a line manager is counted on the overview so that nobody is missed. Renaming a department moves everyone in it.
Who
Preparer or Admin; everyone can read it.
What to do
- Open HR → Org chart & departments.
- Choose Add next to a department marked “not listed”, or type a new one and choose Add (1).
- Choose Edit to rename a department or choose its head.
- Check the chart (2). To move someone, change their line manager on People → Edit.
23.5 Everyone's HR details in one list
Why
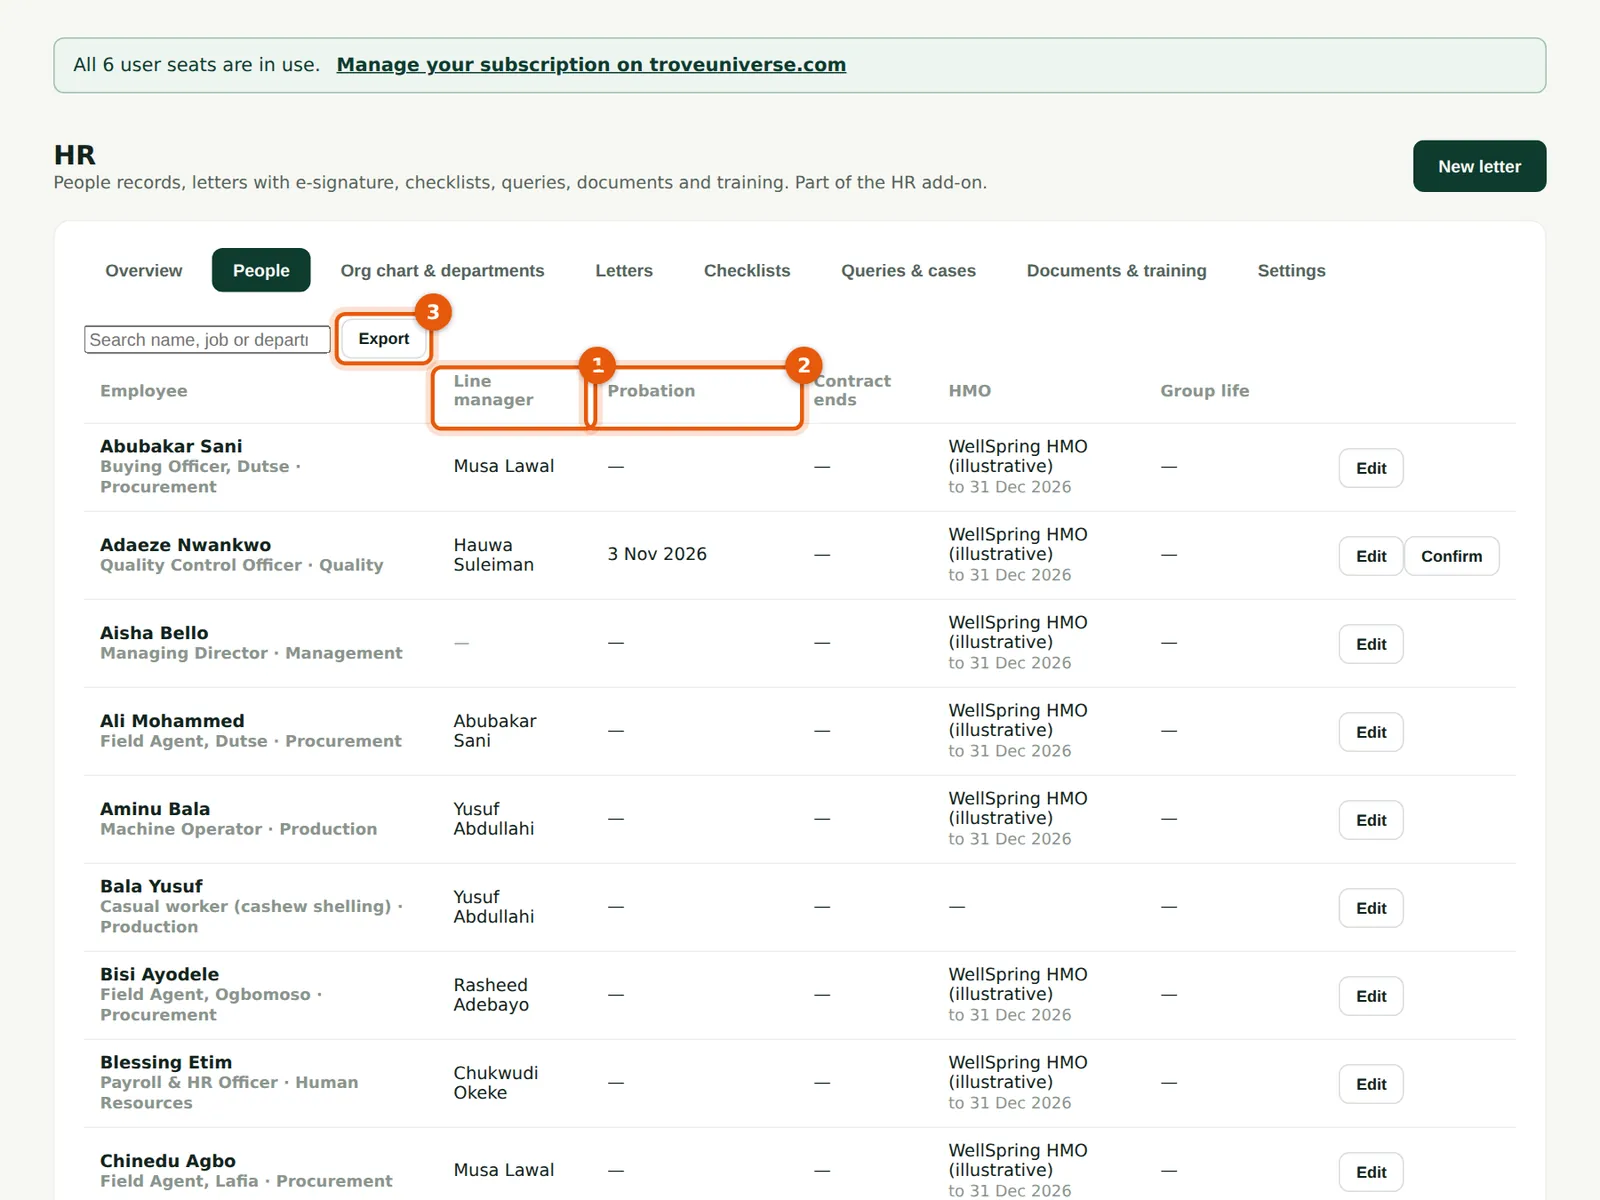
The People list shows each person's line manager (1), probation (2), contract end, HMO and group life beneficiary, with a coloured note when a date is near. Confirm appears for anyone still on probation. Export (3) downloads the list as a spreadsheet, for example for the HMO's annual renewal.
Who
Everyone with a staff login.
What to do
- Search by name, job or department.
- Choose Confirm when someone completes probation: PayTrove records the date and can draft the confirmation letter. Choose Edit → Extend probation to extend it with a reason.
- Choose Export (3) for a spreadsheet.
23.6 Draft a letter
Why
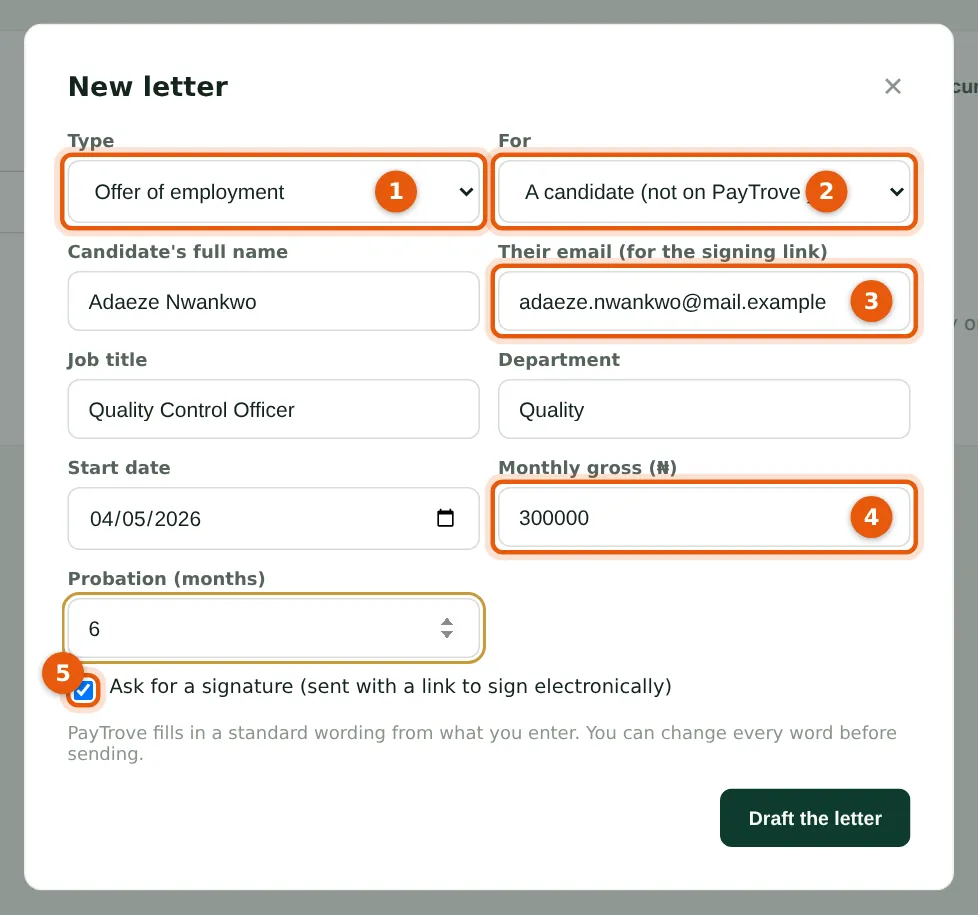
PayTrove drafts letters from your records: offer, appointment, confirmation, promotion, transfer, query, warning, termination, reference, or any other letter. A letter can be for an employee or for a candidate who is not on PayTrove yet (2). Blessing drafts an offer for Adaeze Nwankwo as Quality Control Officer at the Kaduna factory, starting on 4 May 2026 at ₦300,000 a month (4), with six months' probation. The candidate's email (3) is where the signing link goes. Ask for a signature (5) is ticked for letters that must be accepted; a query or a reference is sent for information.
Who
Preparer or Admin.
What to do
- Choose New letter at the top of the HR page (or Draft a letter on a person's HR record).
- Choose the type (1) and whether it is for an employee or a candidate (2).
- For a candidate, enter the name and email (3). For an employee, choose them: their job, department and pay are filled in.
- Fill the fields of that type of letter (4) and choose Draft the letter.
23.7 Check the wording and send
Why
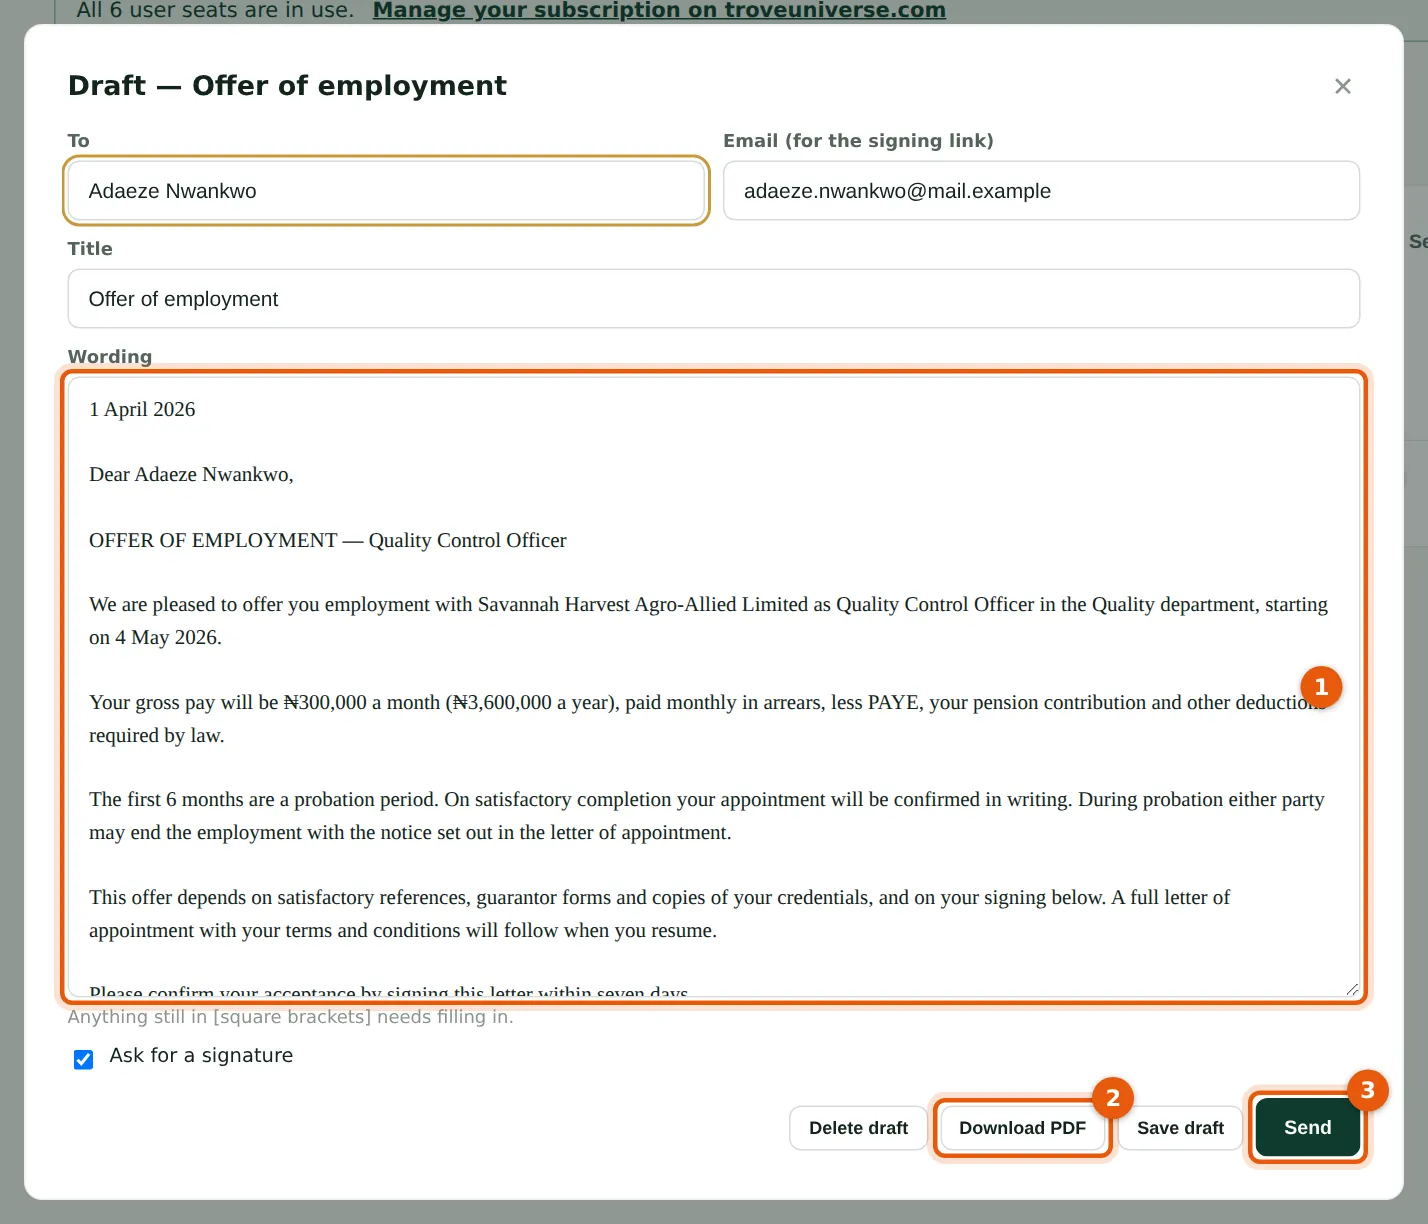
The draft is plain text (1) that you can change word for word: PayTrove's wording is a starting point, not legal advice, so use your own if you have it. Anything left in [square brackets] needs filling in; PayTrove warns before sending a letter with blanks. Download PDF (2) gives the letter on the company's letterhead. Send (3) fixes the wording — it cannot be edited afterwards — and records a fingerprint of it, then emails the signing link to the candidate. An employee with a self-service login also finds the letter in My HR.
Who
Preparer or Admin.
What to do
- Read the wording (1) and change anything that does not fit; choose Save draft to come back later.
- Choose Download PDF (2) if you want a paper copy.
- Choose Send (3) and confirm. To withdraw a letter after sending, open it and choose Withdraw with a reason.
23.8 The email with the signing link
Why
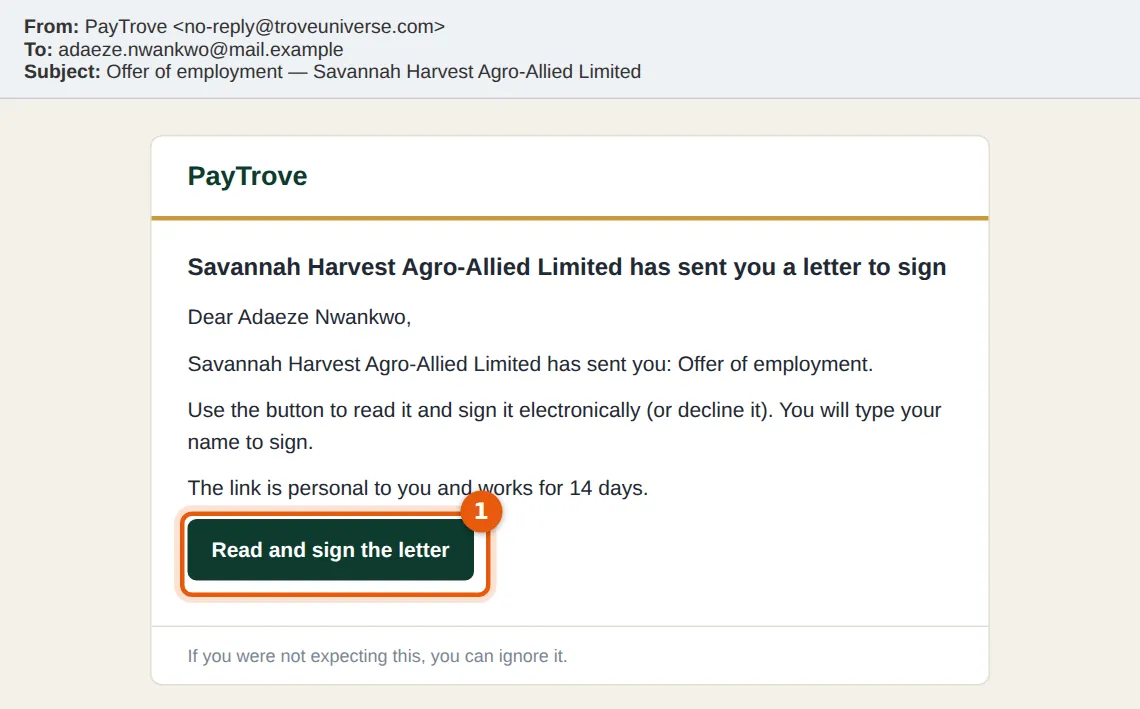
The email says who sent the letter and has one button (1). The link is personal, stops working once the letter is signed or declined, and expires after 14 days; PayTrove keeps only a scrambled copy of it, so nobody can recover it from the database. If it expires or is lost, open the letter and choose Email a new link: the old link stops working.
Who
The recipient.
What to do
- The candidate chooses Read and sign the letter (1). It opens on a phone or a computer; no PayTrove login is needed.
23.9 The letter on the candidate's phone
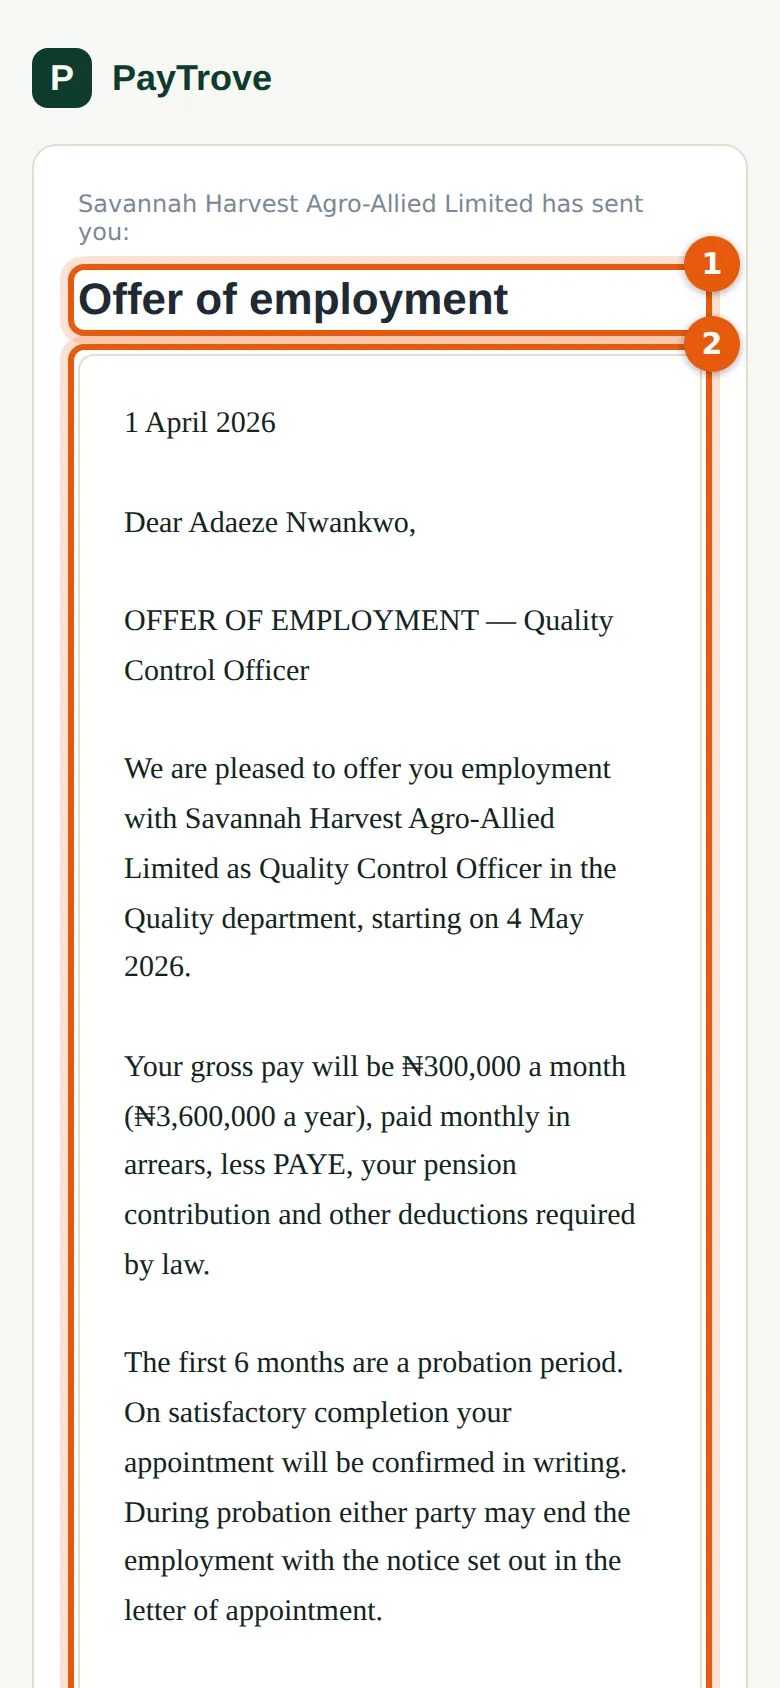
Why
The signing page shows who sent the letter, its title (1) and the full wording (2), exactly as sent. The link is taken out of the address bar as soon as the page opens, so it is not left in the phone's history.
Who
The recipient.
What to do
- Read the letter to the end.
23.10 Sign by typing your name
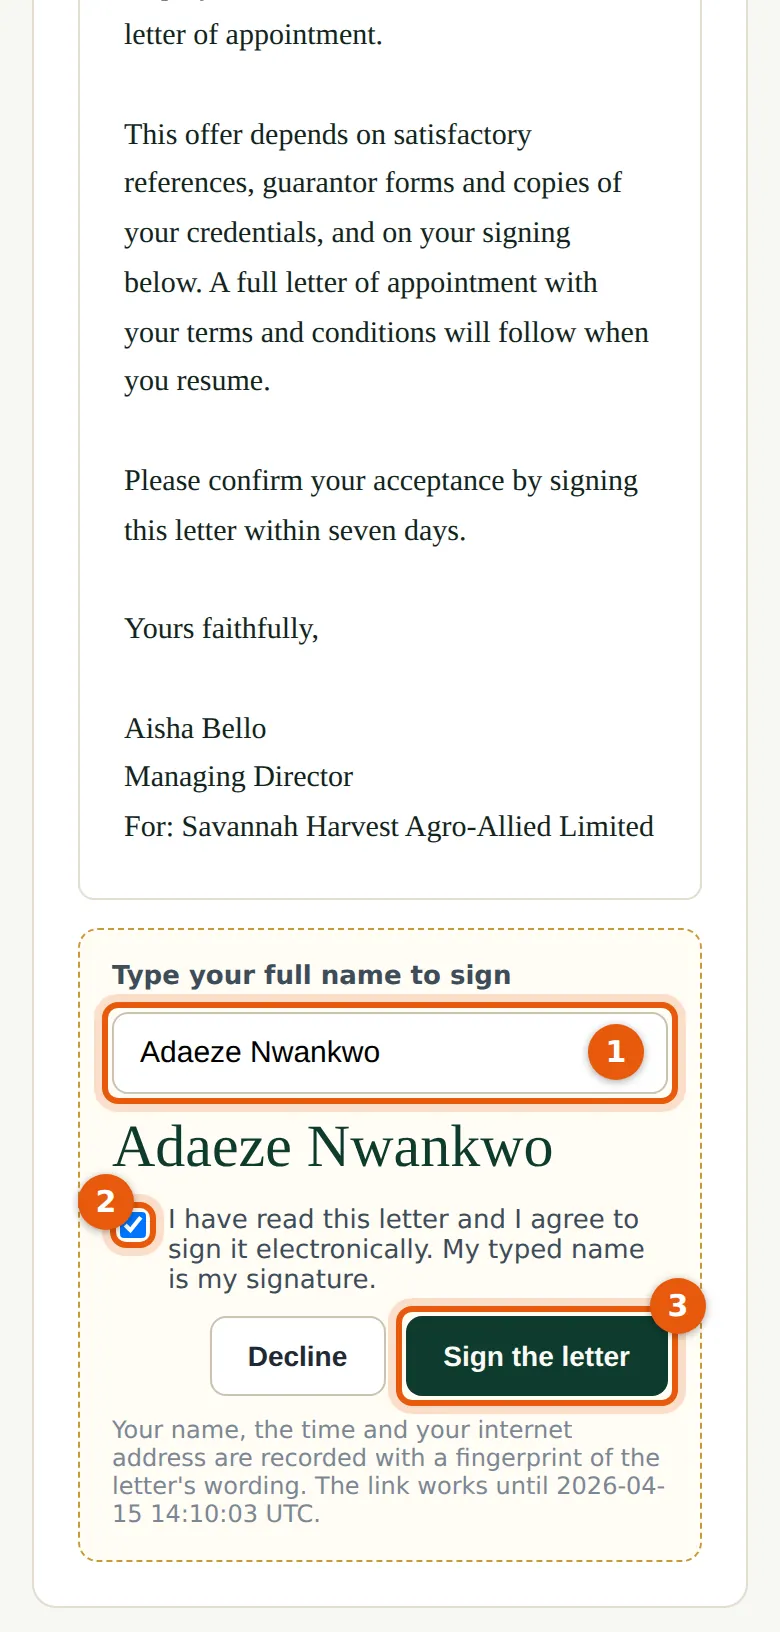
Why
The signature is the person's typed name (1), shown in a handwriting style, with the box ticked (2) to agree to sign electronically. Electronic signatures of this kind are recognised for employment letters under the Evidence Act 2011 (section 93). PayTrove records the name, the time, the internet address and the fingerprint of the wording. The person can also Decline and give a reason, which HR sees.
Who
The recipient.
What to do
- Check the name (1), tick the box (2) and choose Sign the letter (3).
- A thank-you page confirms the signature; the link then stops working.
23.11 The signed letter in HR
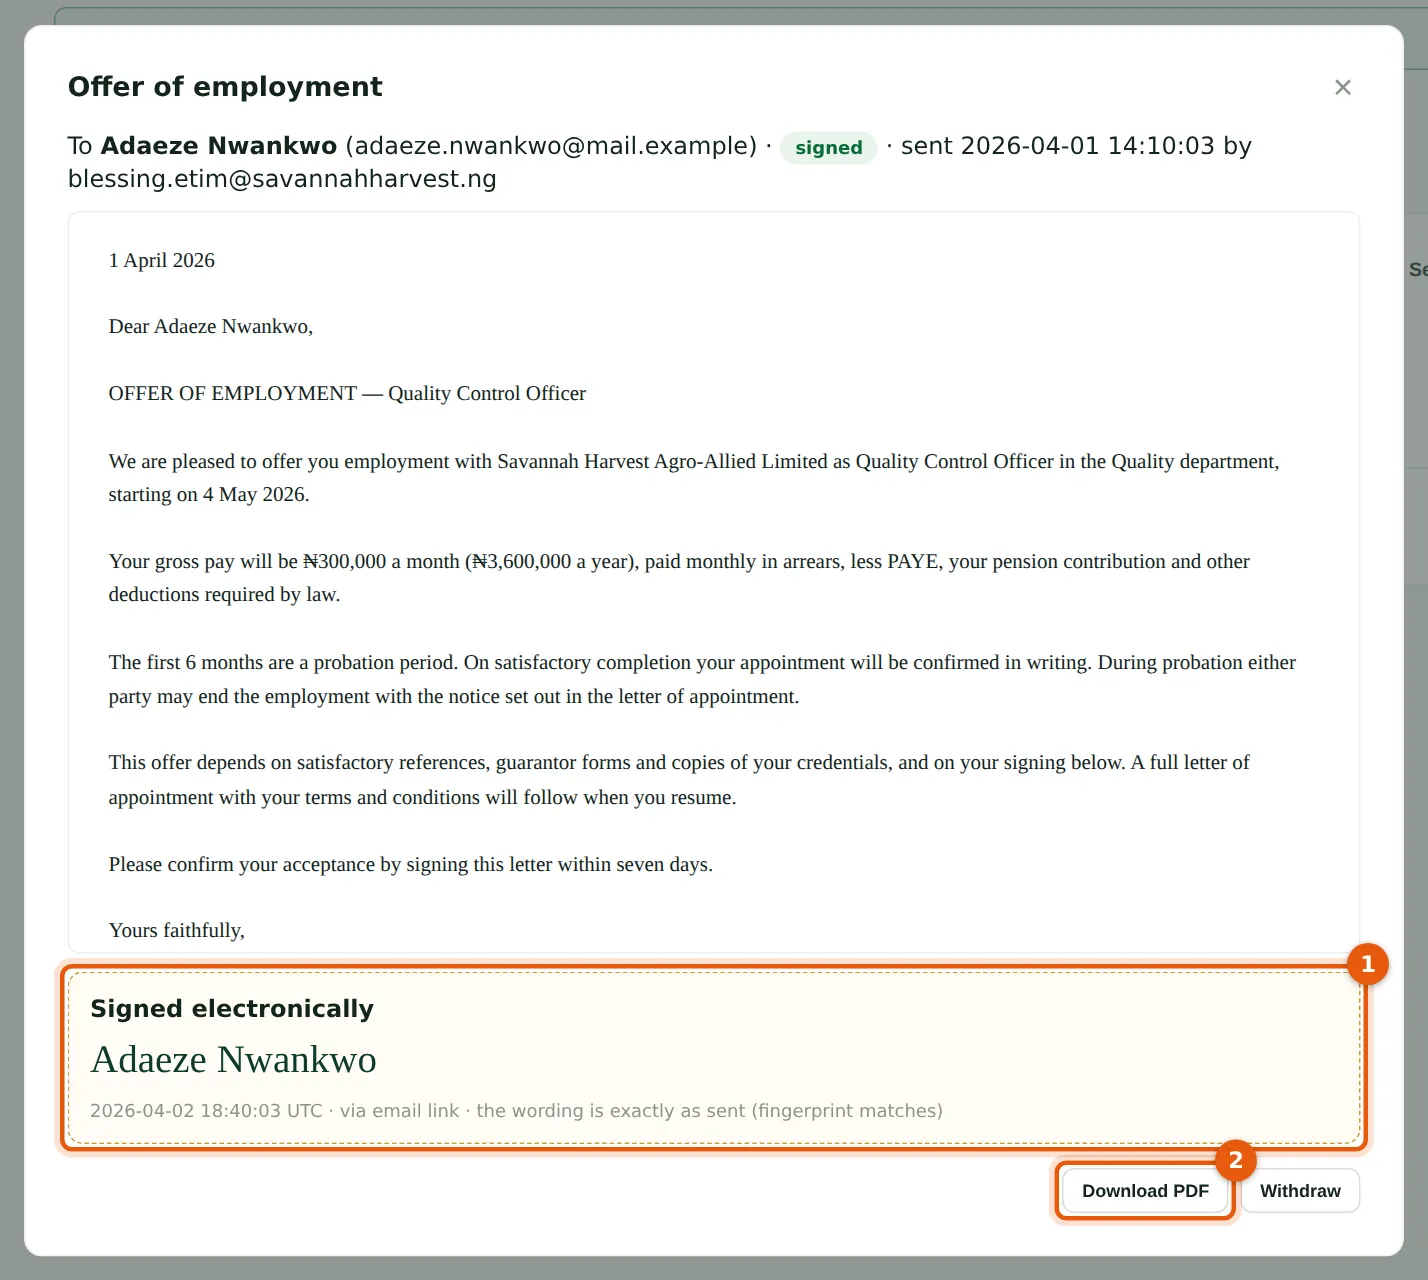
Why
The signed letter shows the signature (1) with the time, how it was signed (email link or My HR), and whether the wording is still exactly what was signed (the fingerprints match). If anyone changed the stored wording later, PayTrove would say so in red. Download PDF (2) gives the signed copy for the personnel file.
Who
Everyone with a staff login can read it.
What to do
- Open HR → Letters and choose Open on the letter.
- Check the signature box (1) and choose Download PDF (2) for the file.
23.12 An onboarding checklist
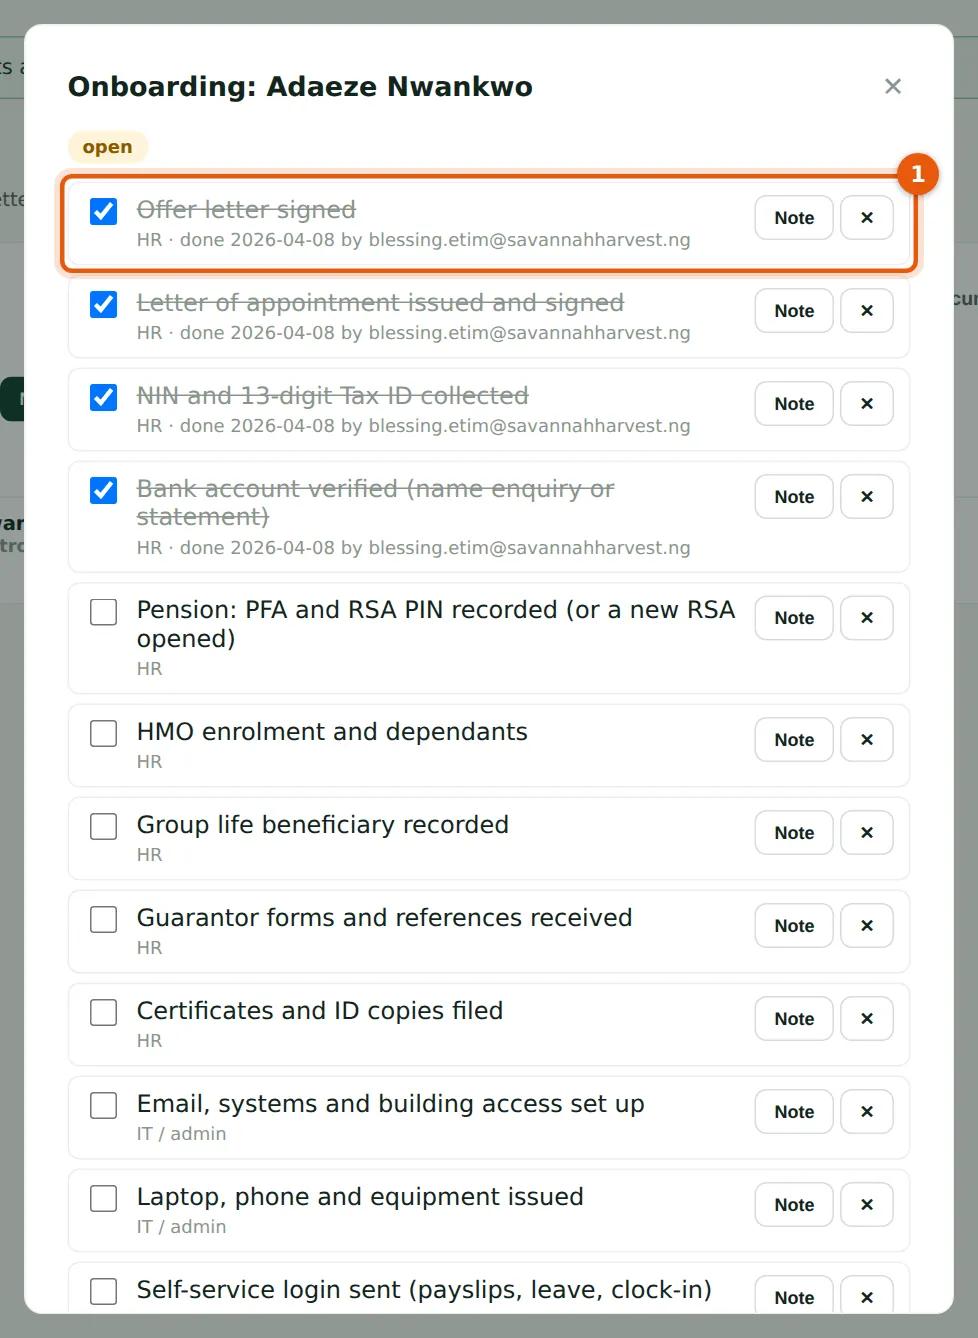
Why
Once Adaeze signed, Blessing adds her as an employee starting on 4 May (chapter 5) and starts her onboarding checklist from her HR record. The checklist comes from the template in Settings: the signed offer, appointment letter, NIN and Tax ID, bank account, pension, HMO, group life beneficiary, guarantor forms, access, equipment and the self-service login, each with who does it. Ticking a step (1) records who did it and when; when every step is done the checklist closes itself. An exit checklist works the same way for a leaver.
Who
Preparer or Admin.
What to do
- Open the person on HR → People → Edit and choose Onboarding checklist (or Exit checklist), or use HR → Checklists → New checklist.
- Tick each step (1) as it is done; choose Note to add a detail.
- Add a step for this person only in the box at the bottom (2).
23.13 Issue a query
Why
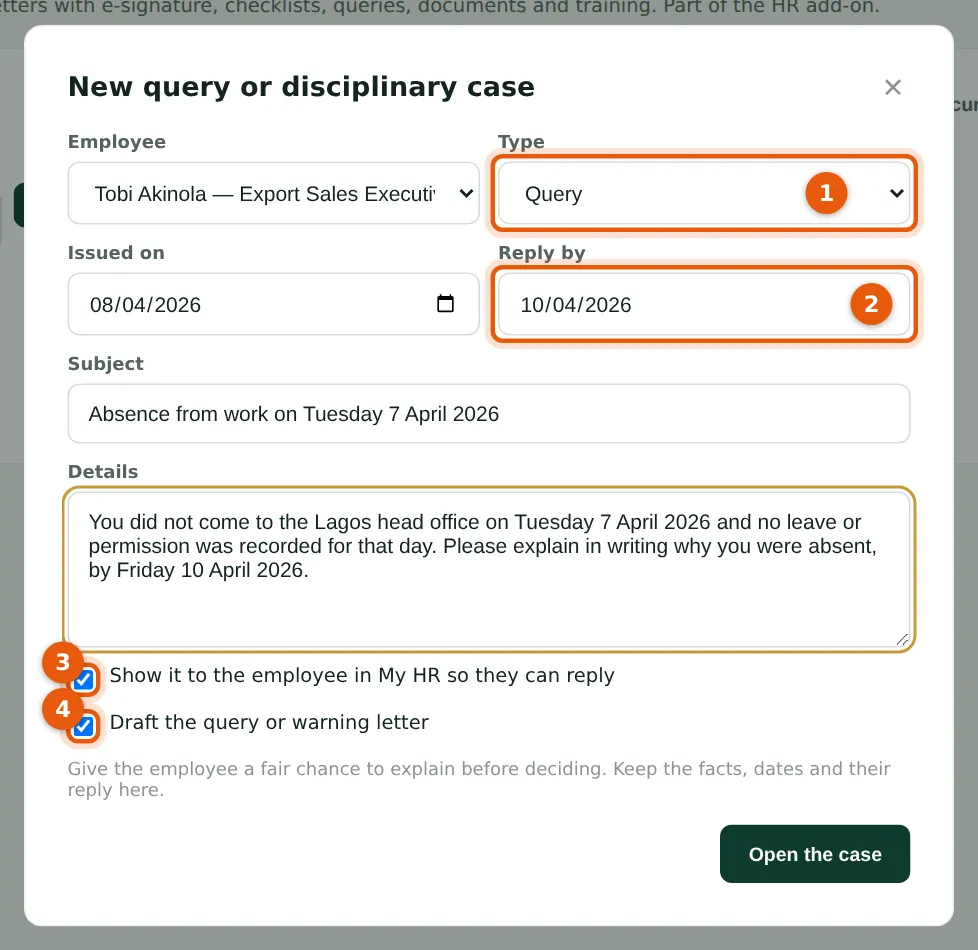
Tobi Akinola did not come to work on Tuesday 7 April and no leave was recorded. A query asks for an explanation before anything is decided — a fair hearing that Nigerian courts expect before disciplinary action. Blessing opens a Query (1) with a reply date (2). Shown to the employee (3), it appears in his My HR where he can reply; left unticked, it is a private note. Draft the query or warning letter (4) drafts the formal letter as well.
Who
Preparer or Admin.
What to do
- Open HR → Queries & cases → New query or case.
- Choose the employee, the type (1) — query, warning, final warning, suspension, dismissal or other — and the reply date (2).
- Write the subject and the facts, with dates.
- Keep the case visible to the employee (3) so they can reply, and the letter ticked (4) if you want one. Choose Open the case, then check and send the letter.
23.14 The employee replies in My HR
Why
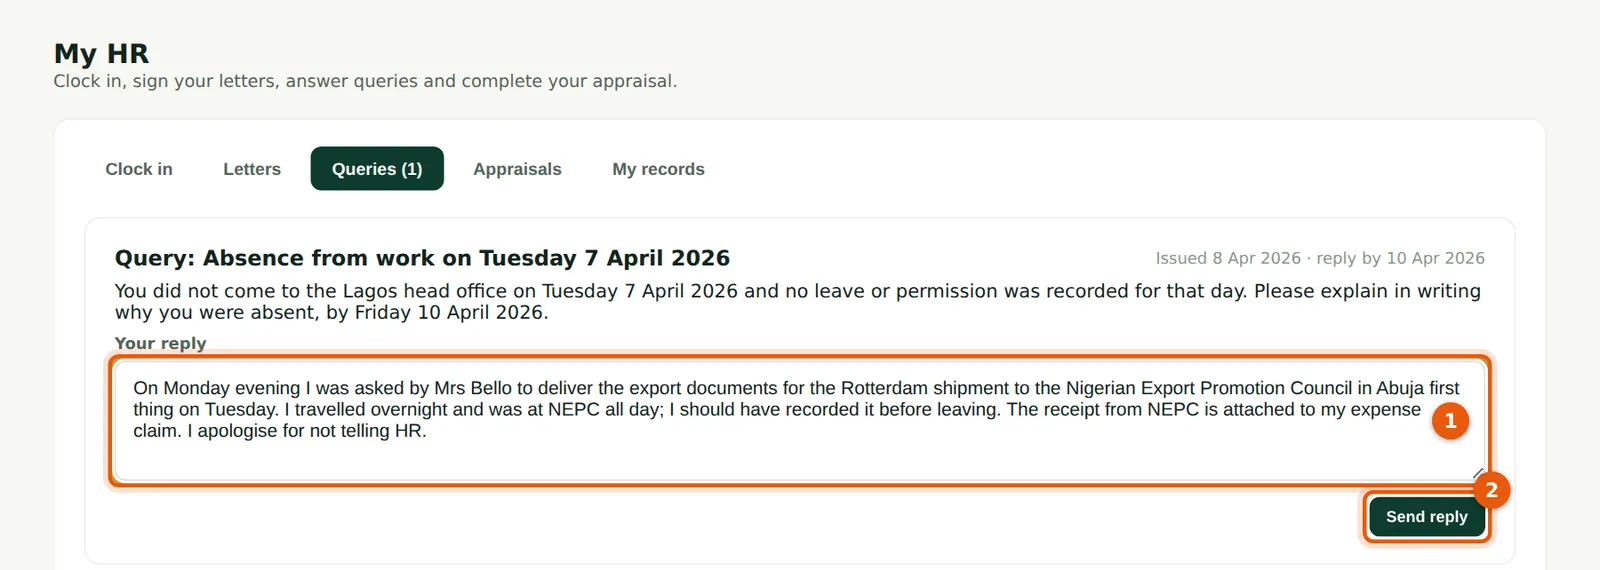
Tobi sees the query in My HR → Queries with the details and the reply date, writes his explanation (1) and sends it (2). He can change his reply until HR closes the matter. He explains that Aisha Bello sent him to the Nigerian Export Promotion Council in Abuja that day.
Who
The employee (self-service).
What to do
- Open My HR → Queries.
- Write the reply (1) and choose Send reply (2).
23.15 Close the case with the outcome
Why
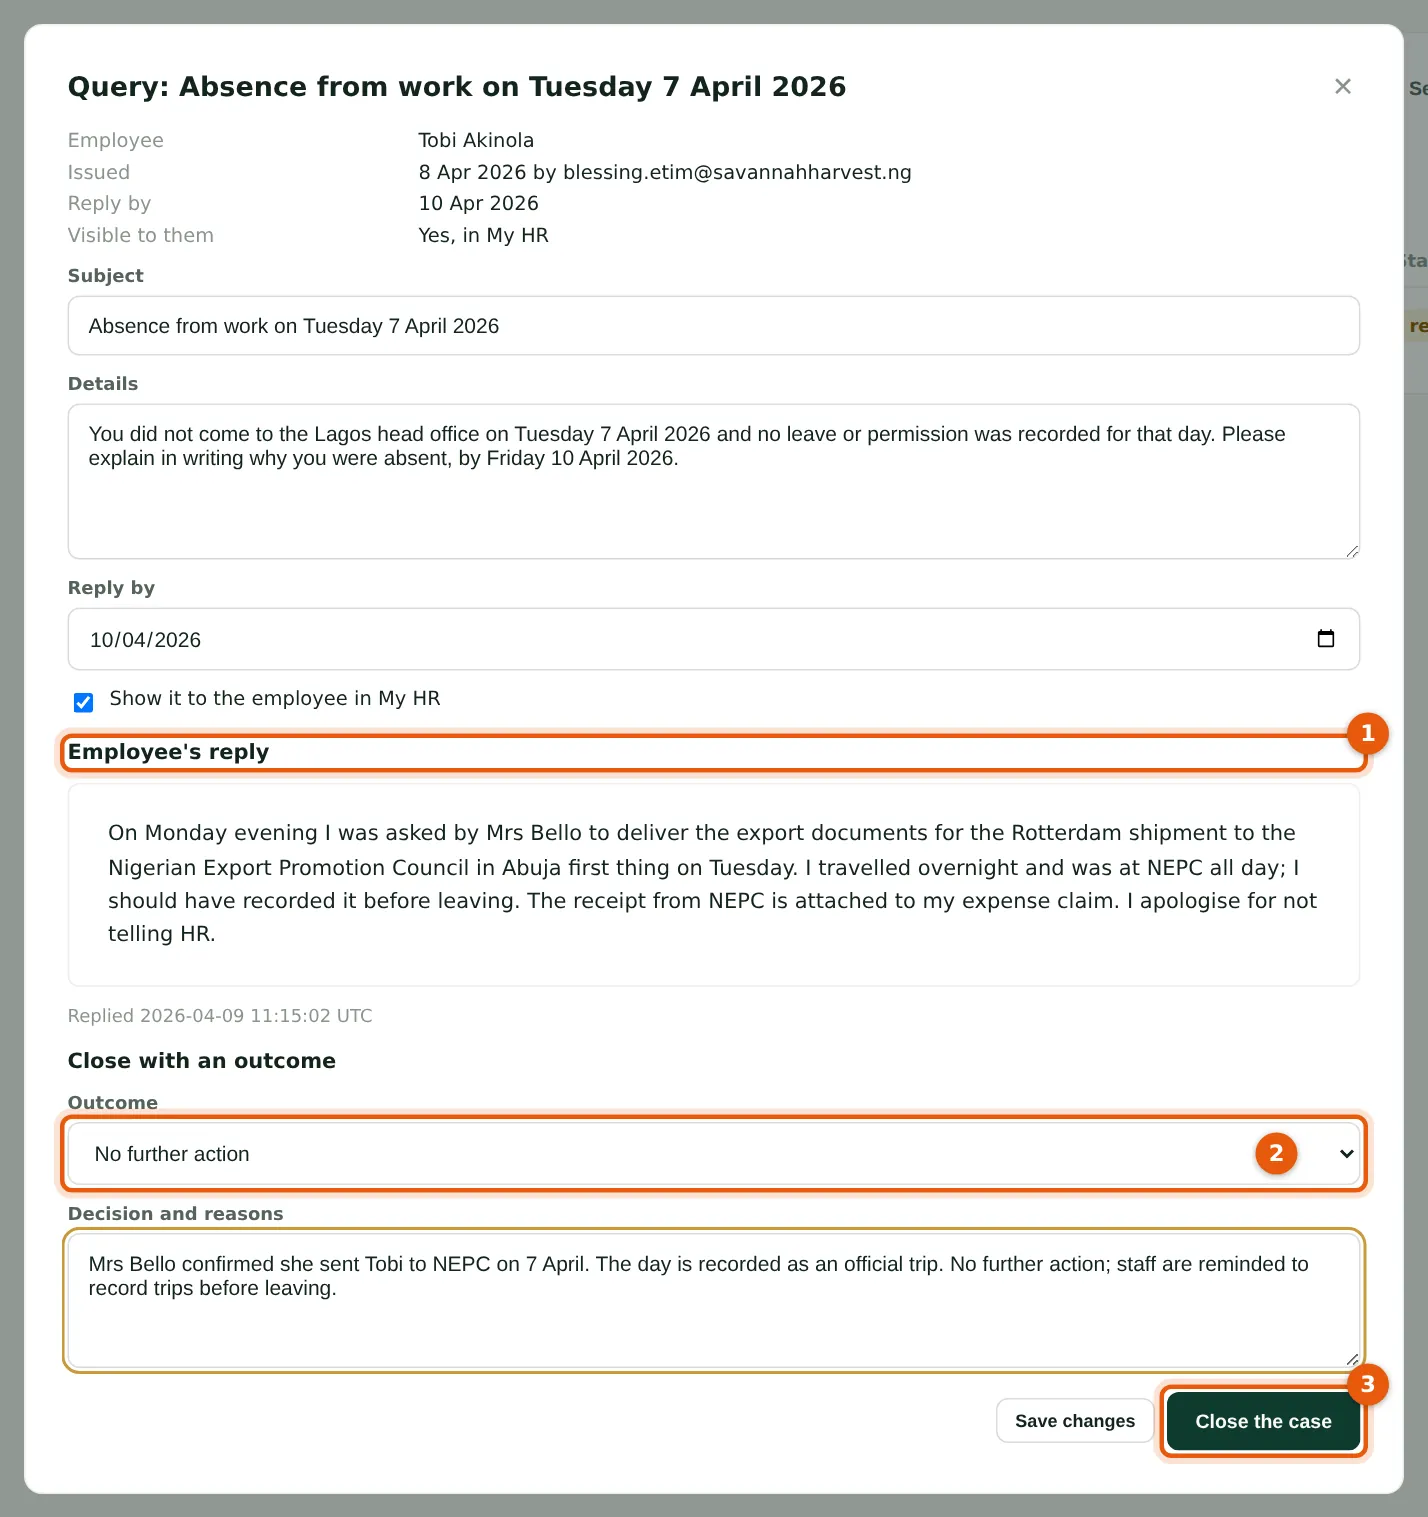
The case shows the employee's reply (1) beside the query. Blessing checks with Mrs Bello, records the outcome No further action (2) with the reasons, and closes the case (3). The disciplinary log keeps every case, reply and decision with dates, which is the record you need if a decision is ever challenged.
Who
Preparer or Admin.
What to do
- Open the case from HR → Queries & cases.
- Read the reply (1).
- Choose the outcome (2), write the decision and reasons, and choose Close the case (3).
23.16 Record a document with an expiry date
Why
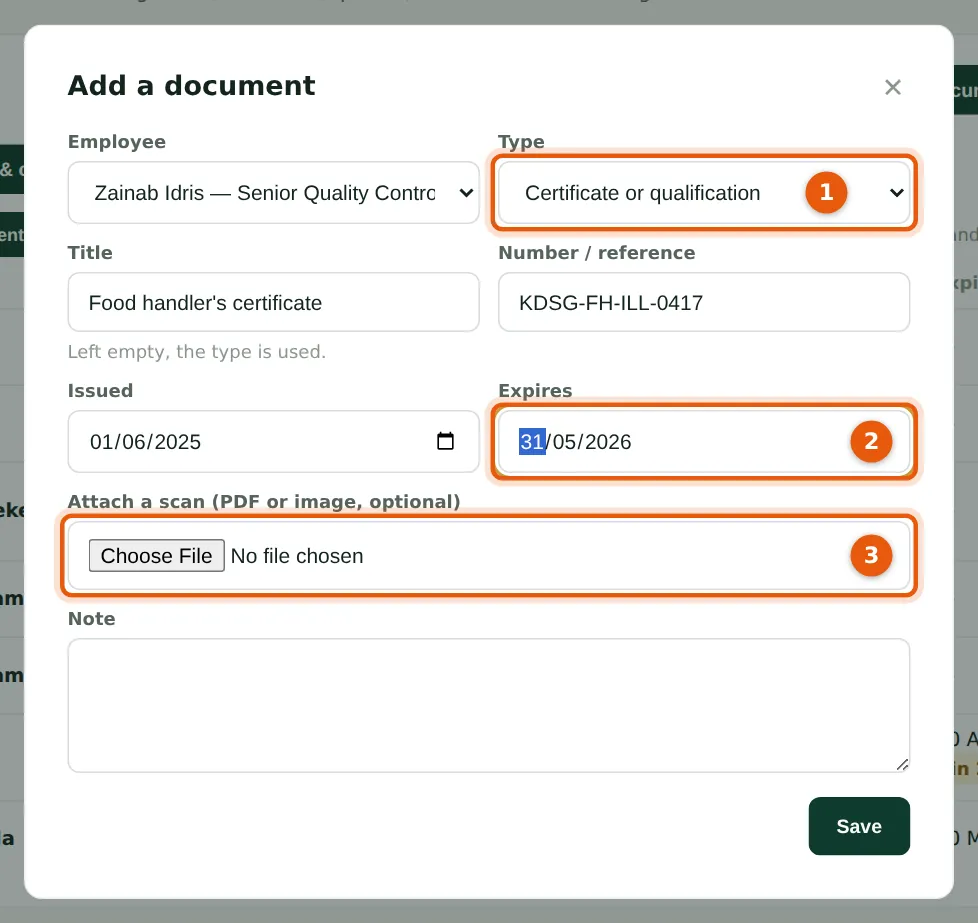
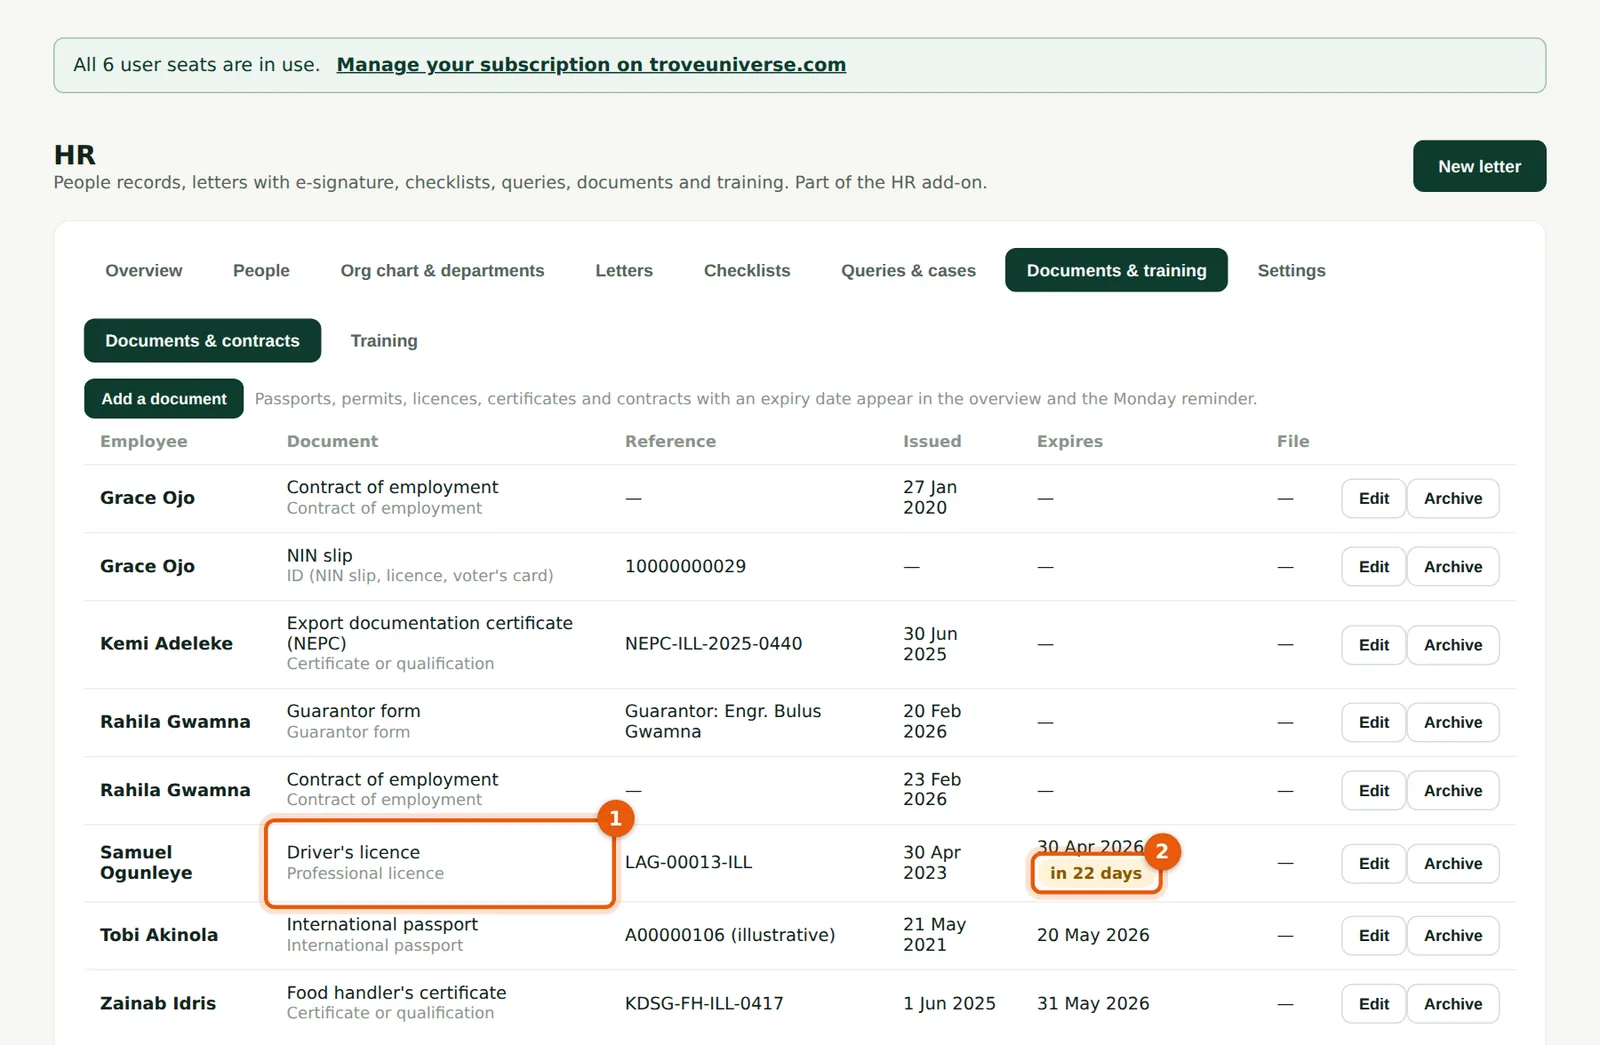
Documents HR holds — contracts, passports, work permits, ID, certificates, professional licences, guarantor forms, medical fitness — are recorded with their type (1), reference and dates. An expiry date (2) puts the document in the overview and the Monday email before it lapses. A scan can be attached (3). Zainab's food handler's certificate expires on 31 May 2026; Samuel Ogunleye's driving licence on 30 April; Tobi's passport, which he needs for export trips, on 20 May.
Who
Preparer or Admin.
What to do
- Open HR → Documents & training → Documents & contracts → Add a document.
- Choose the employee and the type (1); give a title and the number.
- Enter the issue and expiry dates (2), attach the scan (3) if you have it, and choose Save.
23.17 The documents list
Why
The list shows every active document with its expiry and how soon it comes (2): Samuel's driving licence (1) expires in 22 days. Archive keeps an old document on file but takes it out of the reminders, for example when a renewed passport is recorded.
Who
Everyone with a staff login can read it; Preparer or Admin change it.
What to do
- Check the Expires column (2); choose Edit to record a renewal, or Archive a document no longer current.
23.18 Record training
Why
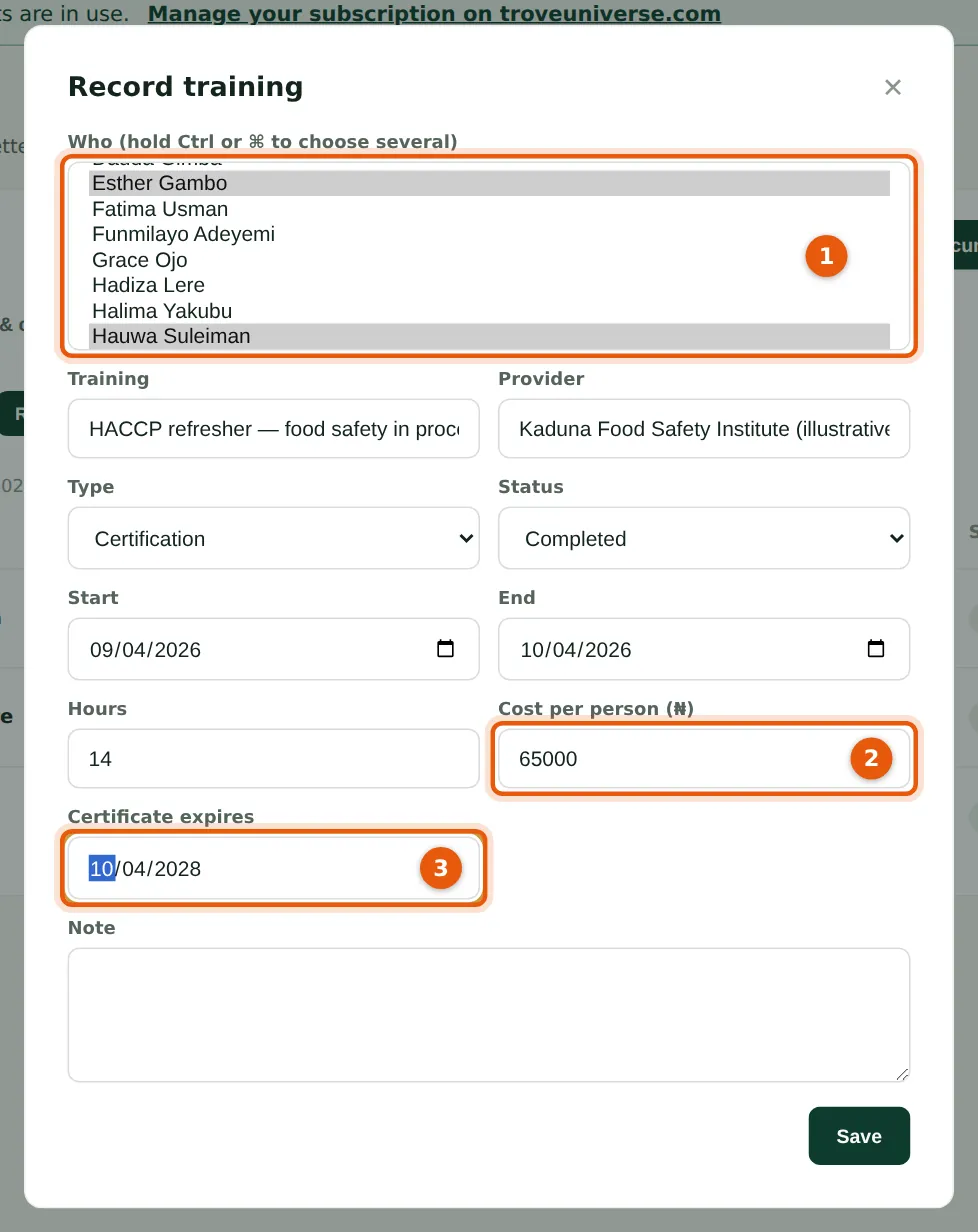
Training is recorded once for everyone who attended (1), with the provider, dates, hours, cost per person (2) and, for a certification, when the certificate expires (3). Four factory staff took a two-day HACCP food-safety refresher at ₦65,000 each. Keep course details and receipts: they support a training reimbursement claim from the Industrial Training Fund (ITF).
Who
Preparer or Admin.
What to do
- Open HR → Documents & training → Training → Record training.
- Choose who attended (1) — hold Ctrl or ⌘ to choose several.
- Enter the training, provider, type, status, dates, hours and cost (2), and the certificate expiry (3). Choose Save.
23.19 The training record for the year
Why
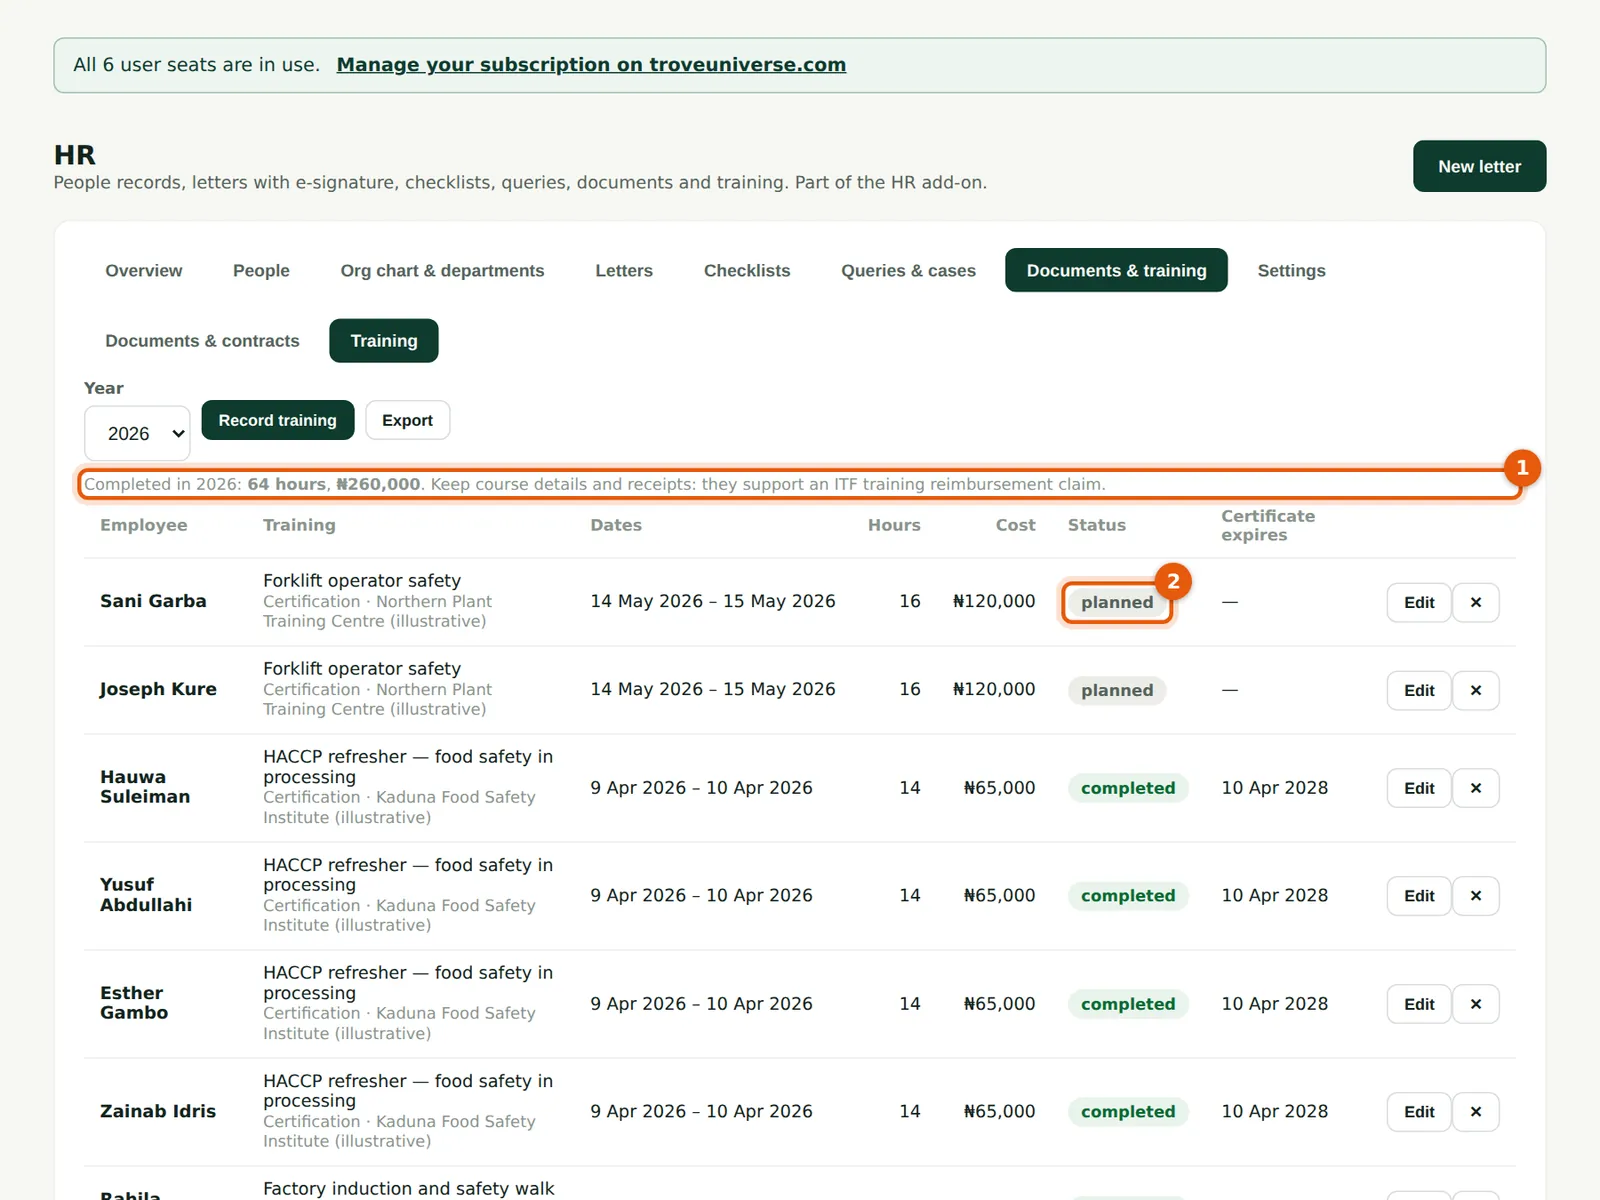
The year's total of completed hours and cost (1) is shown above the list; planned courses (2) are listed too, such as the forklift safety course booked for May. Export gives the list as a spreadsheet for the ITF claim.
Who
Everyone with a staff login.
What to do
- Choose the year; choose Edit to mark a planned course completed; choose Export.
23.20 The HR overview and the Monday reminder
Why
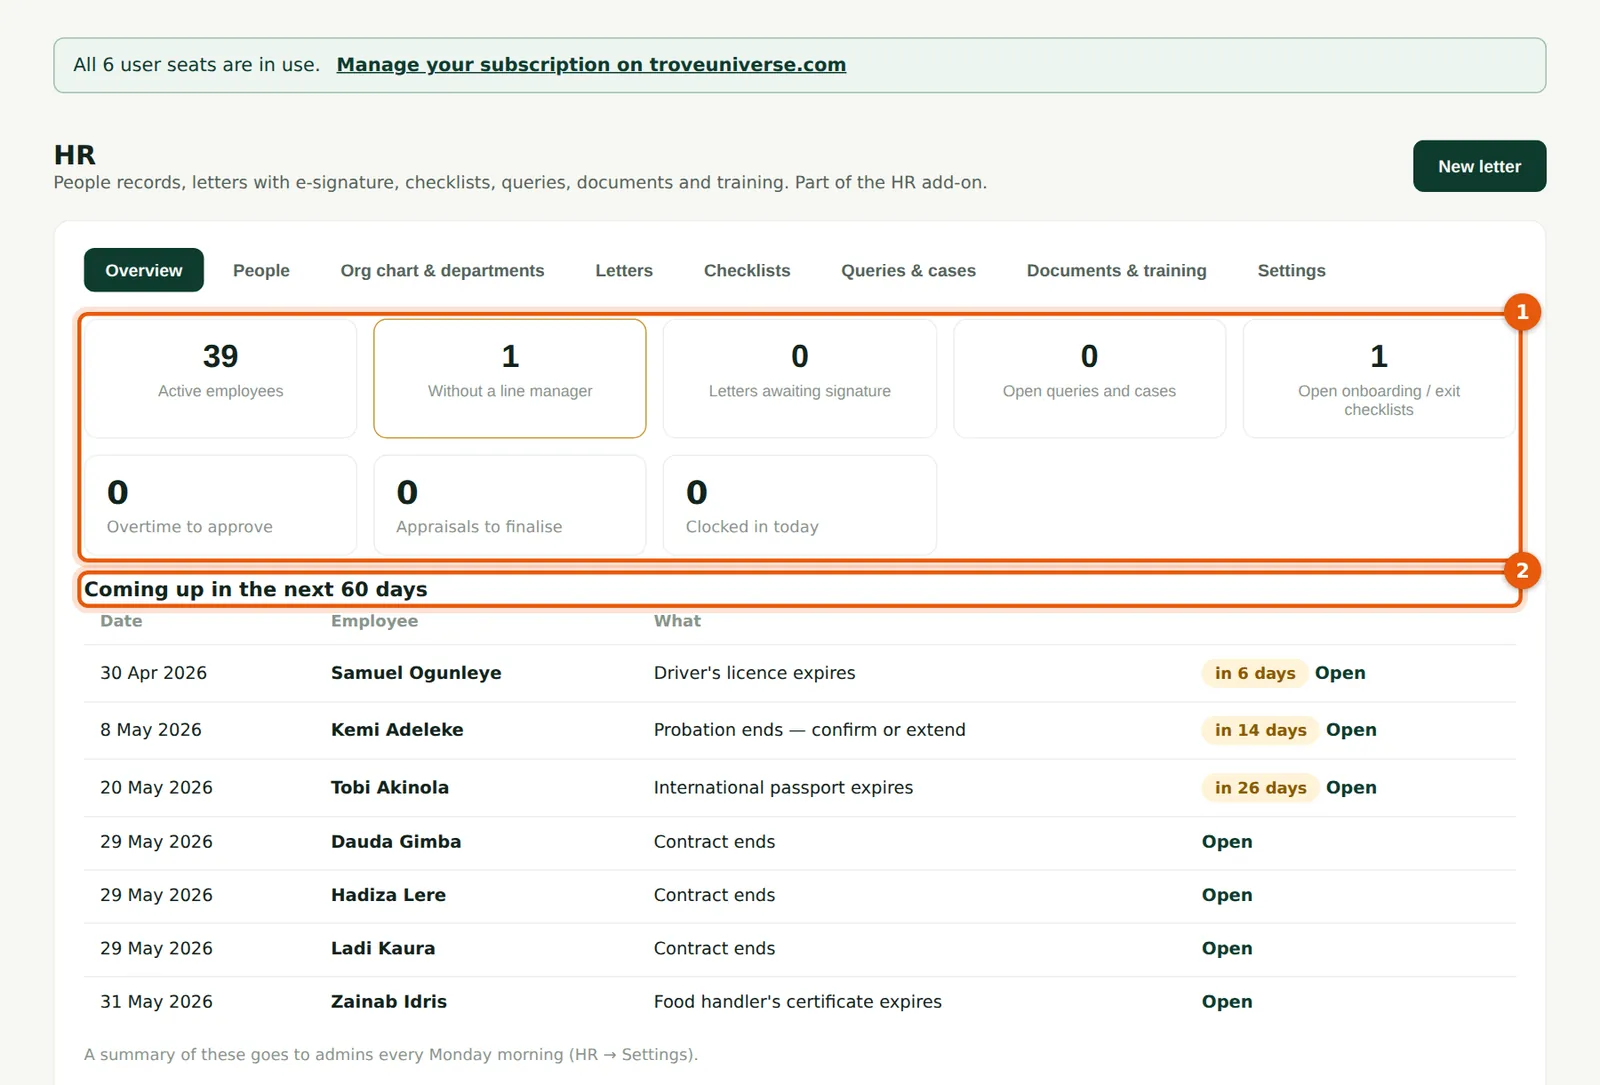
The overview (1) counts active employees, people without a line manager, letters awaiting signature, open cases and checklists, overtime to approve, appraisals to finalise and who clocked in today. Coming up in the next 60 days (2) lists probation ends, contract ends and expiring documents, certificates and HMO cover: on 24 April it shows Samuel's driving licence, Kemi Adeleke's probation (8 May), Tobi's passport, the three seasonal factory hands' contracts ending on 29 May and Zainab's certificate. The same list is emailed to the Admins every Monday morning.
Who
Everyone with a staff login.
What to do
- Choose a tile (1) to go to that list.
- Choose Open on an item (2) to deal with it.