Steps in this chapter (20)
This chapter covers the settings not shown earlier, and the three connections that need the company's own accounts and keys with an outside service: NRS e-invoicing, bank feeds and AI assistance. BookTrove does not supply these accounts. Savannah Harvest has not connected any of them, so the screens show them empty — nothing here is invented output.
Settings are changed by owners and administrators (Company settings: Full). Every change is recorded in the audit trail.
18.1 Document numbering
Why
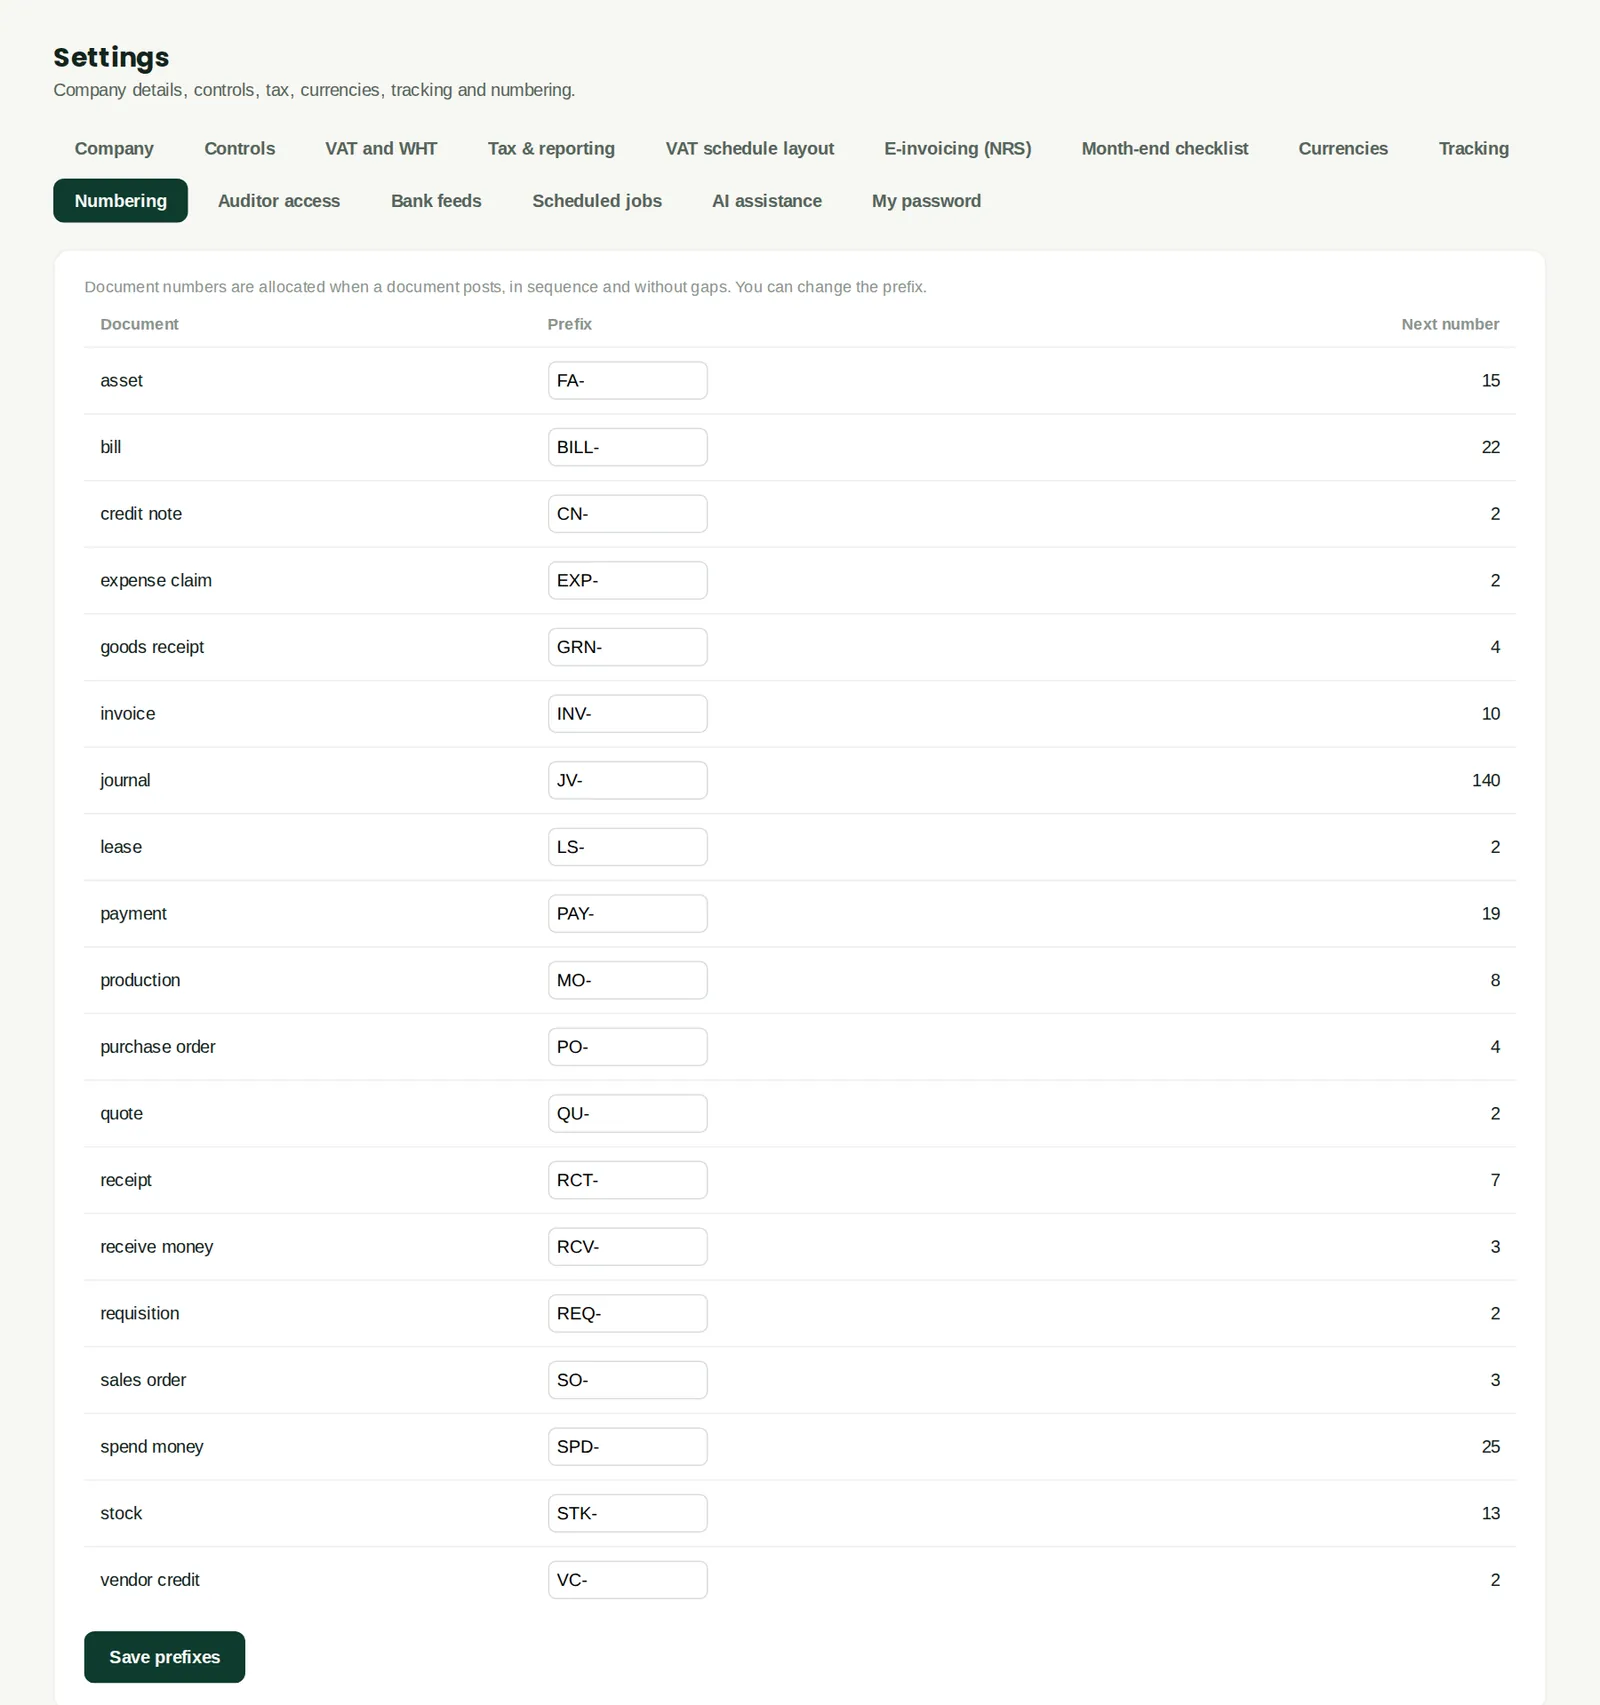
Each kind of document has its own prefix and sequence: INV- for invoices, BILL- for bills and so on. Numbers are given when a document is posted, in order and without gaps, which the VAT rules require for invoices. The Numbering gaps report (chapter 19) checks this.
Who
An owner or administrator.
What to do
- Change a prefix if you need to (for example to add the year) and click Save prefixes. Numbers already issued do not change.
18.2 The VAT schedule layout
Why
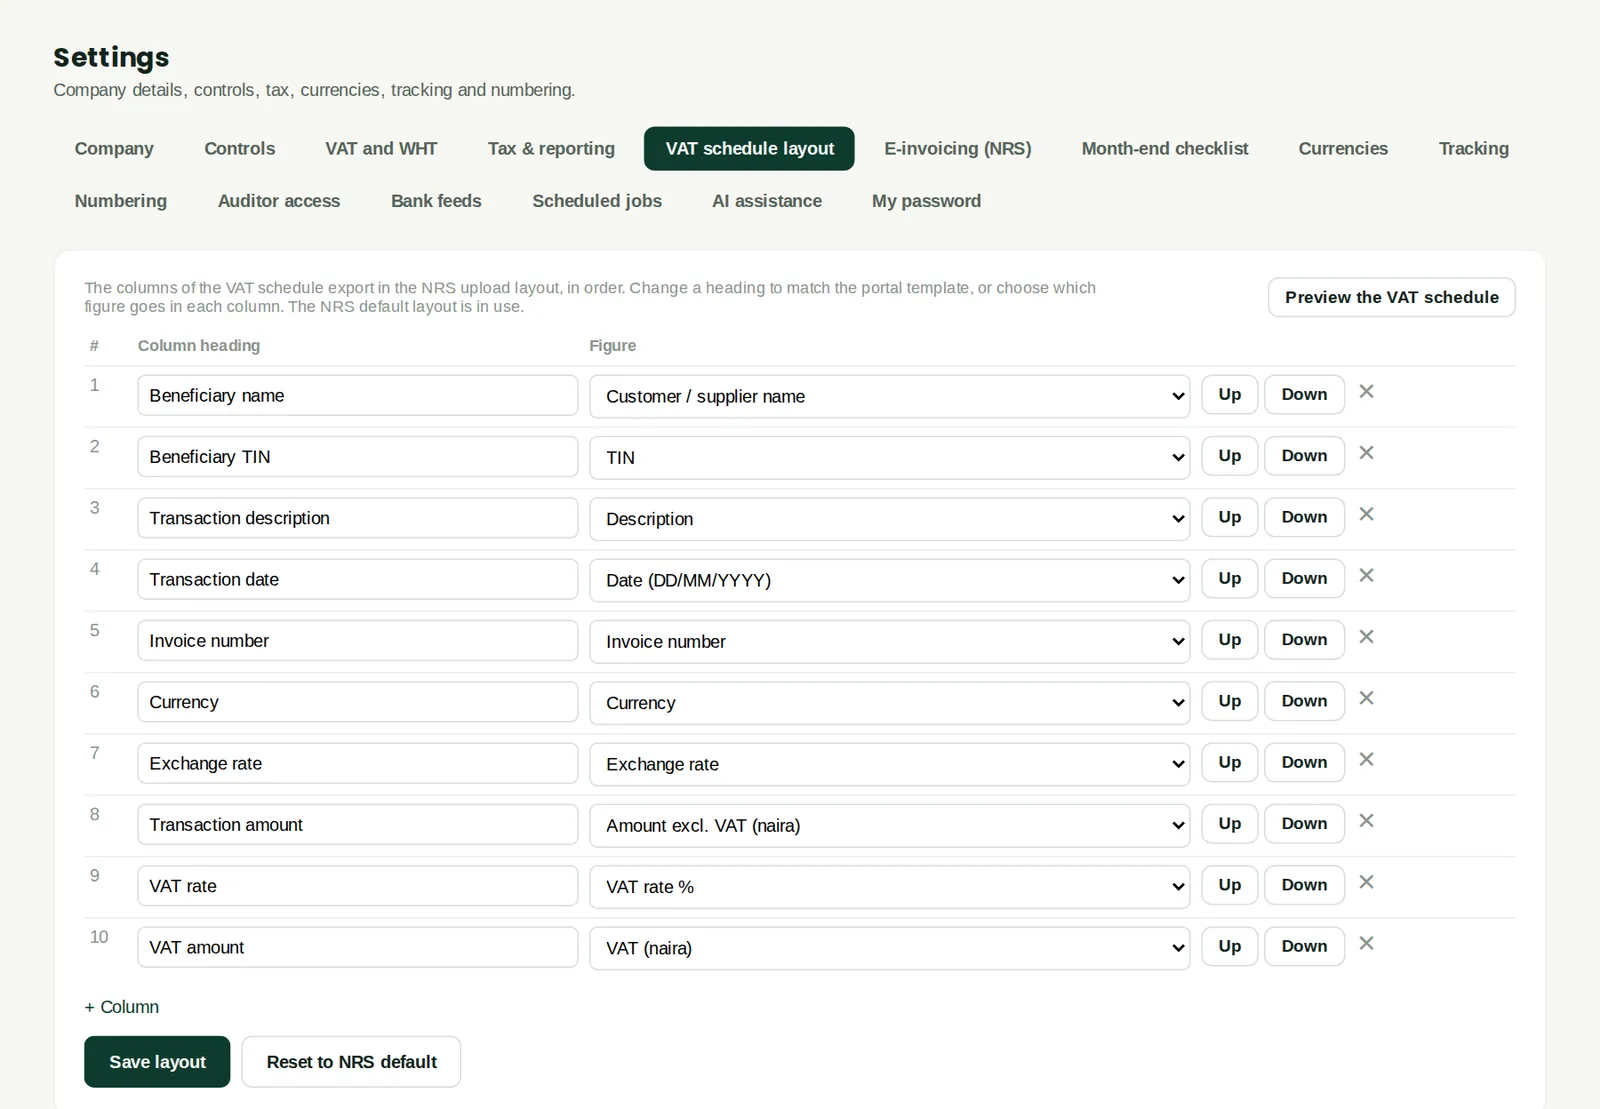
The VAT schedule (chapter 11) is exported in the column order of the NRS upload template. If NRS changes its template, change the headings and the figure in each column here instead of editing the file by hand.
Who
Accountant or administrator.
What to do
- Change a heading or the figure in a column, move columns Up or Down, add or remove columns and click Save layout. Reset to NRS default puts back the standard layout; Preview the VAT schedule shows the result.
18.3 The month-end checklist
Why
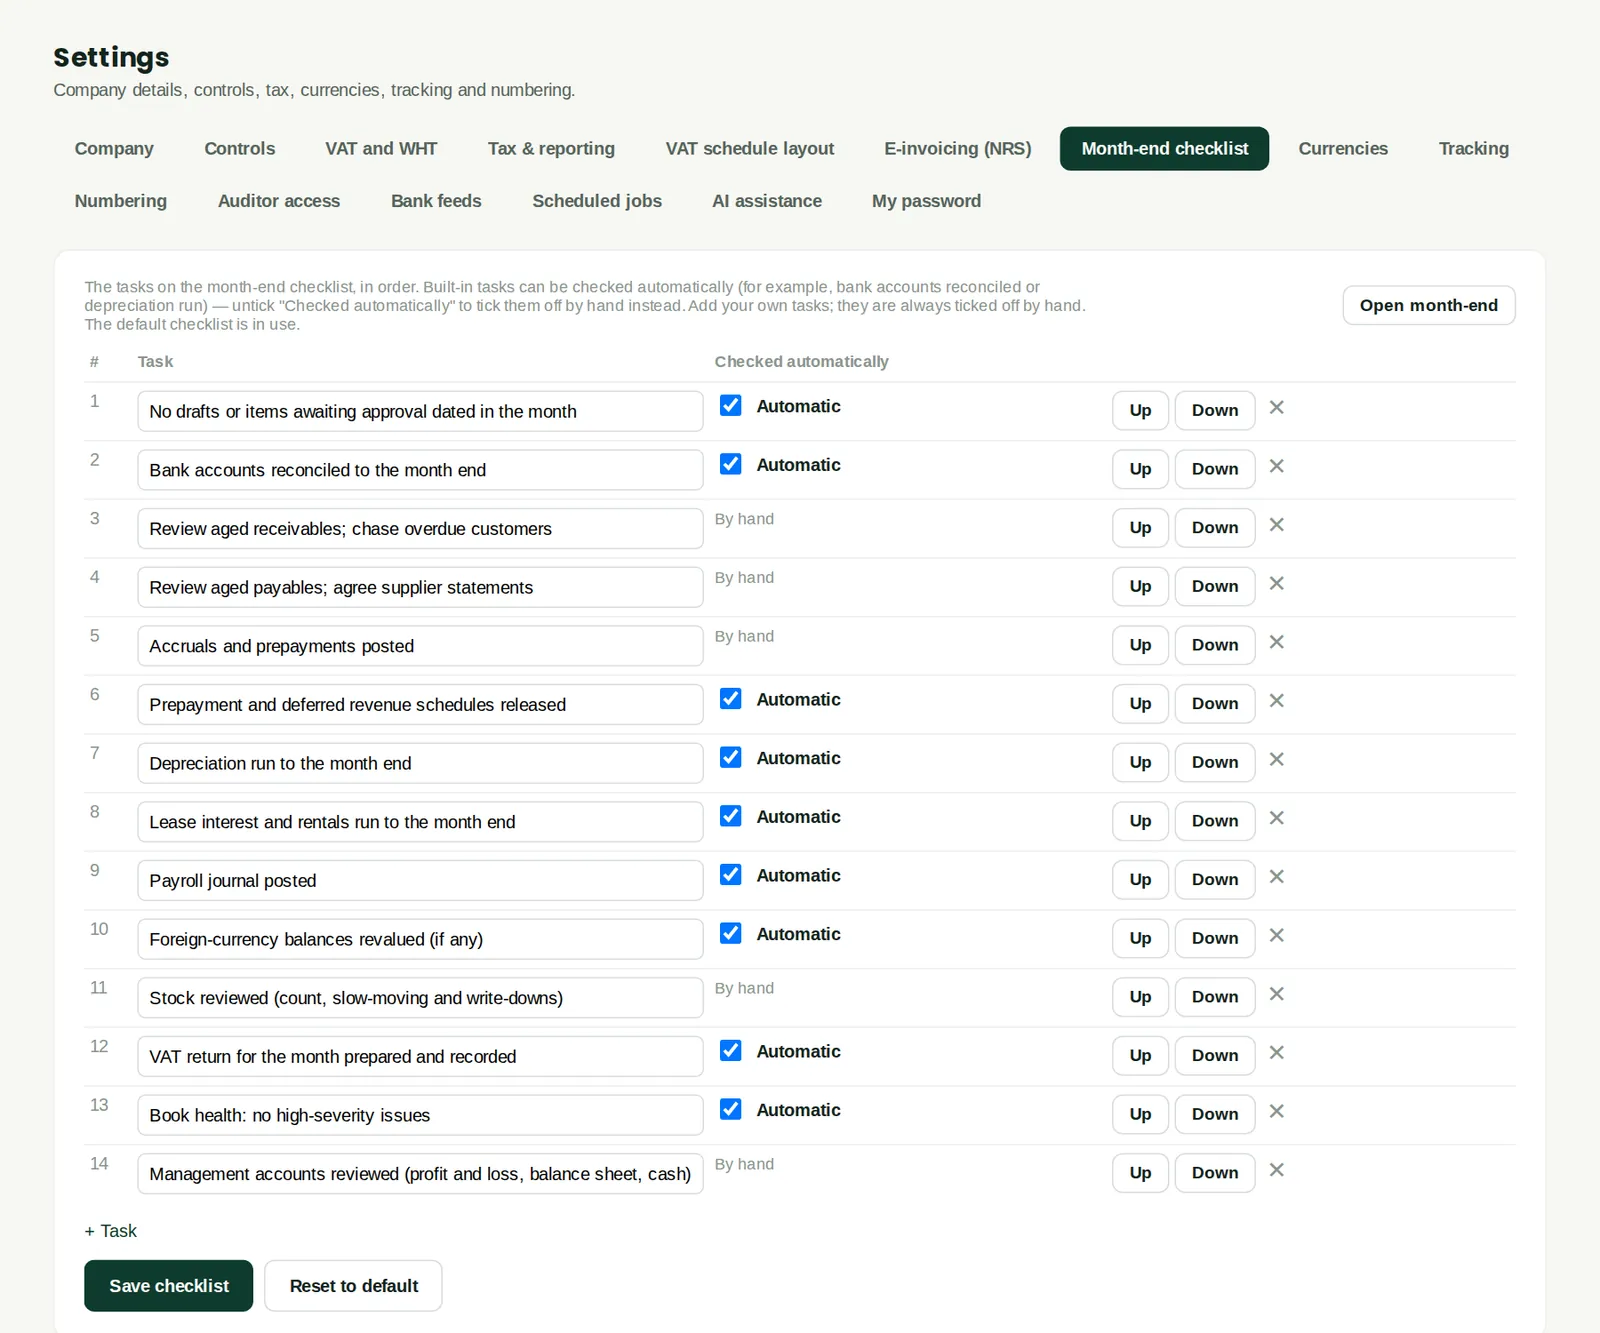
The tasks on the month-end checklist (chapter 10), in order. Built-in tasks marked Automatic are ticked by BookTrove when the check passes (for example bank accounts reconciled to the month end). Add your own tasks, which are ticked by hand.
Who
Accountant or administrator.
What to do
- Edit, reorder or remove tasks, click + Task for a new one and click Save checklist. Reset to default restores the standard list.
18.4 Auditor access tokens
Why
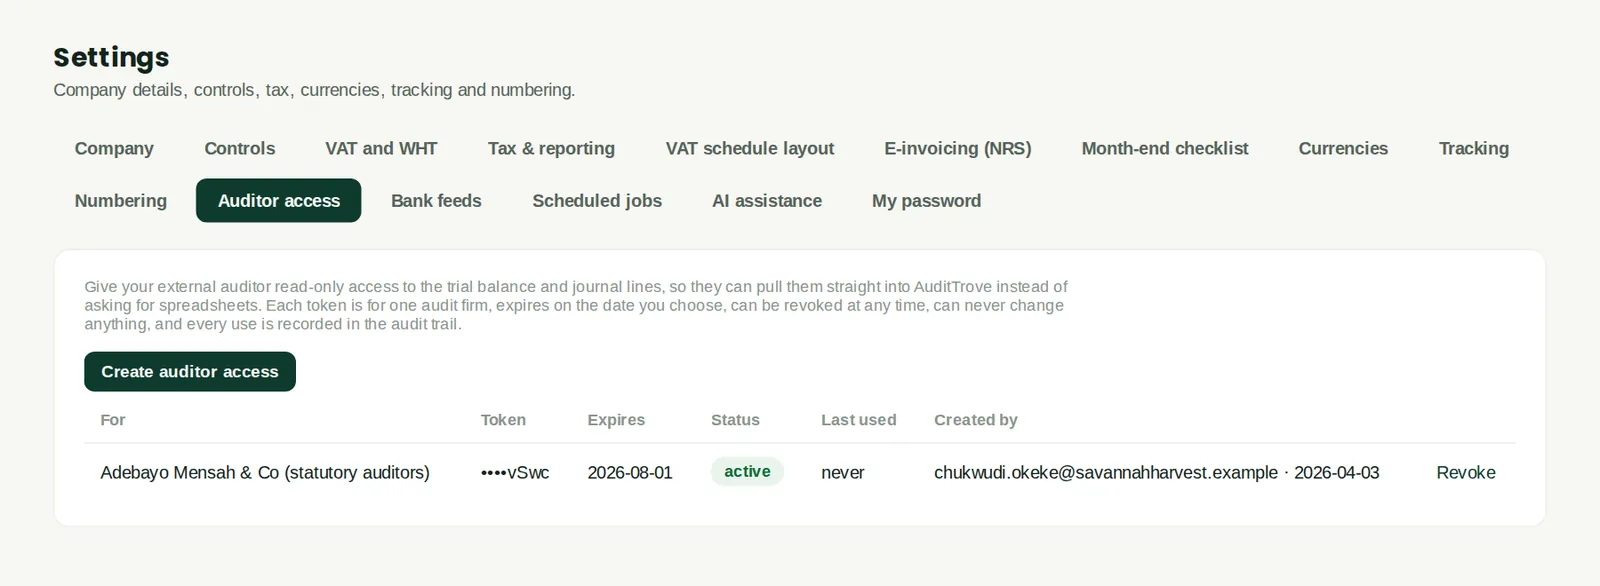
The tokens given to external auditors (chapter 14), with the audit firm, the hint of the token, expiry, status, last use and who created it. Revoke a token as soon as the audit is finished.
Who
An owner or administrator.
What to do
- Click Revoke next to a token to stop it working.
18.5 Connect NRS e-invoicing
Why
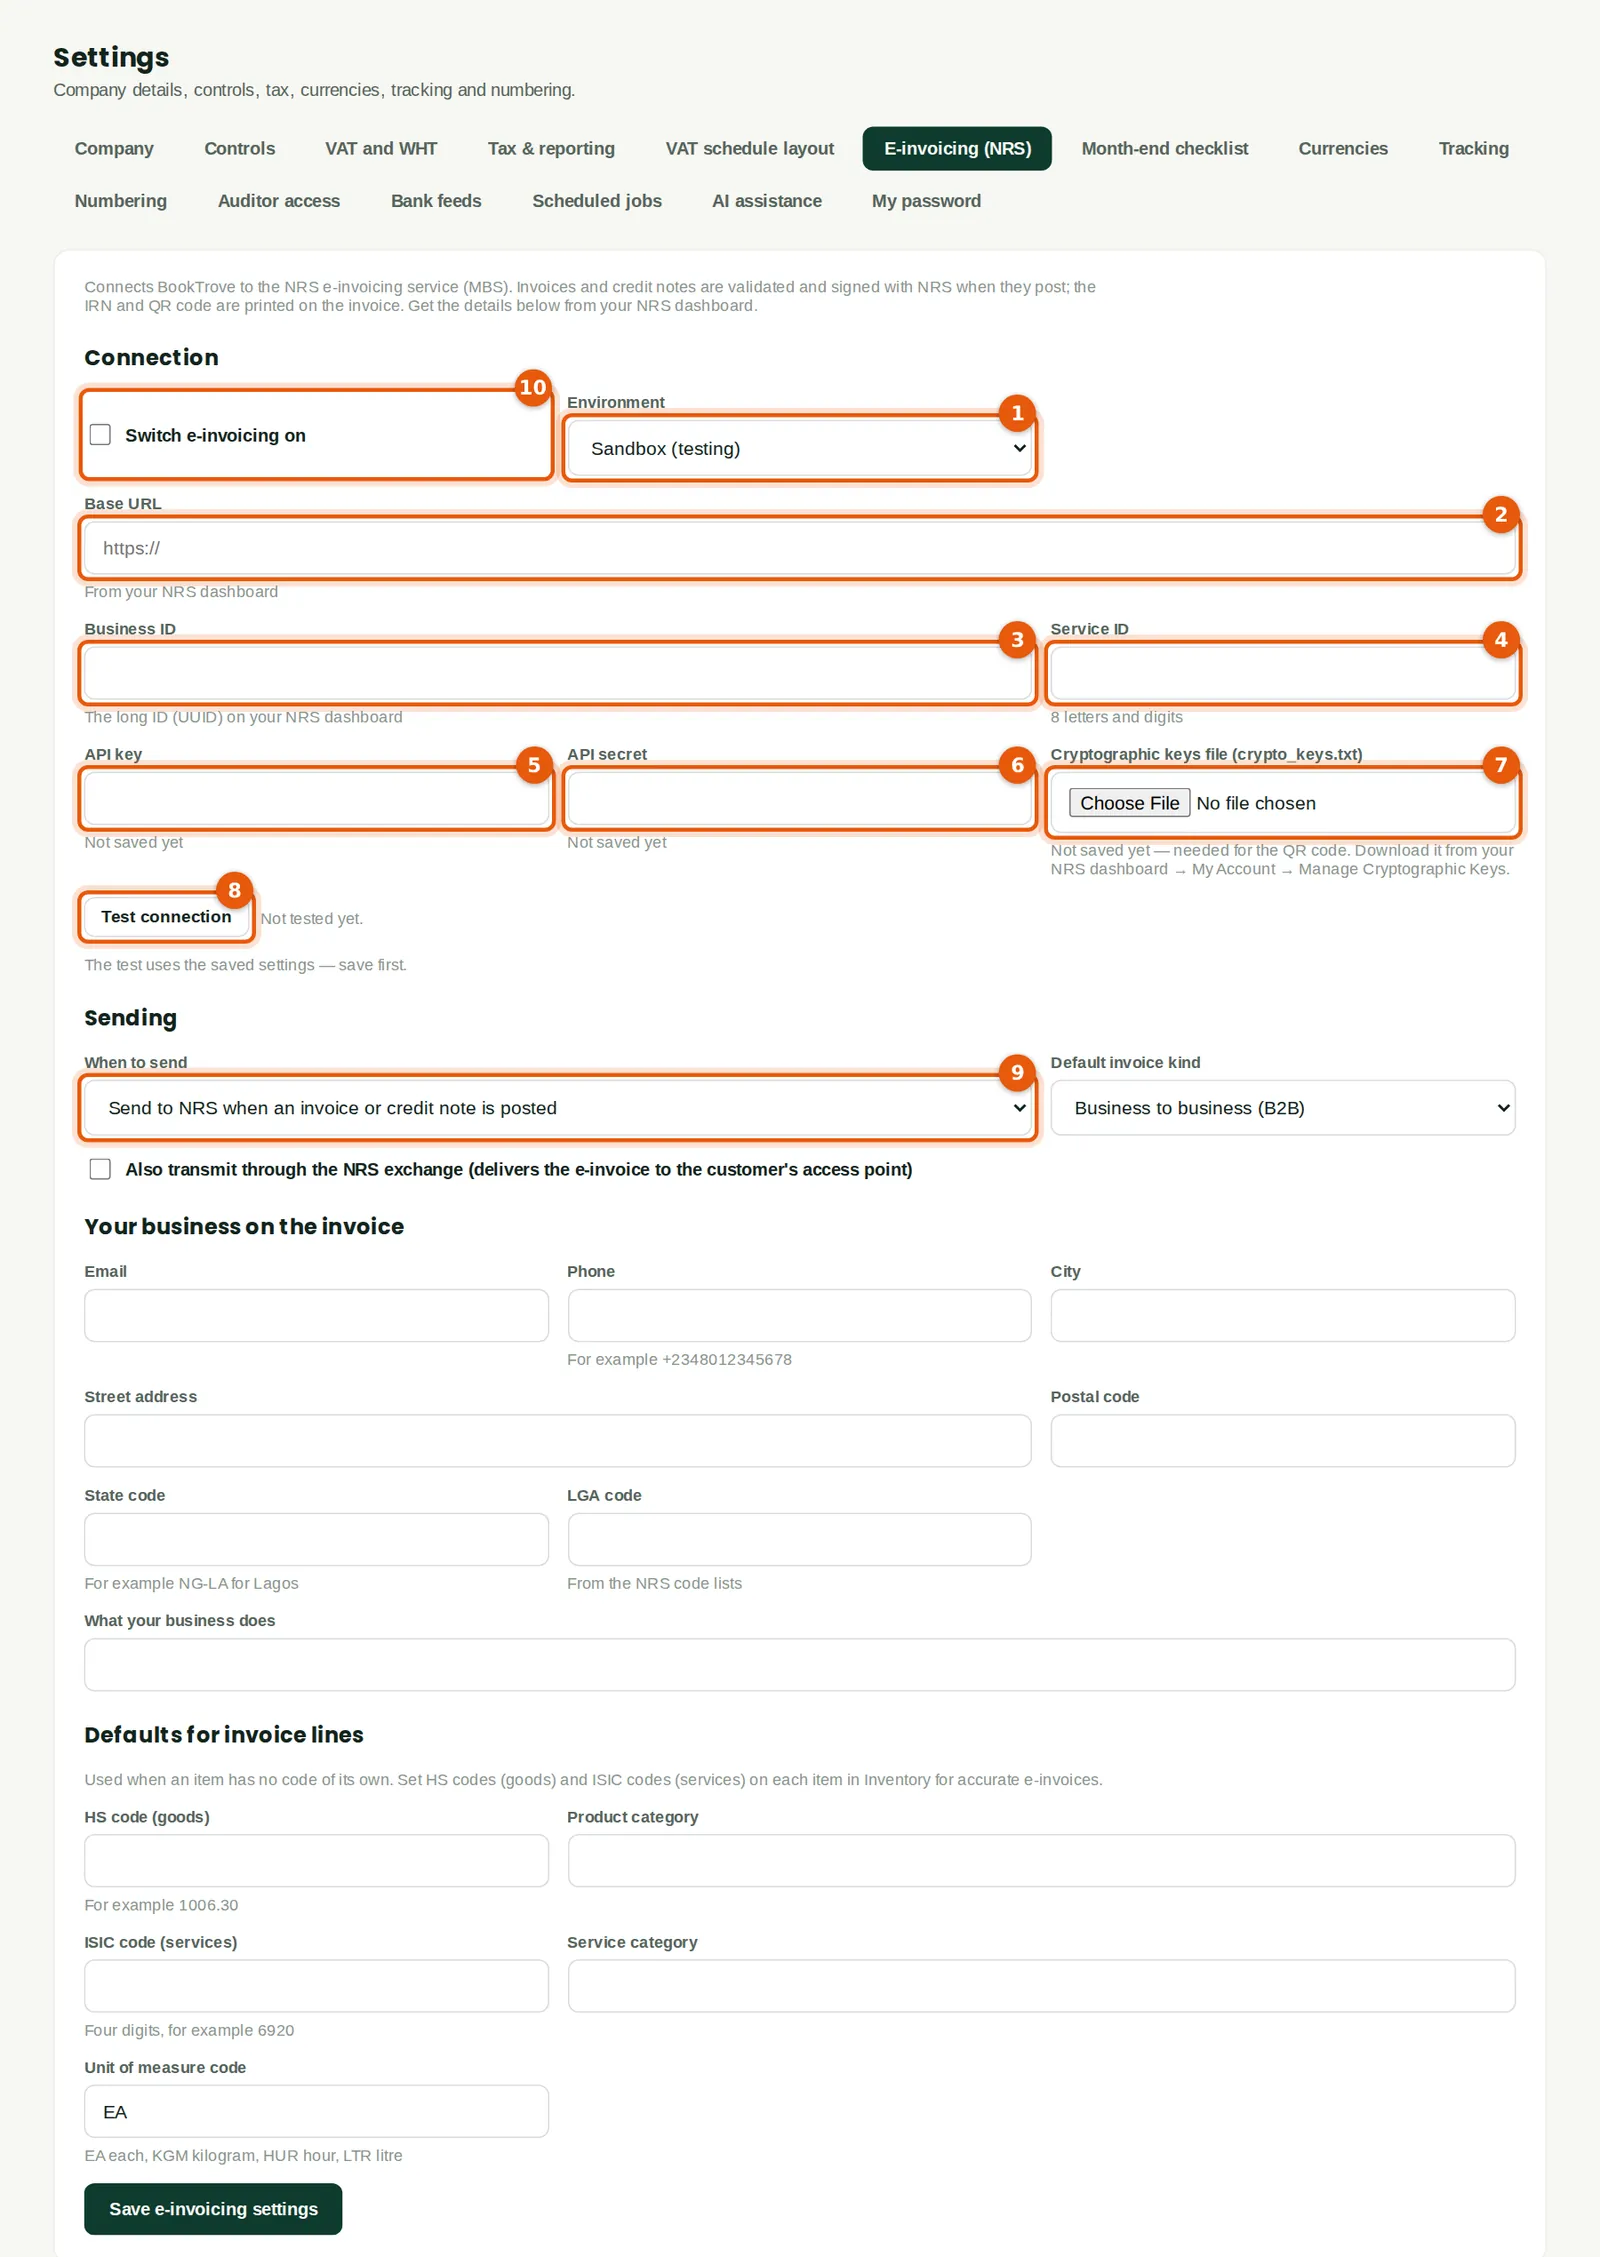
Under the NRS e-invoicing rules, invoices and credit notes are validated and signed by NRS, which returns an invoice reference number (IRN) and a QR code to print on the invoice. BookTrove connects to the NRS e-invoicing service with the company's own credentials. First register the company for e-invoicing with NRS; its NRS e-invoicing dashboard then shows the details below. Start in the sandbox (test) environment and move to production only after a successful test.
Who
An owner or administrator, with the company's NRS e-invoicing details.
What to do
- Environment (1): choose Sandbox (testing) first.
- Base URL (2): the address of the NRS service, as shown on your NRS dashboard.
- Business ID (3): the long ID (UUID) on your NRS dashboard. Service ID (4): the 8-letter-and-digit service ID.
- API key (5) and API secret (6): from the NRS dashboard. They are stored encrypted and never shown again.
- Cryptographic keys file (7): download crypto_keys.txt from the NRS dashboard (My Account → Manage Cryptographic Keys) and choose it here. It is needed to make the QR code.
- Click Save e-invoicing settings, then Test connection (8). Fix anything it reports.
- Under Sending, choose when to send (9) — normally when an invoice or credit note is posted — and the default invoice kind. Fill in Your business on the invoice and the defaults for invoice lines (HS or ISIC codes and categories; set them on each item for accuracy).
- When the test succeeds, tick Switch e-invoicing on (10) and save. Change the environment to production when NRS confirms you are ready.
18.6 The e-invoicing queue
Why
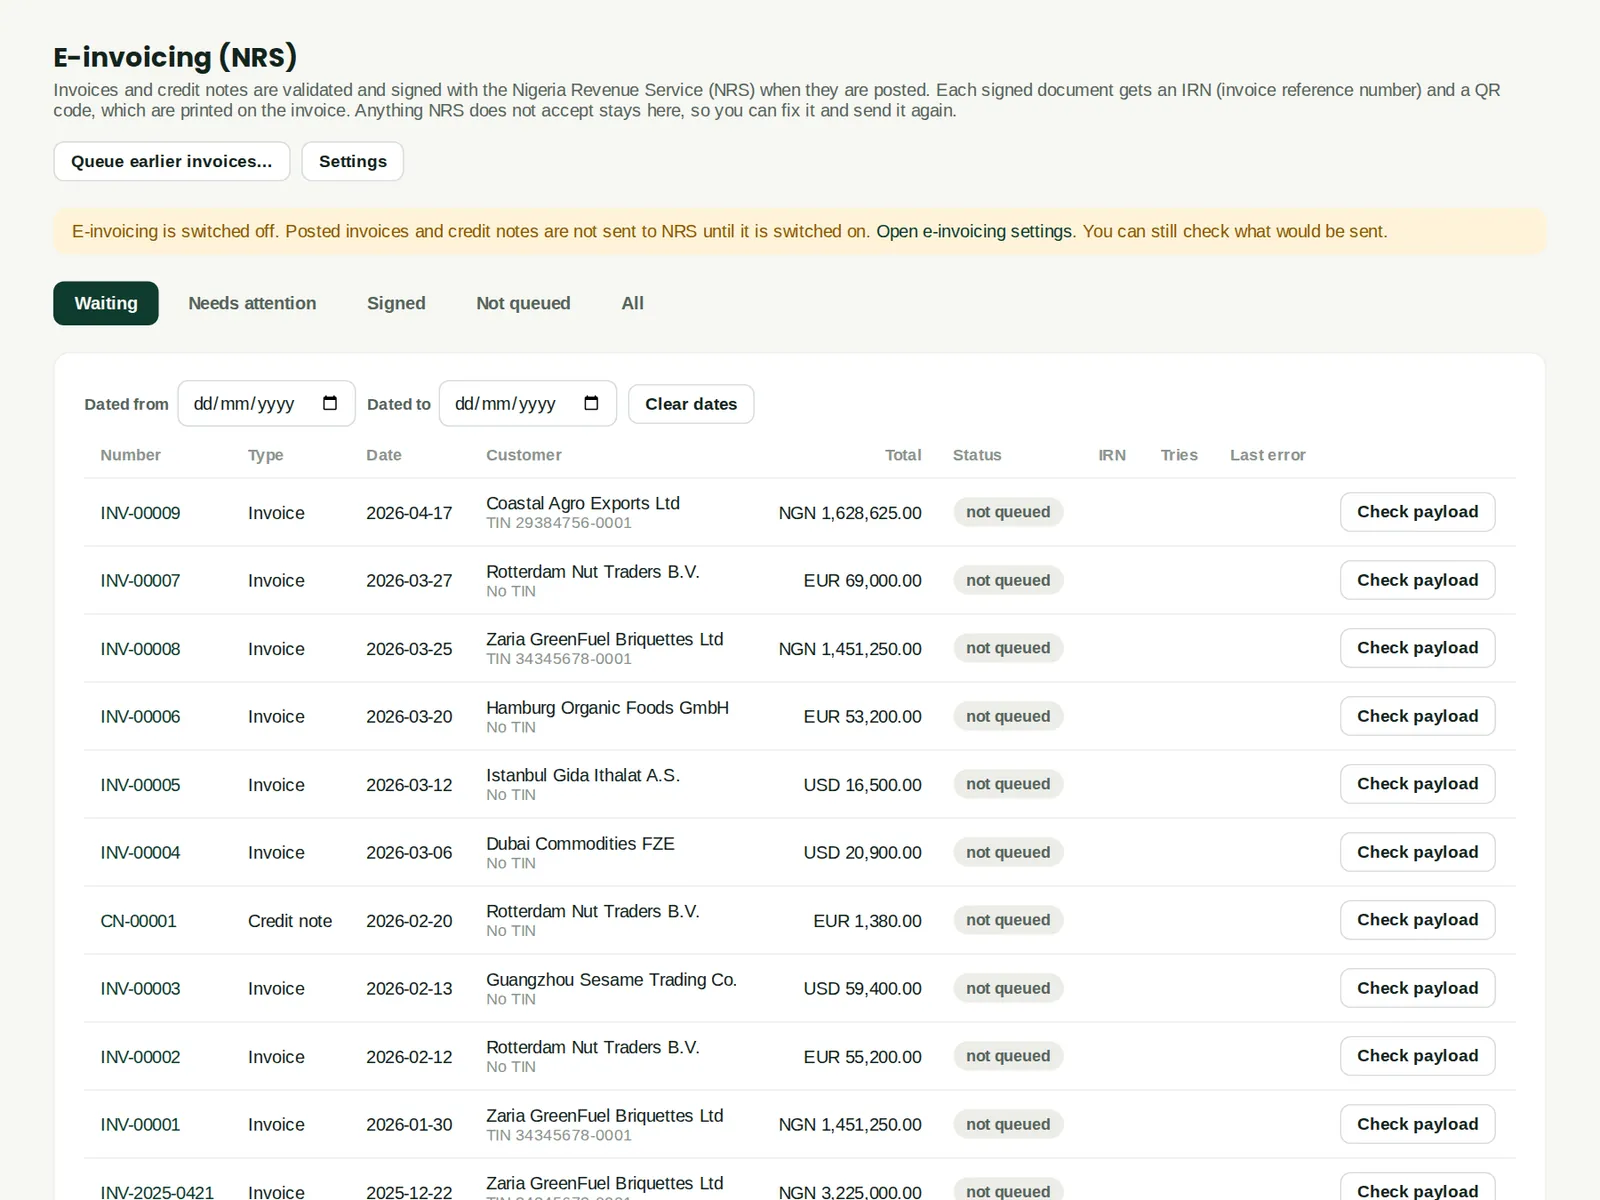
Every invoice and credit note with its e-invoicing status: waiting, needs attention, signed or not queued, with the IRN and the last error. Failed sends are retried automatically; documents NRS rejected need fixing. While e-invoicing is off, as here, nothing is sent and the documents show as not queued.
Who
Accountant, sales.
What to do
- Use the tabs to see what needs attention. Click Check payload to see the data for a document.
18.7 Connect bank feeds
Why
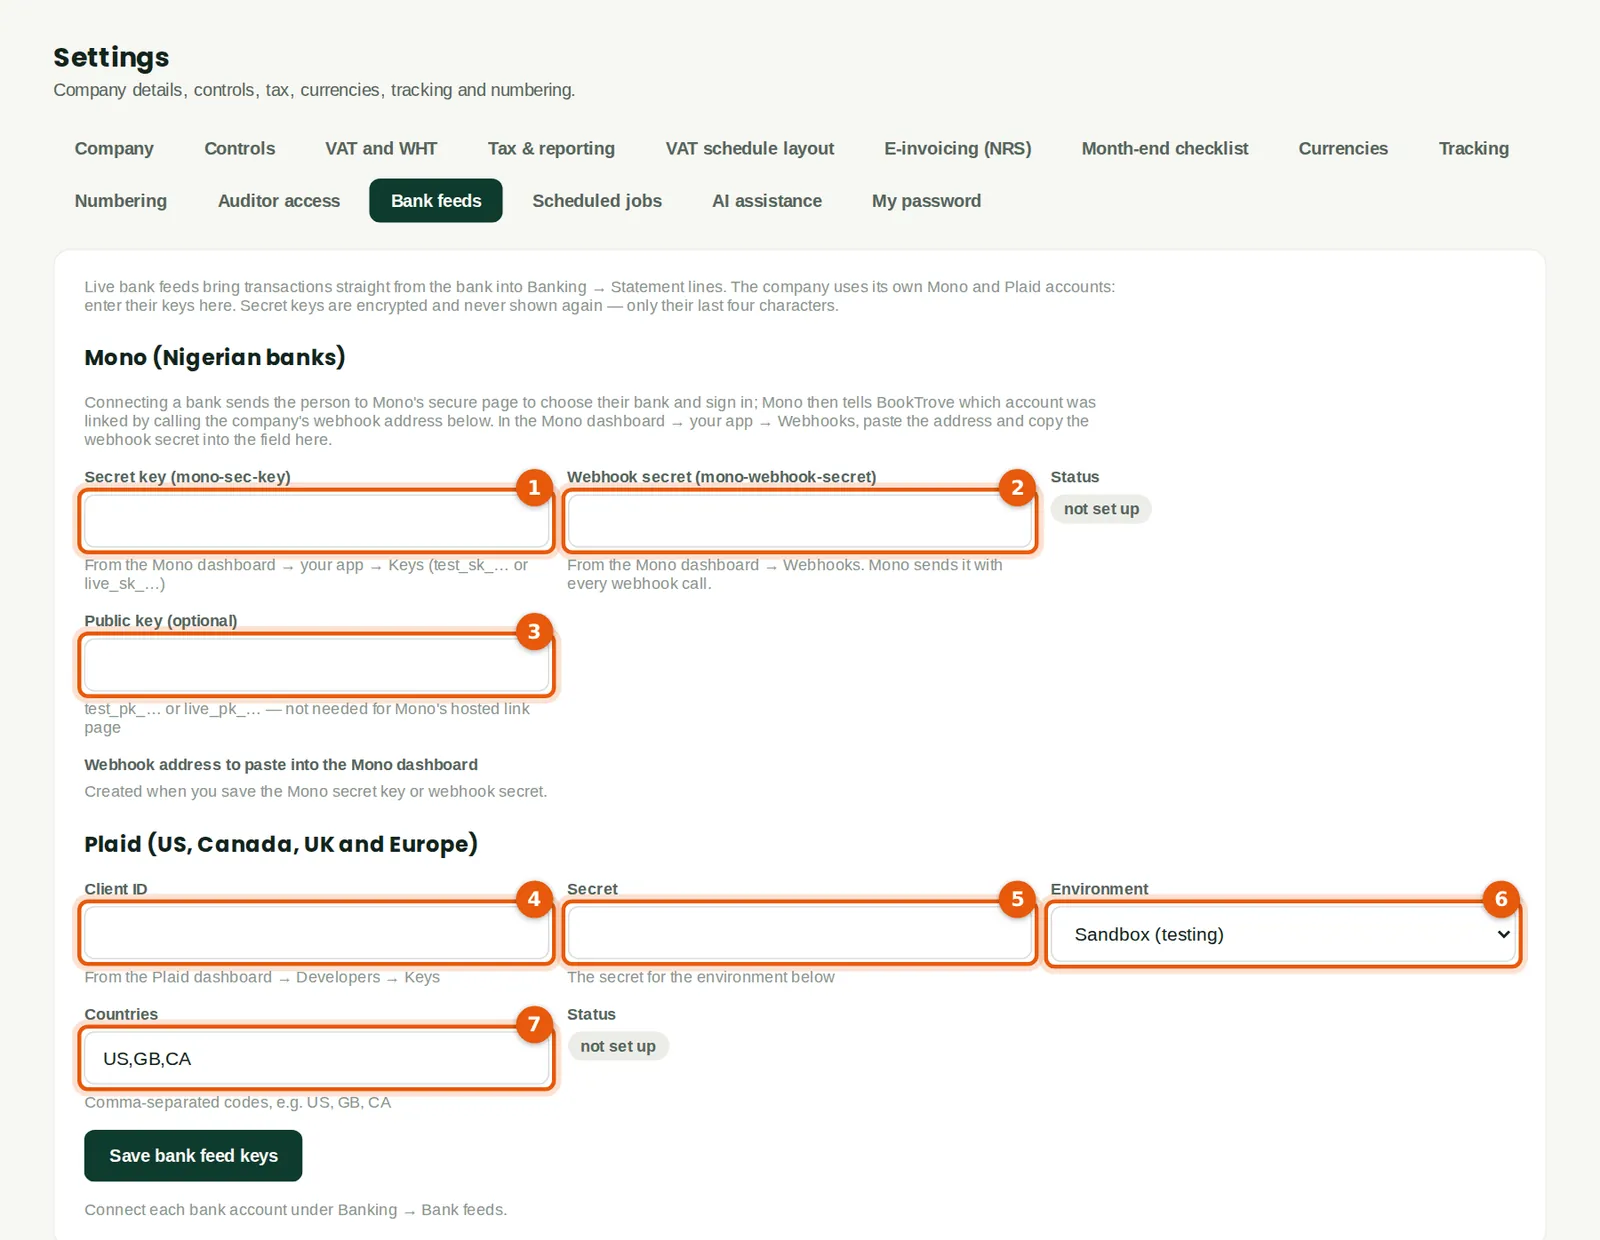
Bank feeds bring statement lines in automatically instead of importing a CSV (chapter 8). BookTrove works with two providers: Mono for Nigerian banks and Plaid for banks in the US, Canada, the UK and Europe. The company opens its own account with the provider, which may charge for it, and enters its keys here. Secret keys are stored encrypted and never shown again.
Who
An owner or administrator.
What to do
- Mono: in the Mono dashboard, open your app → Keys and copy the secret key into Secret key (1).
- In the Mono dashboard → Webhooks, copy the webhook secret into Webhook secret (2). The public key (3) is optional.
- Click Save bank feed keys. BookTrove then shows a Webhook address: copy it into the Mono dashboard's webhook settings so Mono can tell BookTrove when new transactions arrive.
- Plaid: in the Plaid dashboard → Developers → Keys, copy the client ID (4) and the secret (5) for the environment you choose (6). Type the countries (7), for example GB for a UK bank. Save.
- Then connect each bank account in Banking → Bank feeds (chapter 8): the person with the bank login signs in on the provider's own secure page, and BookTrove receives read-only access to the transactions.
18.8 Set up AI assistance
Why
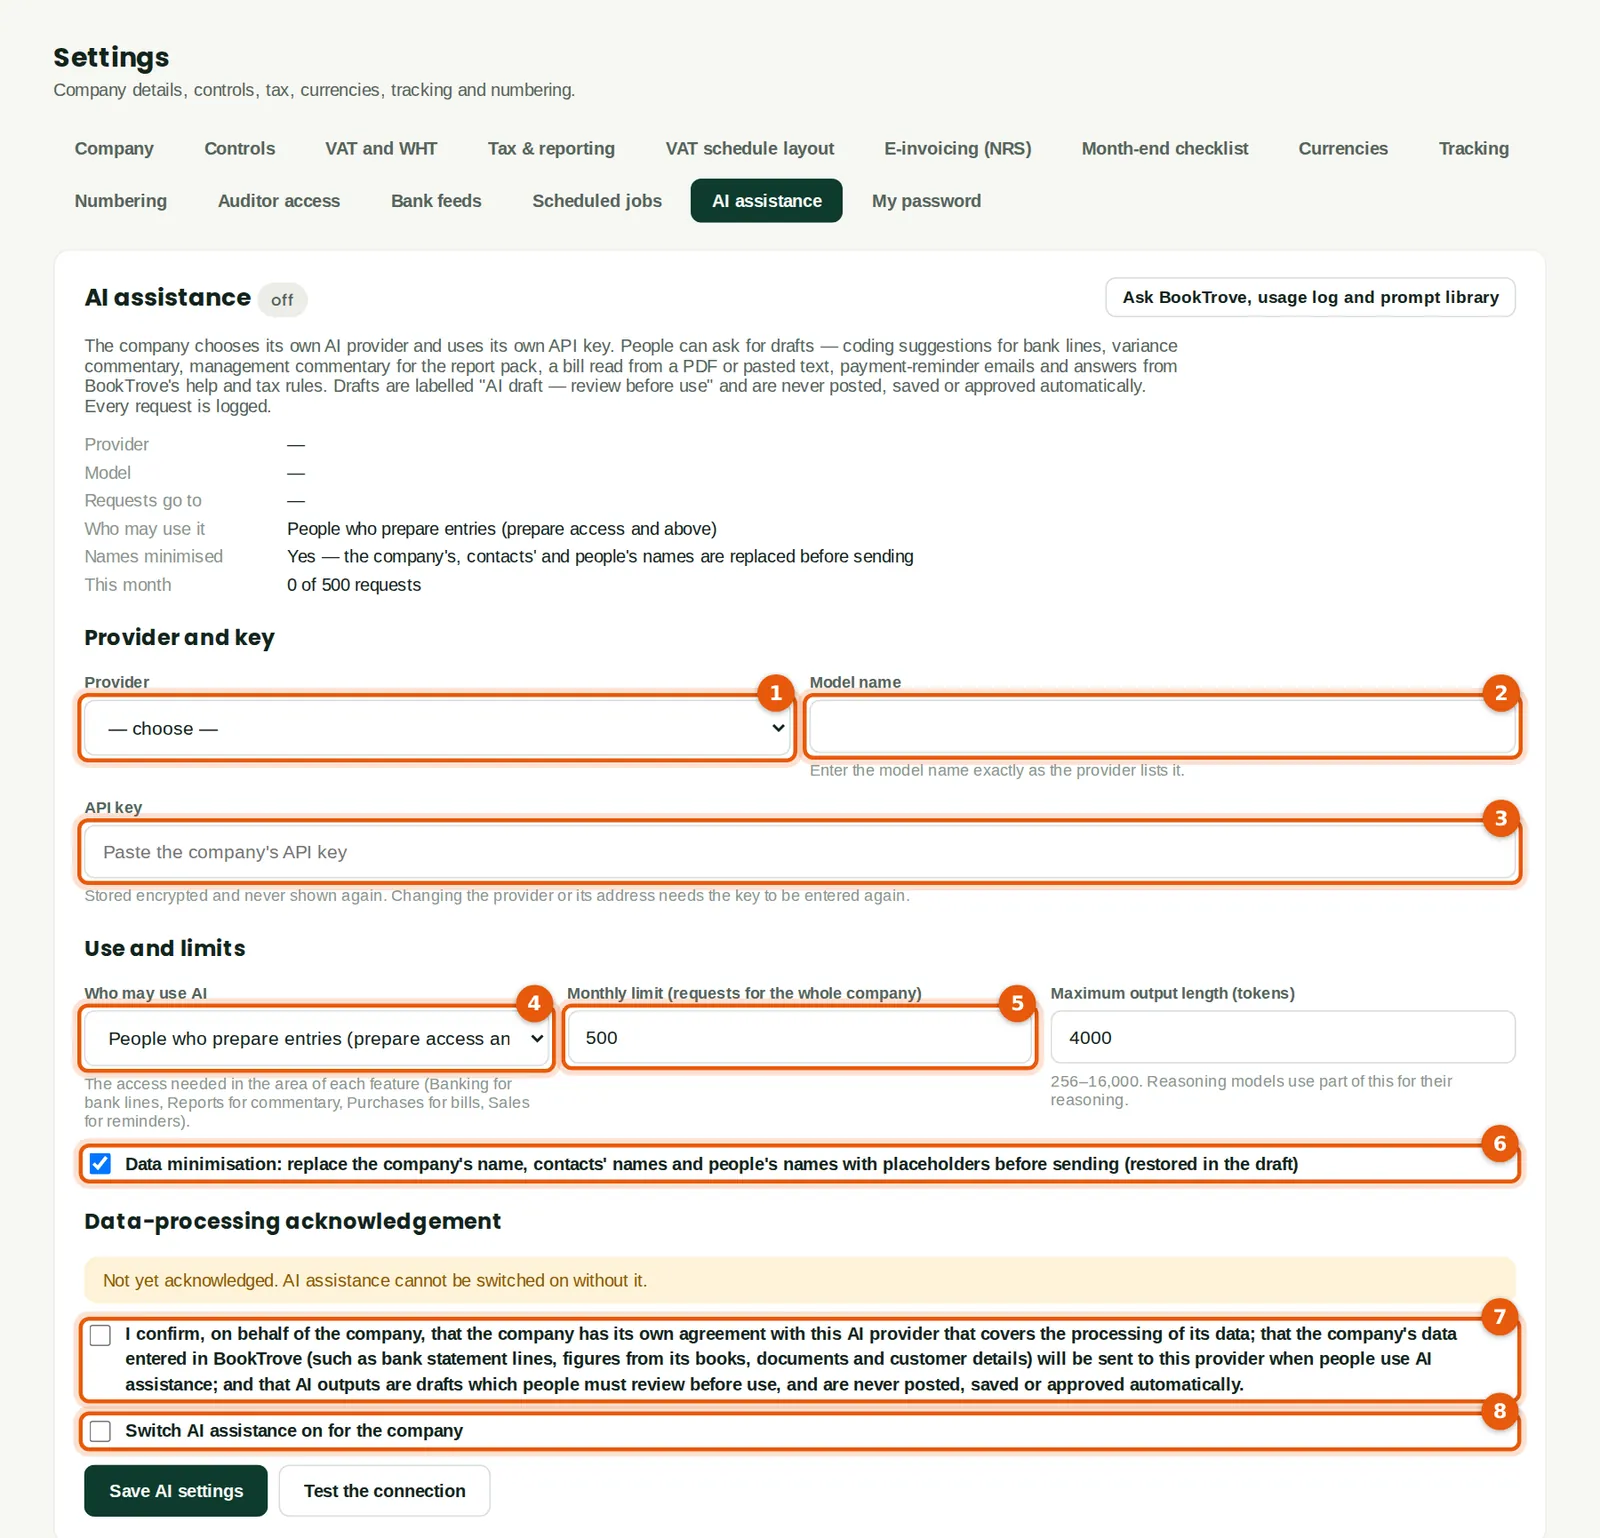
AI assistance uses the company's own account with an AI provider: Anthropic (Claude), OpenAI, Google Gemini, Azure OpenAI or another OpenAI-compatible service. The company pays the provider for what it uses. Everything the AI produces is a draft for a person to check; nothing is posted, approved or sent automatically, and every request is logged.
Who
An owner or administrator.
What to do
- Choose the provider (1) and type the model name (2) exactly as the provider lists it (the provider's documentation lists the models).
- Create an API key in the provider's console and paste it into API key (3). It is stored encrypted and never shown again.
- Choose who may use AI (4) and a monthly limit on requests for the whole company (5). Keep Data minimisation (6) ticked so names are replaced with placeholders before anything is sent.
- Read the data-processing acknowledgement and tick it (7): the company confirms it has an agreement with the provider covering its data.
- Tick Switch AI assistance on (8), click Save AI settings and then Test the connection.
18.9 AI usage log
Why
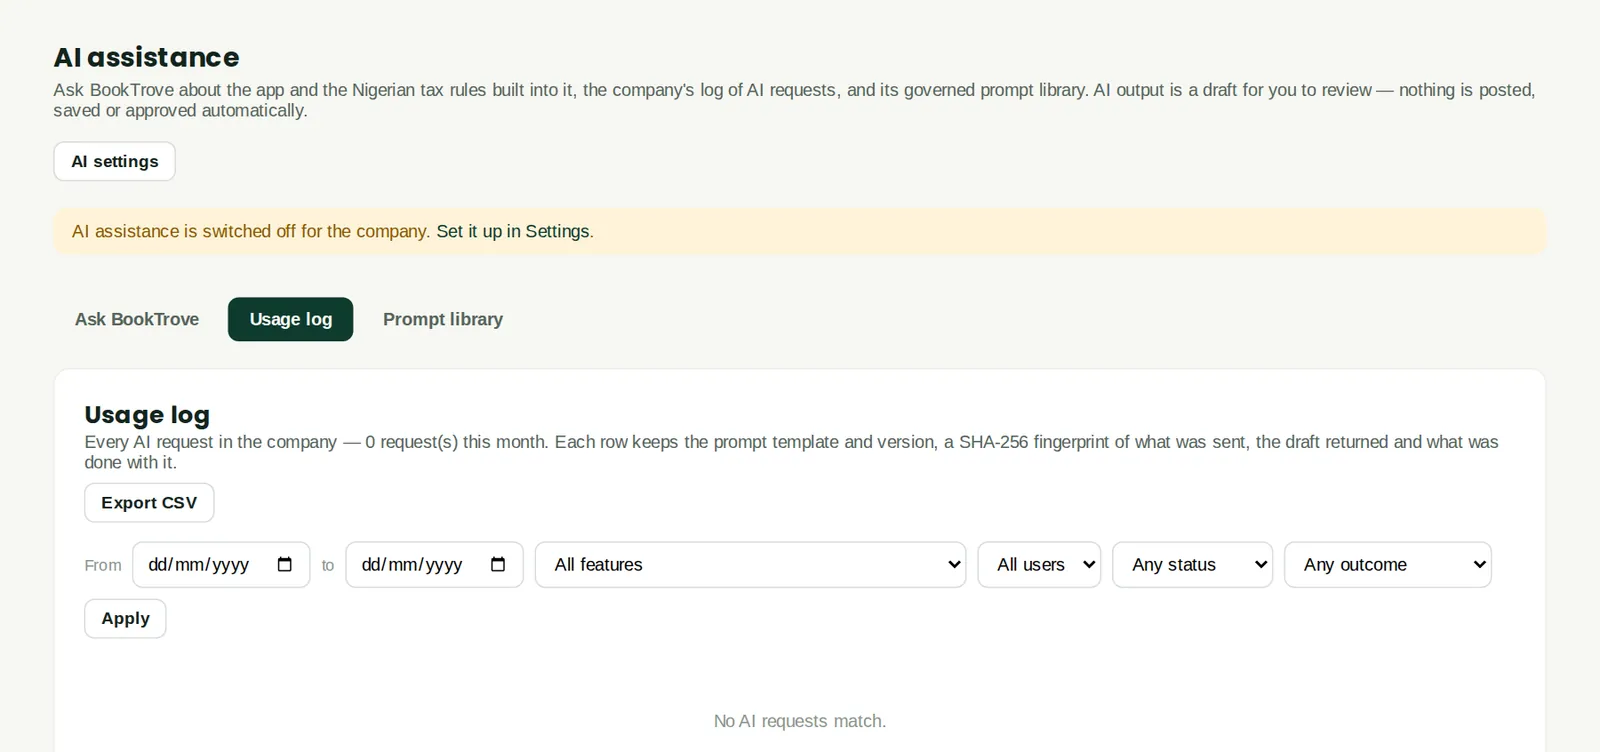
Every AI request is logged with who made it, which prompt and version was used, a fingerprint of what was sent, what came back and whether it was accepted. Savannah Harvest has made no requests, so the log is empty.
Who
Owners, administrators, auditors.
What to do
- Filter by date, feature, user, status or outcome and click Apply. Export CSV for a review.
18.10 The prompt library
Why
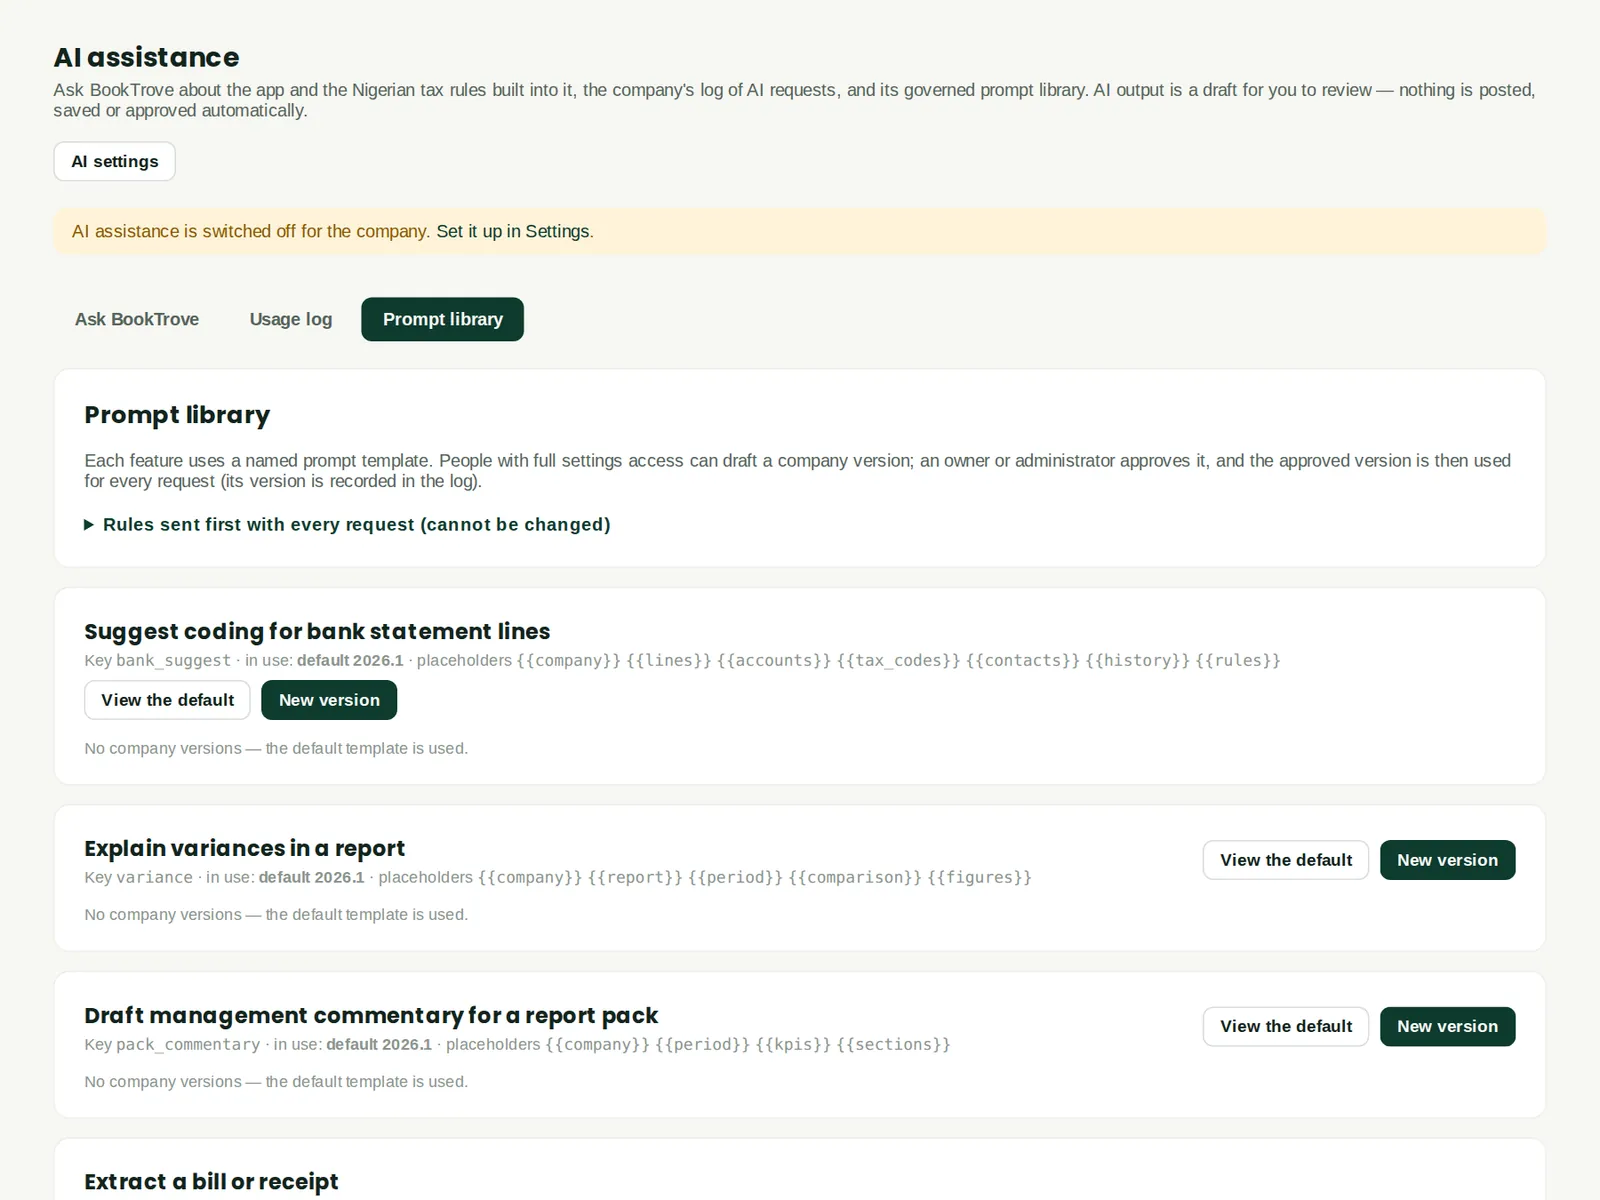
Each AI feature uses a named prompt: suggesting coding for bank lines, explaining report variances, drafting management commentary, reading a bill or receipt, drafting a payment reminder and Ask BookTrove. A company can draft its own version of a prompt; once approved, that version is used and recorded in the log. Rules sent with every request cannot be changed.
Who
Administrators draft; an owner or administrator approves.
What to do
- Click View the default to read a prompt, or New version to draft the company's own.
18.11 Import template: Chart of accounts
Why
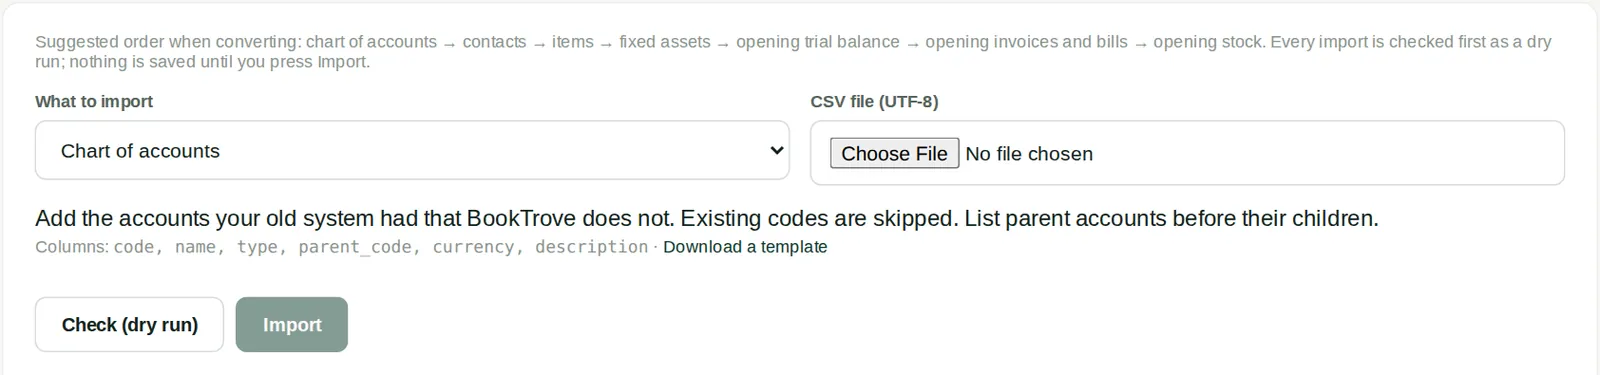
Adds accounts the old system had that BookTrove does not. Existing codes are skipped; list parent accounts before their children. Columns: code, name, type, parent_code, currency, description. Click Download a template for a sample file, fill it in, then Check (dry run) — nothing is saved — and Import.
Who
Administrator or accountant (each import needs the matching permission).
18.12 Import template: Customers and suppliers
Why
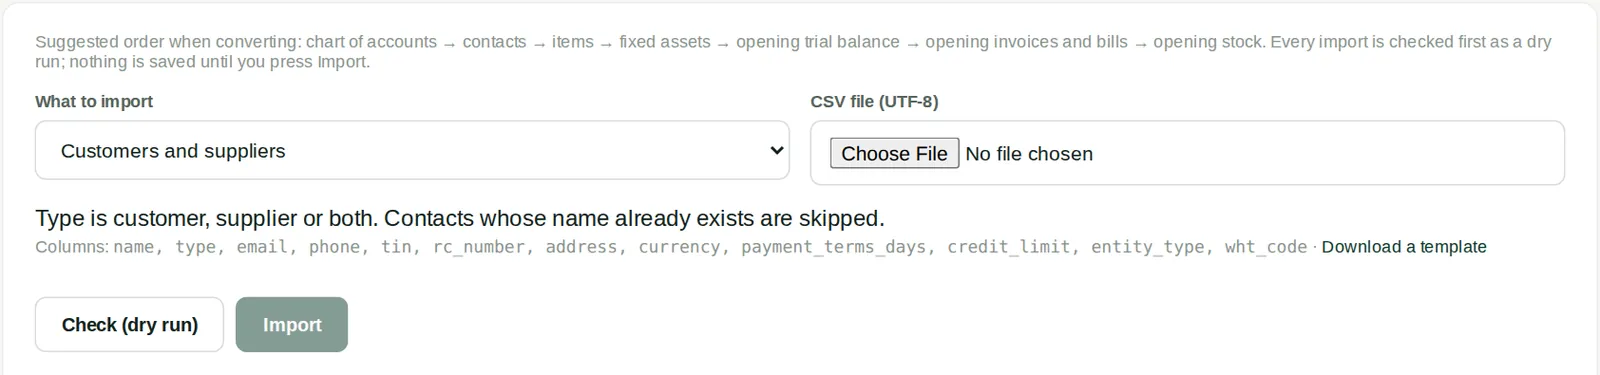
Type is customer, supplier or both. Contacts whose name already exists are skipped (chapter 4). Columns: name, type, email, phone, tin, rc_number, address, currency, payment_terms_days, credit_limit, entity_type, wht_code. Click Download a template for a sample file, fill it in, then Check (dry run) — nothing is saved — and Import.
18.13 Import template: Items
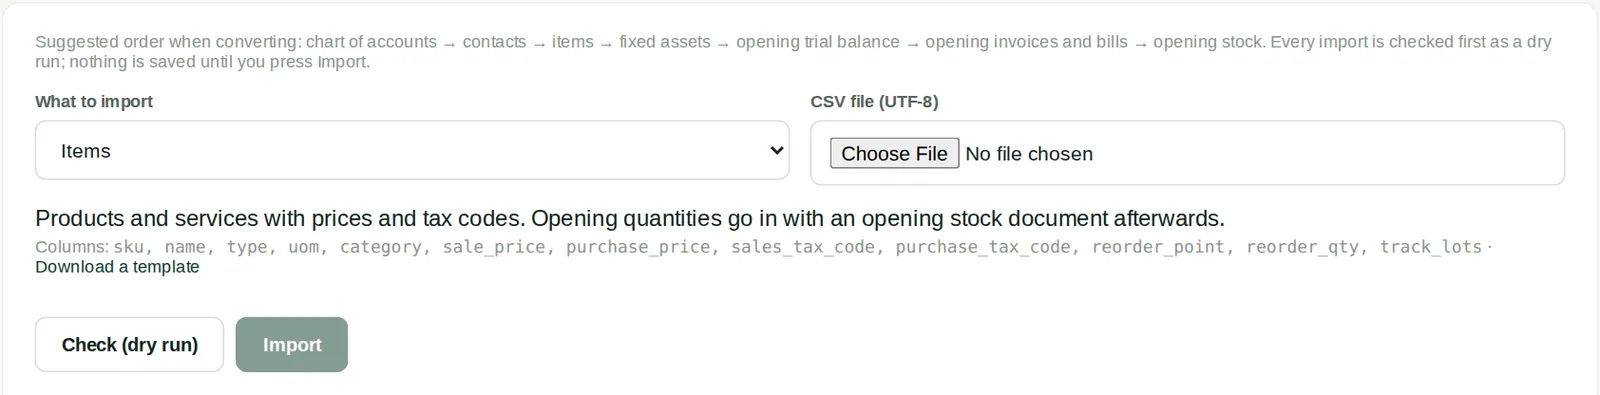
Why
Stock items and services with their prices, VAT codes and reorder levels. Columns: sku, name, type, uom, category, sale_price, purchase_price, sales_tax_code, purchase_tax_code, reorder_point, reorder_qty, track_lots. Click Download a template for a sample file, fill it in, then Check (dry run) — nothing is saved — and Import.
18.14 Import template: Opening invoices
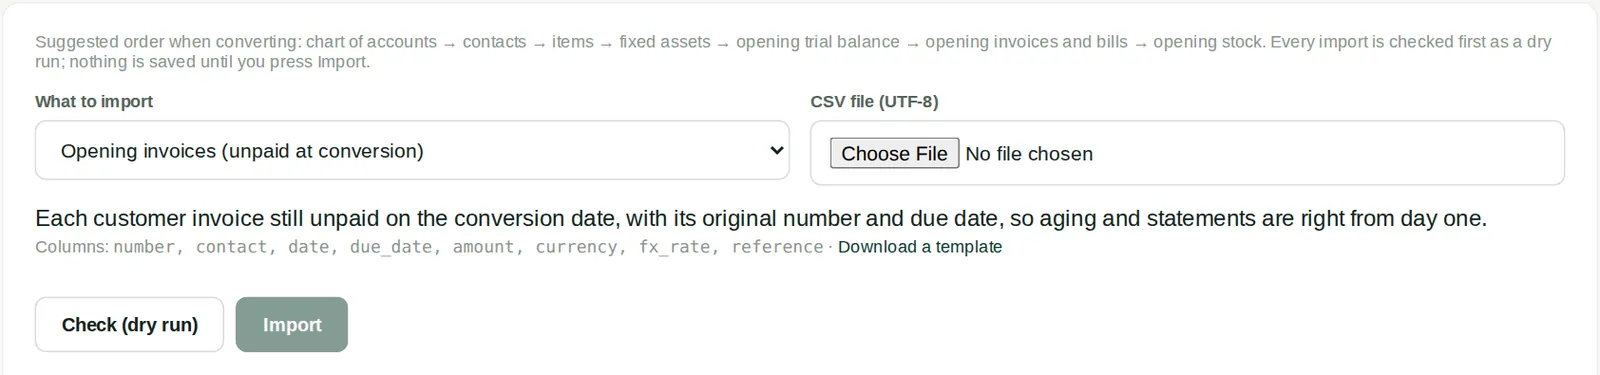
Why
Customer invoices still open at the conversion date, so the aging carries over (chapter 2). Columns: number, contact, date, due_date, amount, currency, fx_rate, reference. Click Download a template for a sample file, fill it in, then Check (dry run) — nothing is saved — and Import.
18.15 Import template: Opening bills
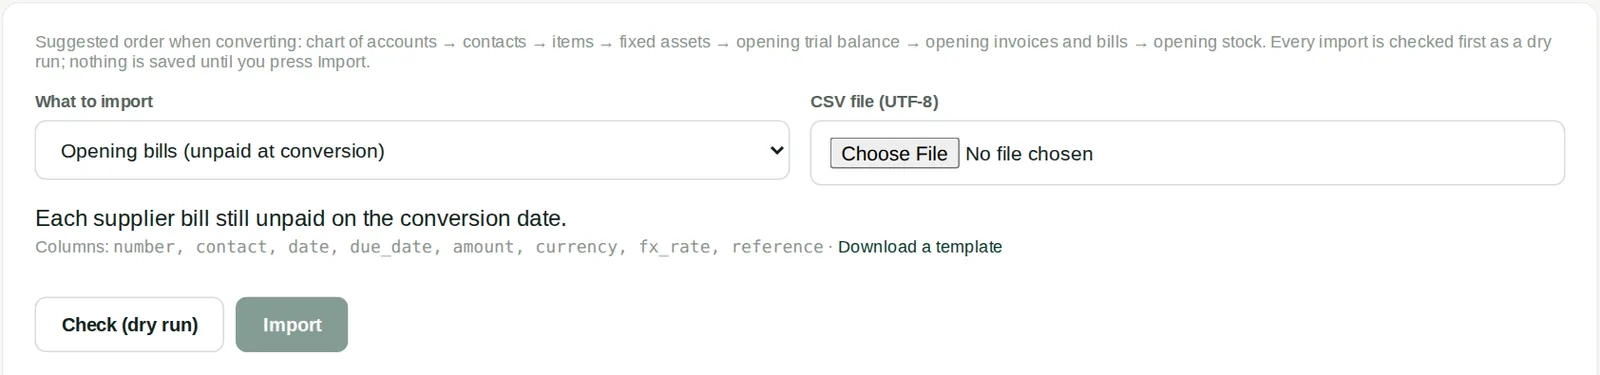
Why
Supplier bills still open at the conversion date. Columns: number, contact, date, due_date, amount, currency, fx_rate, reference. Click Download a template for a sample file, fill it in, then Check (dry run) — nothing is saved — and Import.
18.16 Import template: Opening trial balance
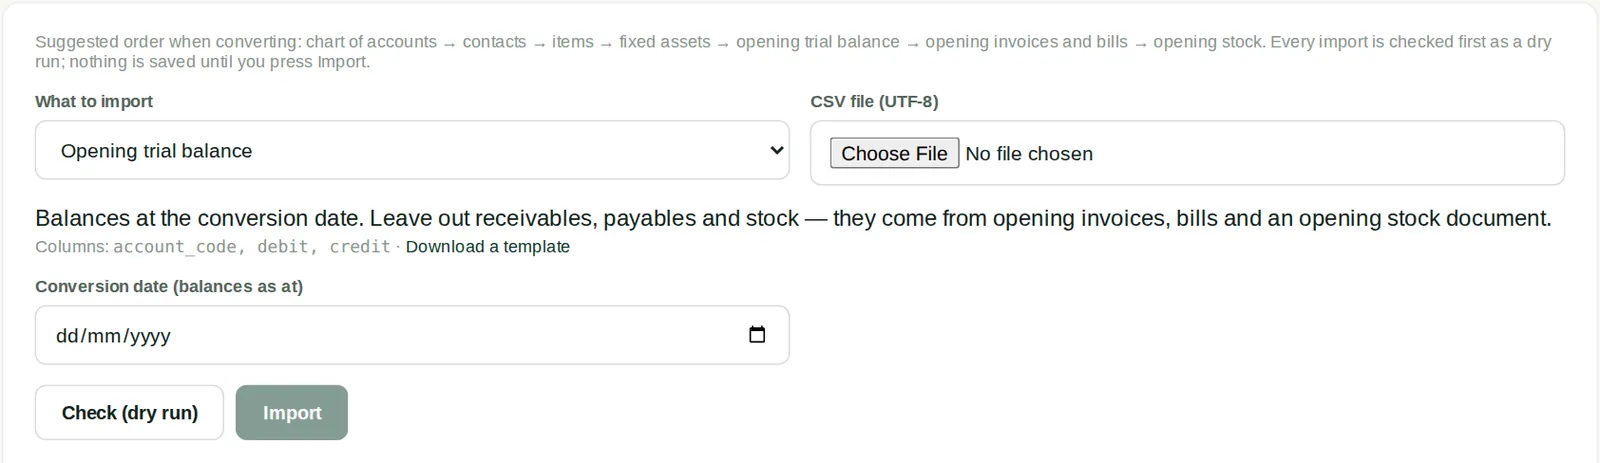
Why
The balances at the conversion date. Receivables, payables and stock are brought in through their own imports. Columns: account_code, debit, credit. Click Download a template for a sample file, fill it in, then Check (dry run) — nothing is saved — and Import.
18.17 Import template: Journals
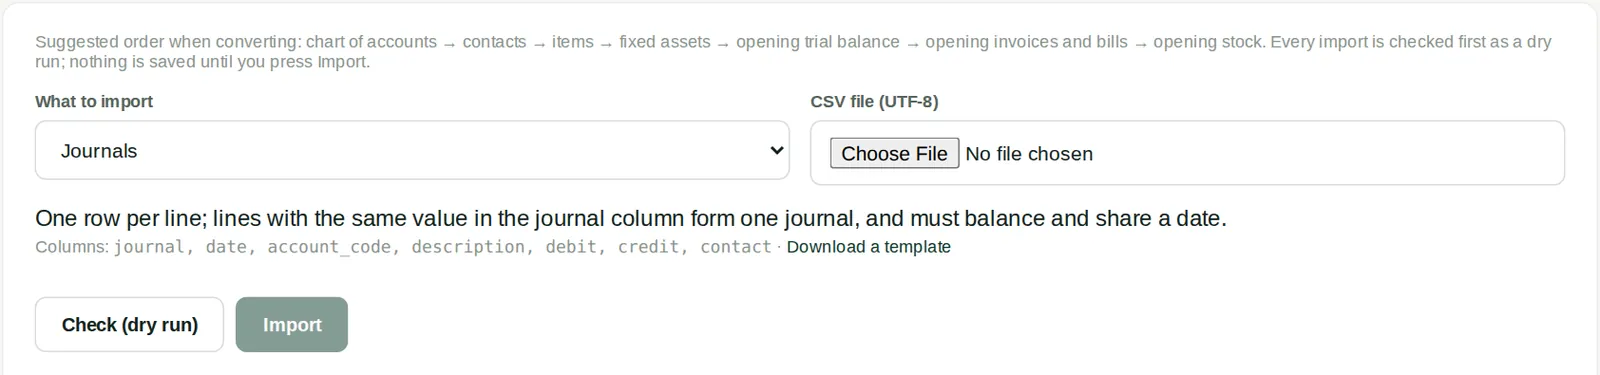
Why
Rows with the same journal reference make one journal; each must balance. Columns: journal, date, account_code, description, debit, credit, contact. Click Download a template for a sample file, fill it in, then Check (dry run) — nothing is saved — and Import.
18.18 Import template: Fixed asset register
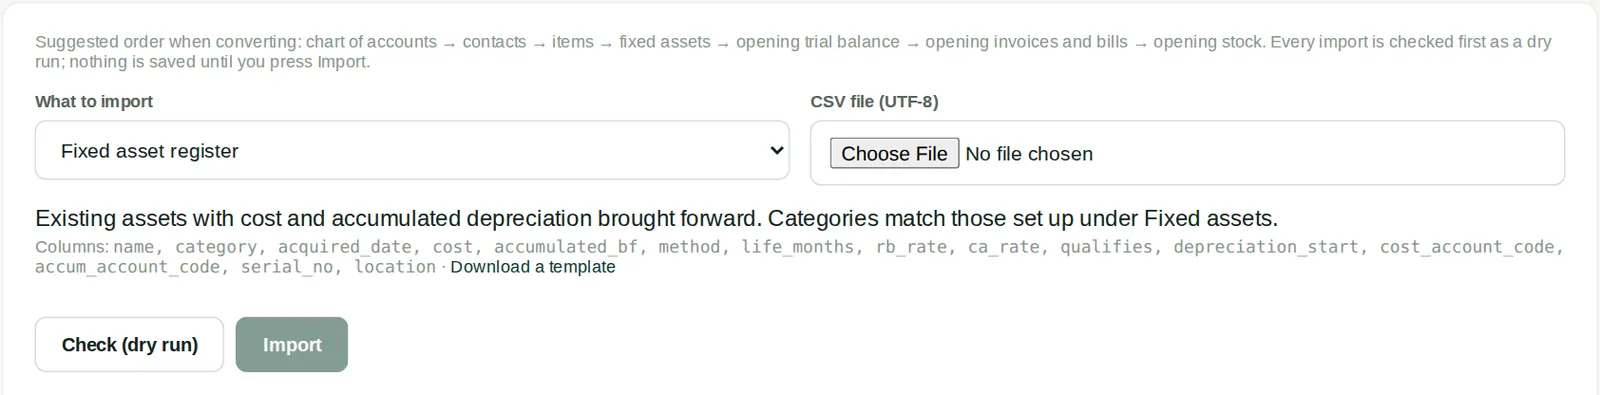
Why
Existing assets with cost and depreciation brought forward (chapter 9). Columns: name, category, acquired_date, cost, accumulated_bf, method, life_months, rb_rate, ca_rate, qualifies, depreciation_start, cost_account_code, accum_account_code, serial_no, location. Click Download a template for a sample file, fill it in, then Check (dry run) — nothing is saved — and Import.
18.19 Import template: Budget
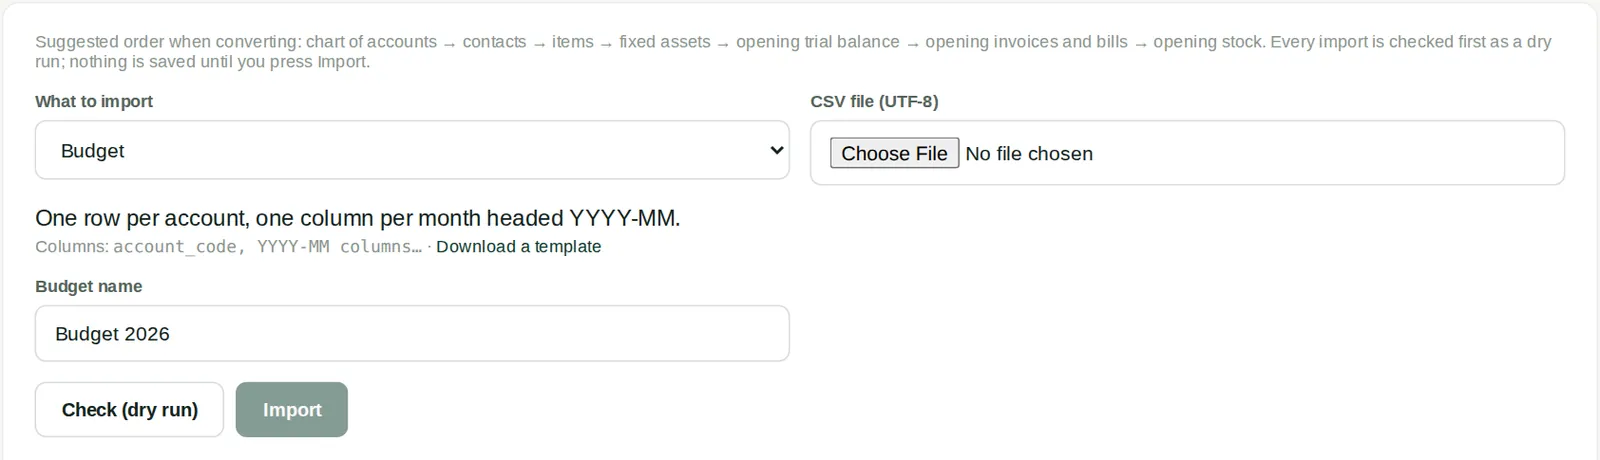
Why
One row per account; the budget name is typed on the screen (chapter 12). Columns: account_code, then one column per month headed YYYY-MM. Click Download a template for a sample file, fill it in, then Check (dry run) — nothing is saved — and Import.
18.20 Post payroll from a journal file
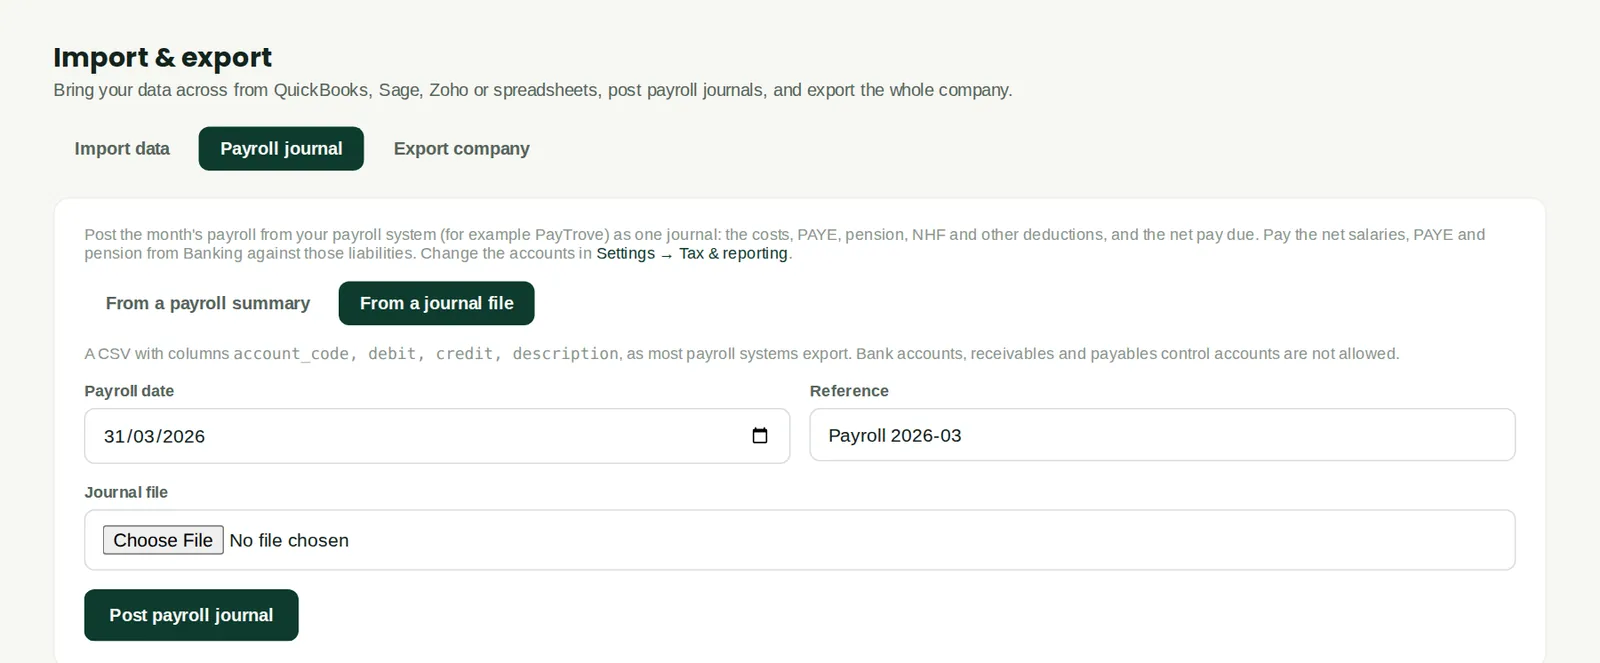
Why
Besides the payroll summary used in chapter 10, a payroll journal can be posted from a CSV file exported by the payroll system, with the columns account_code, debit, credit and description. Bank, receivables and payables control accounts are not allowed in the file; pay the salaries from Banking.
Who
Accountant or payroll officer.
What to do
- Choose the payroll date, type a reference, choose the file and click Post payroll journal.